


I am still holding on to Halloween tutorials – in my mind, Christmas cannot start until October has finished and, seeing as I love all that is spooky, that means that I am still enjoying my Halloween makes. We are however just beyond the middle of October but, thankfully, this Peyote Pumpkin tutorial is short and sweet and these adorable mini pumpkins take no time at all to make.
I already have a Brick Stitch Pumpkin Tutorial here on my blog so I was worried when I sat to make this pattern that they would end up looking rather similar. I couldn’t be more wrong. The brick stitch pumpkin is way more angular than this peyote one, which has a much softer and rounder shape. That is down to how I have made the pattern though because you can use peyote and brick stitch interchangeably – if you flip a brick stitch pattern on its side you can read the pattern as peyote and if you flip a peyote pattern on its side you can read it as brick stitch. I clearly approach pattern building differently depending on the stitch I intend on using.
So, with all that being said, if you prefer brick stitch and you like the shape of the pumpkin, just flip the pattern onto its side and bead as a brick stitch.
There is a free pdf pattern to accompany this peyote project –
Below the photo tutorial is a YouTube video so if that is preferred then keep scrolling down.
Peyote Pumpkin Supply List
For this project you will need –
- Size 11 Delica beads in orange, green and black
- Beading thread (I use Wildfire)
- A beading needle (I use size 12)
- Wire guardians
- Earring wires
How To Bead A Peyote Stitch Pumpkin
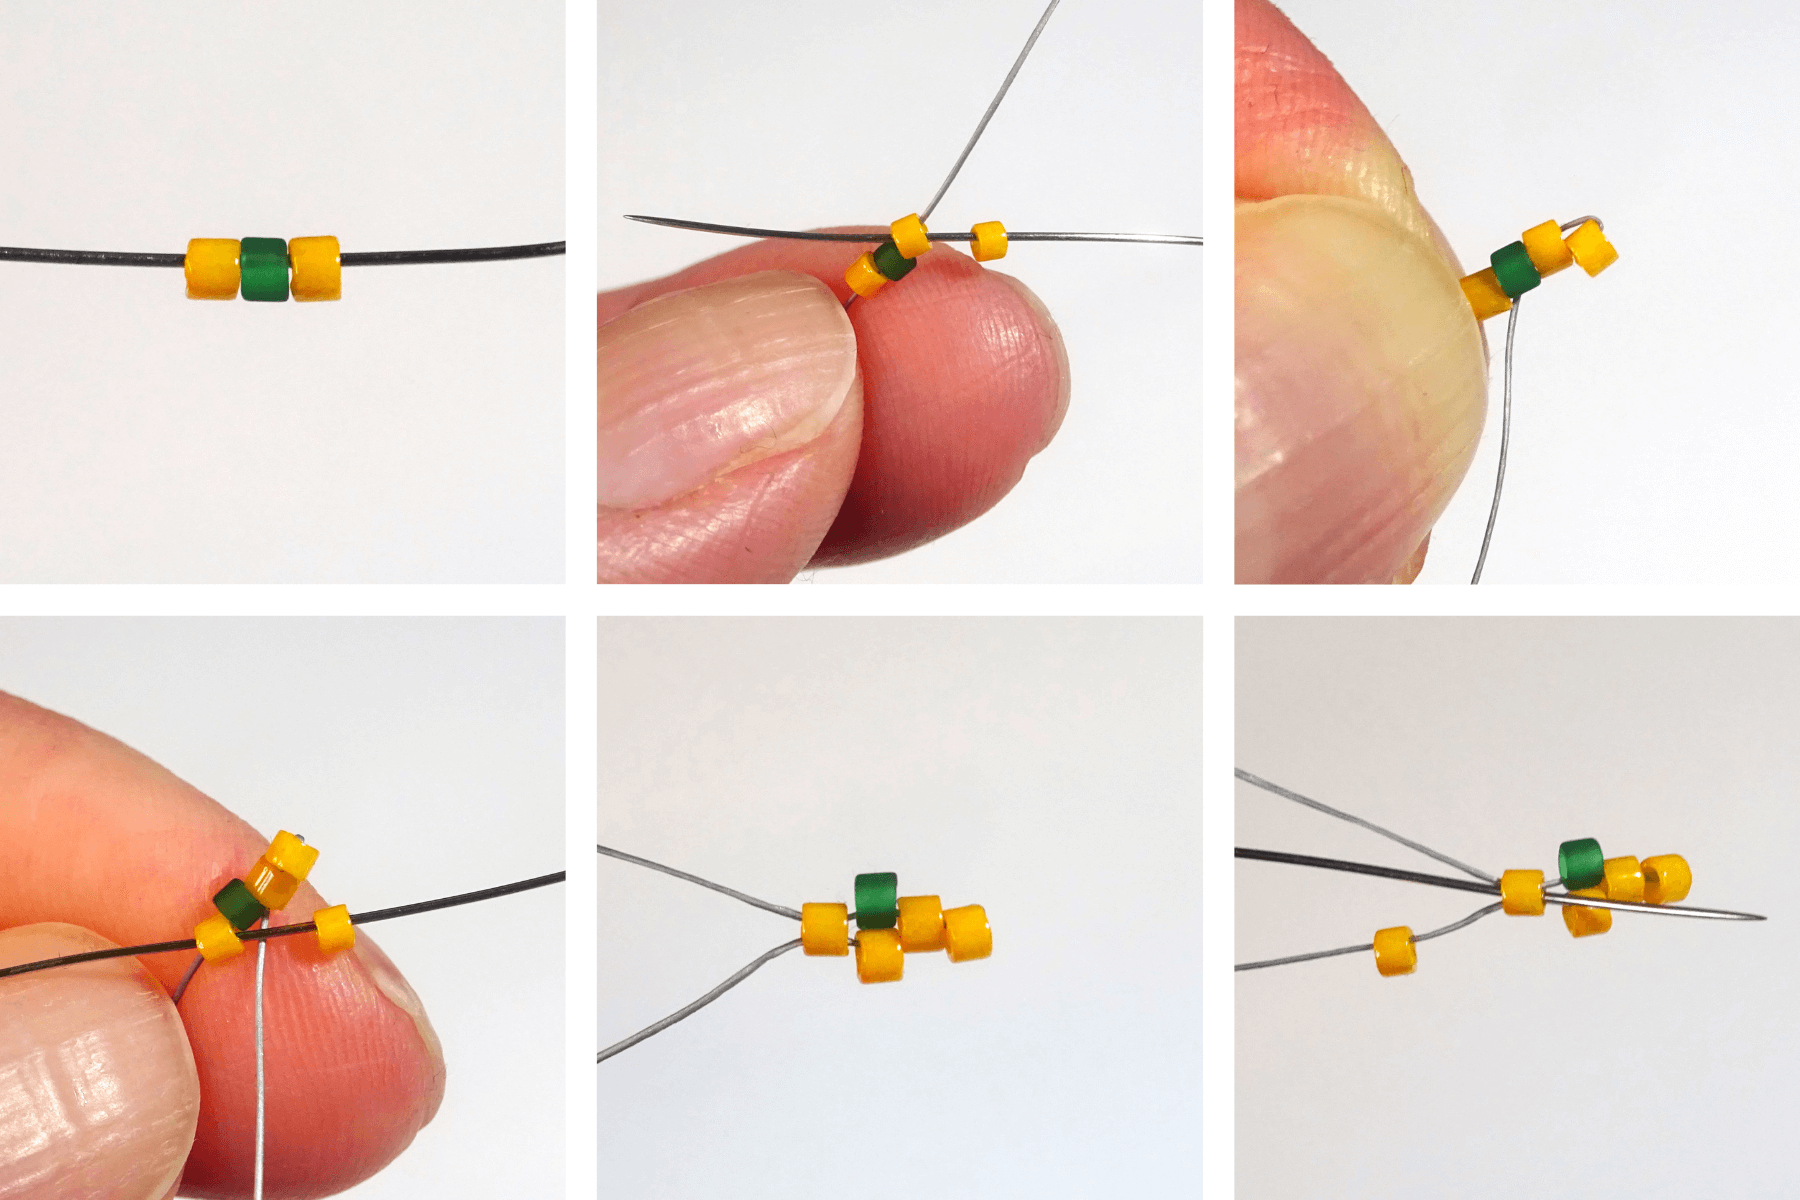
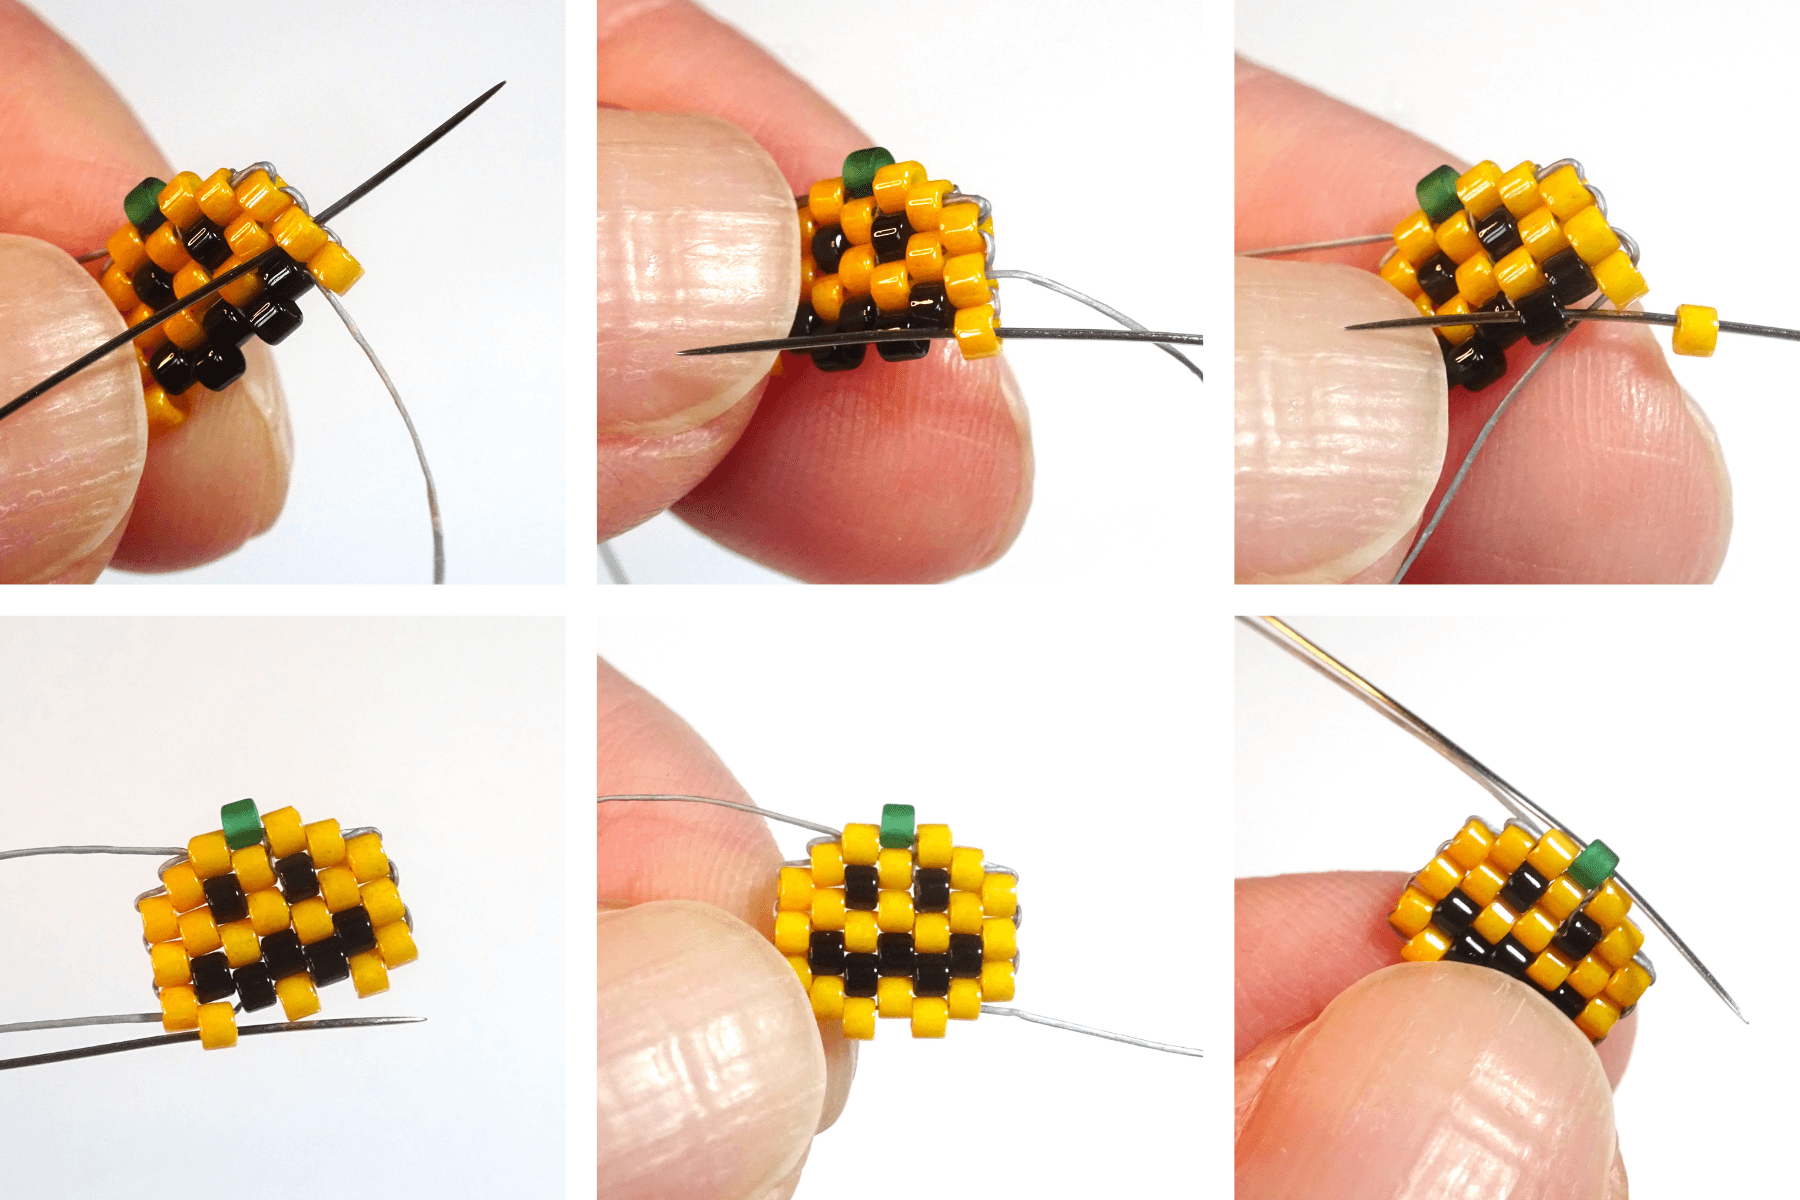
Step 1 –
- Cut yourself some beading thread (25″ should be enough), add a beading needle to one end and pick up one orange Delica, one green and another orange. These beads form the first two rows on the beading pattern.
- We need now to increase out the sides of the project for row 3 but we have no obvious bead to connect the new bead to so, pick up one orange bead and take the needle back in to the orange bead on the end of the previous row and pull tight.
- The new orange bead should now be sitting stepped down from the beadwork.
- Pick up another orange bead and, because in Peyote we skip a bead, miss out the green bead and take the needle into the last orange bead in the row.
- This will now mean that the new orange bead is sitting directly below the green Delica bead.
- Pick up another orange bead and take the needle back into the last orange bead in the row.

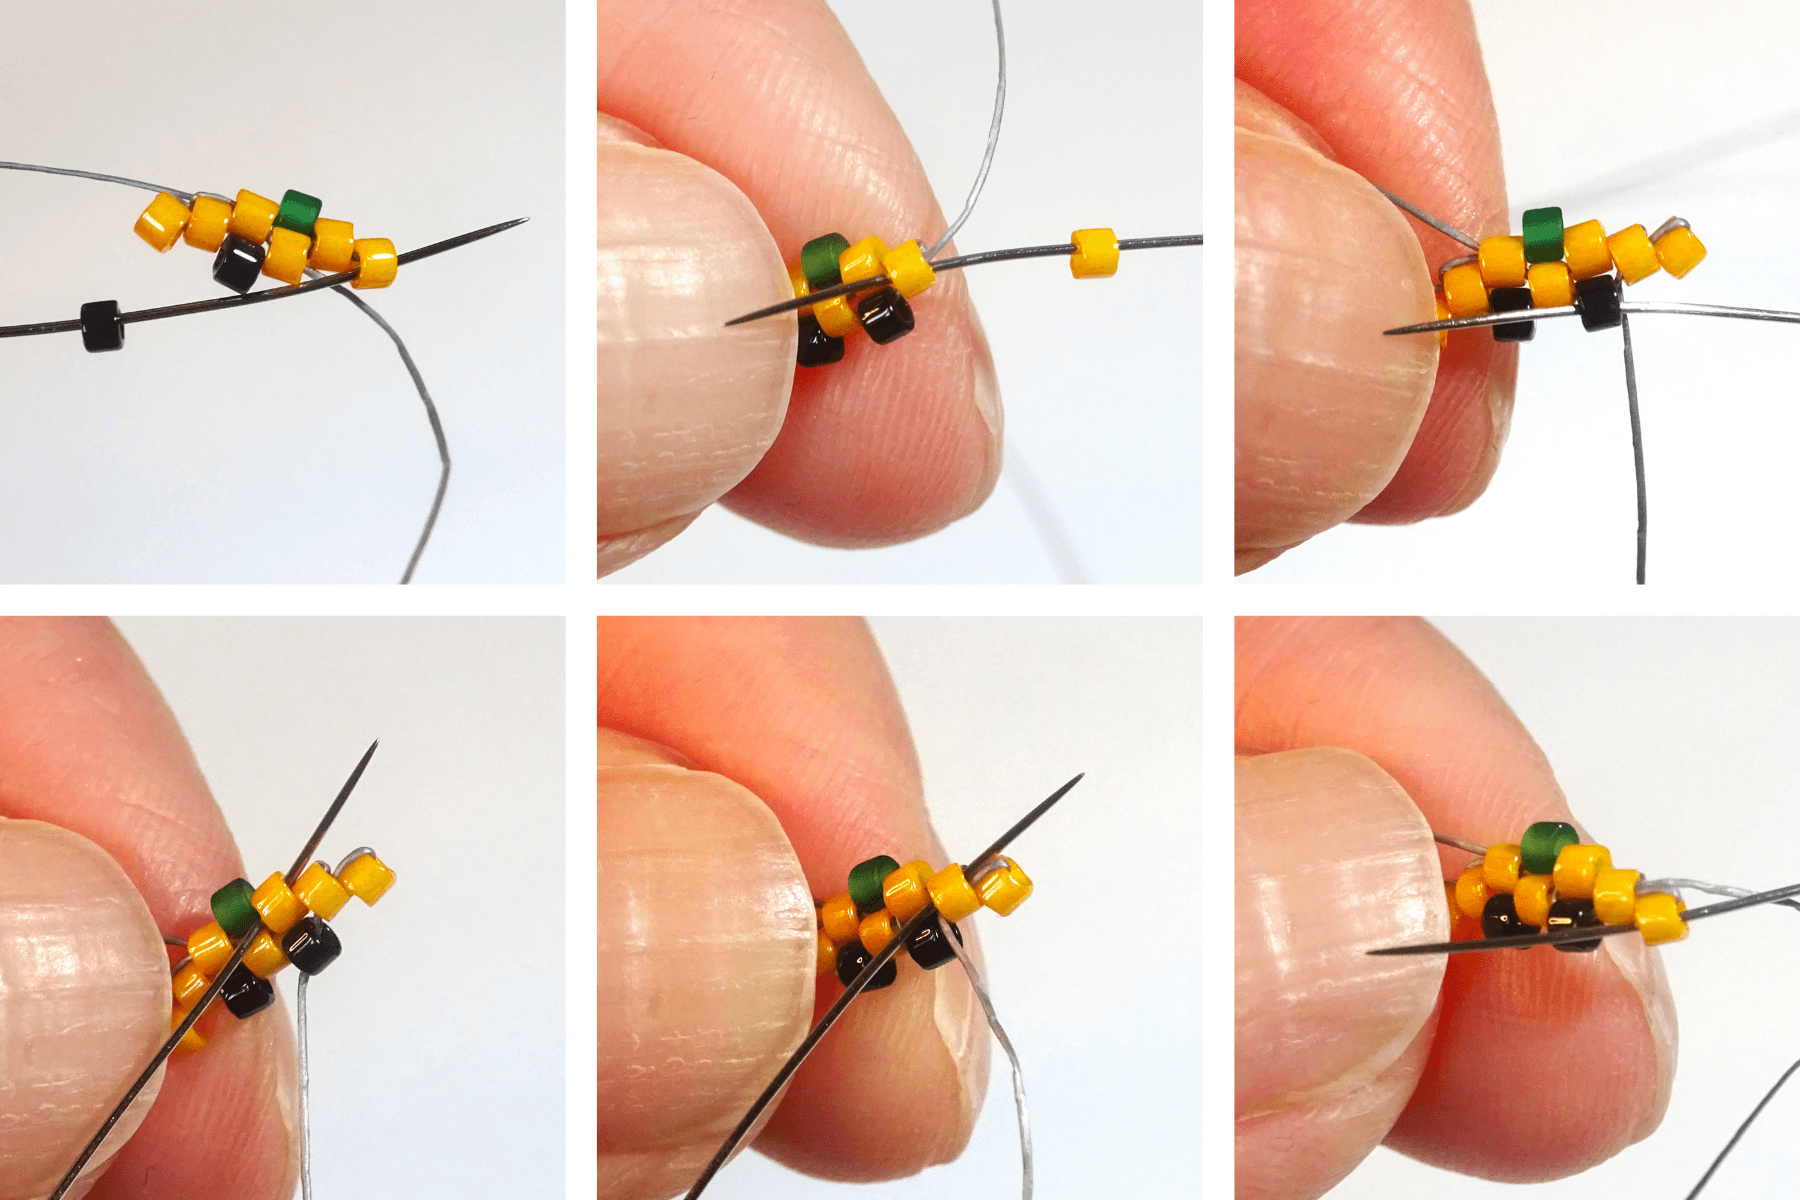
Step 2 –
- The newly added orange bead will now be sitting in line with the last row of beadwork and the needle and thread are moving in towards the beading. We need to turn the needle and thread so that we are exiting out the end of the row so, take the needle into the green bead.
- Step the needle down into the lower orange bead that is sitting directly below the green. Pull tight so that the thread isn’t showing.
- Take the needle through the second to last orange bead in the beadwork.
- Take the needle though the last bead in the row. We are now in a position to add another bead.
- Pick up an orange bead and take the needle into the orange bead at the end of the row again.
- Pick up a black bead and take the needle into the orange Delica bead that is sitting below the green bead.
Step 3 –
- Pick up another black bead and take the needle into the last orange bead in the row.
- Pick up another orange bead and take the needle back into the last orange bead in the row.
- We need to turn the needle and thread around again so take the needle through the next black bead along.
- Step up to the orange bead.
- Take the needle through the next orange bead along.
- Take the needle through the last orange bead in the beadwork but moving in towards the beading.
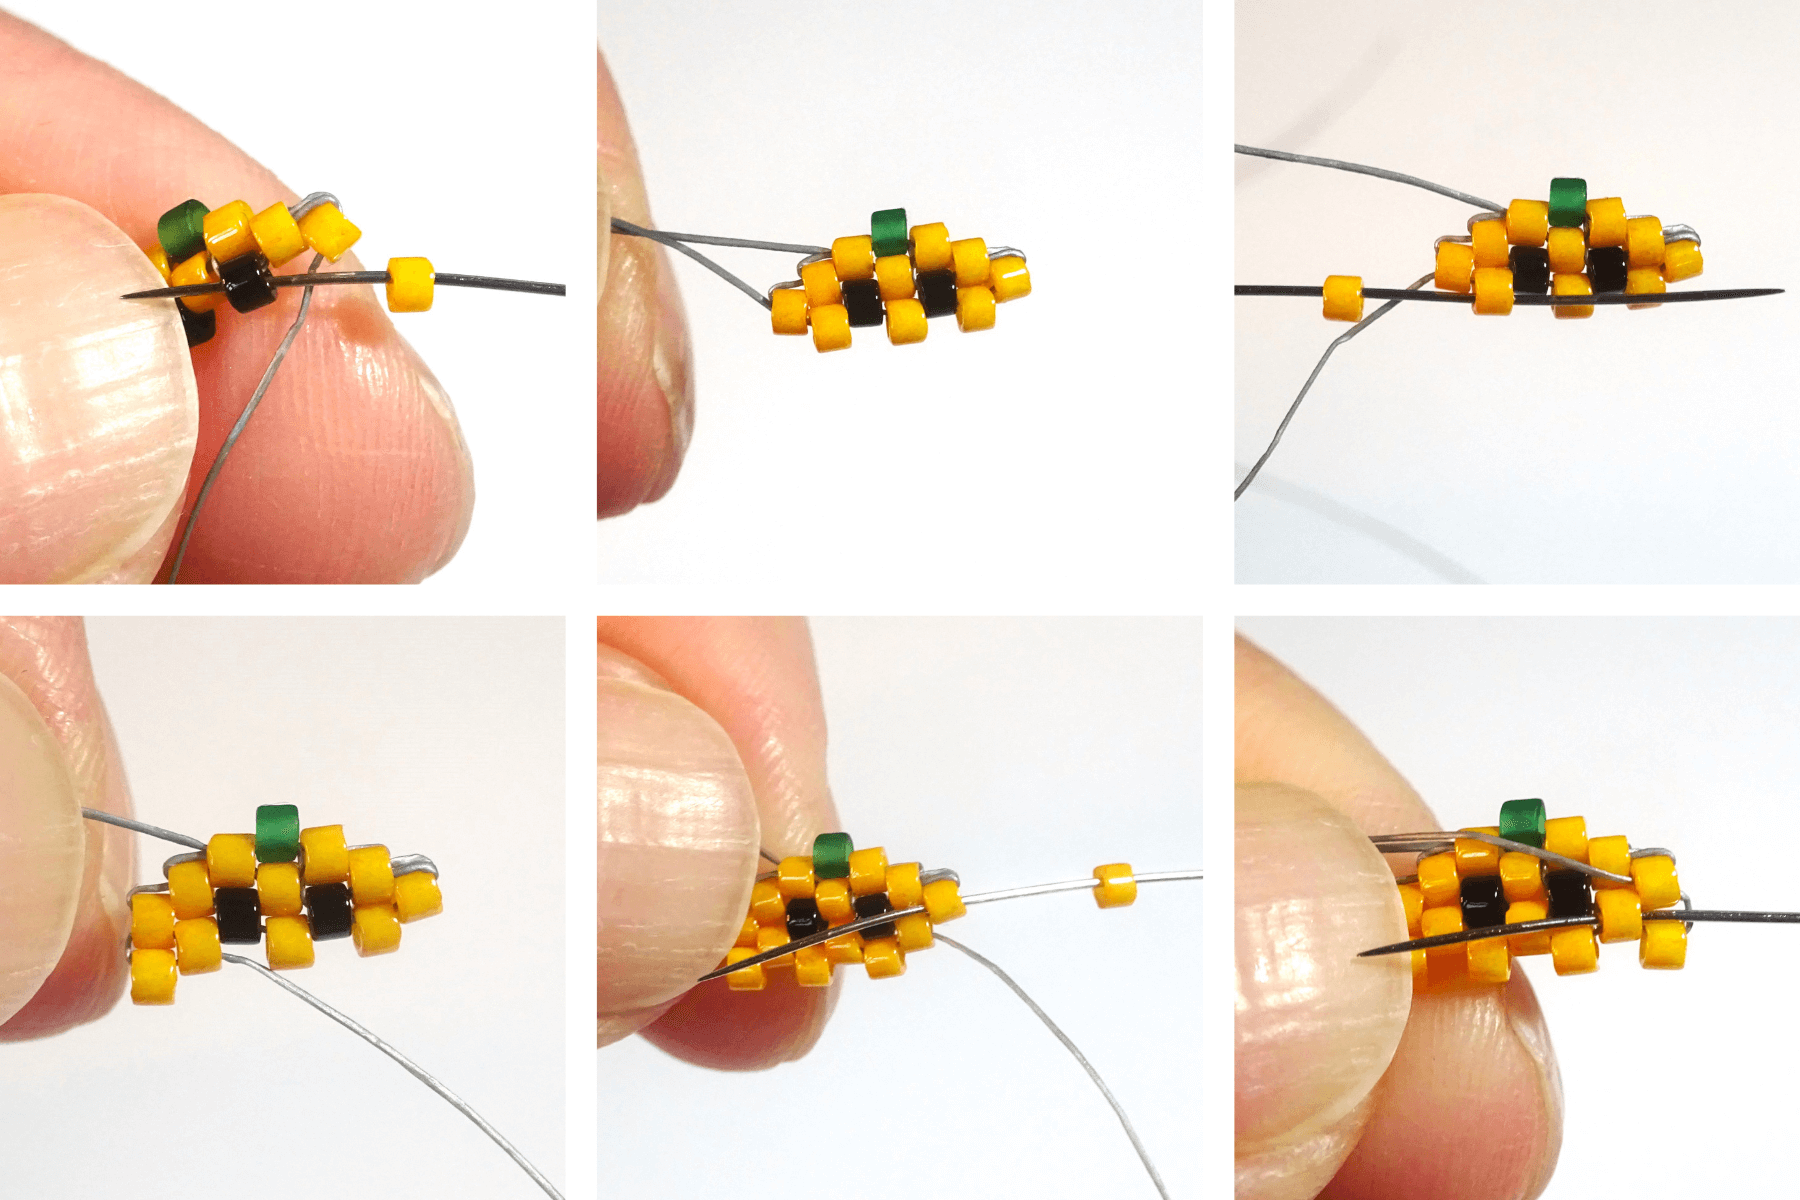
Step 4 –
- Pick up another orange Delica bead and take the needle into the black bead.
- Continue the row by adding two more orange beads using Peyote stitch.
- Pick up another orange bead but take the needle back into the third bead in the row (it is the orange bead sitting to the side of the black bead).
- When you pull the thread tight the newly added orange bead will be sitting in line with the last bead above it.
- Add two more orange beads to continue the row and then pick up and third orange bead and take the needle up into the orange bead on the end of the bead work.
- This new bead will sit in line with the bead above it. Take the needle into the next orange bead along.

Step 5 –
- We are going to continue turning the needle and thread around, so take the needle through the next orange bead along.
- Step up into the black Delica bead.
- Take the needle through the nearest orange bead along.
- Take the needle through the next orange along.
- Step the needle down into the lower orange bead.
- Add three black beads to the next row.
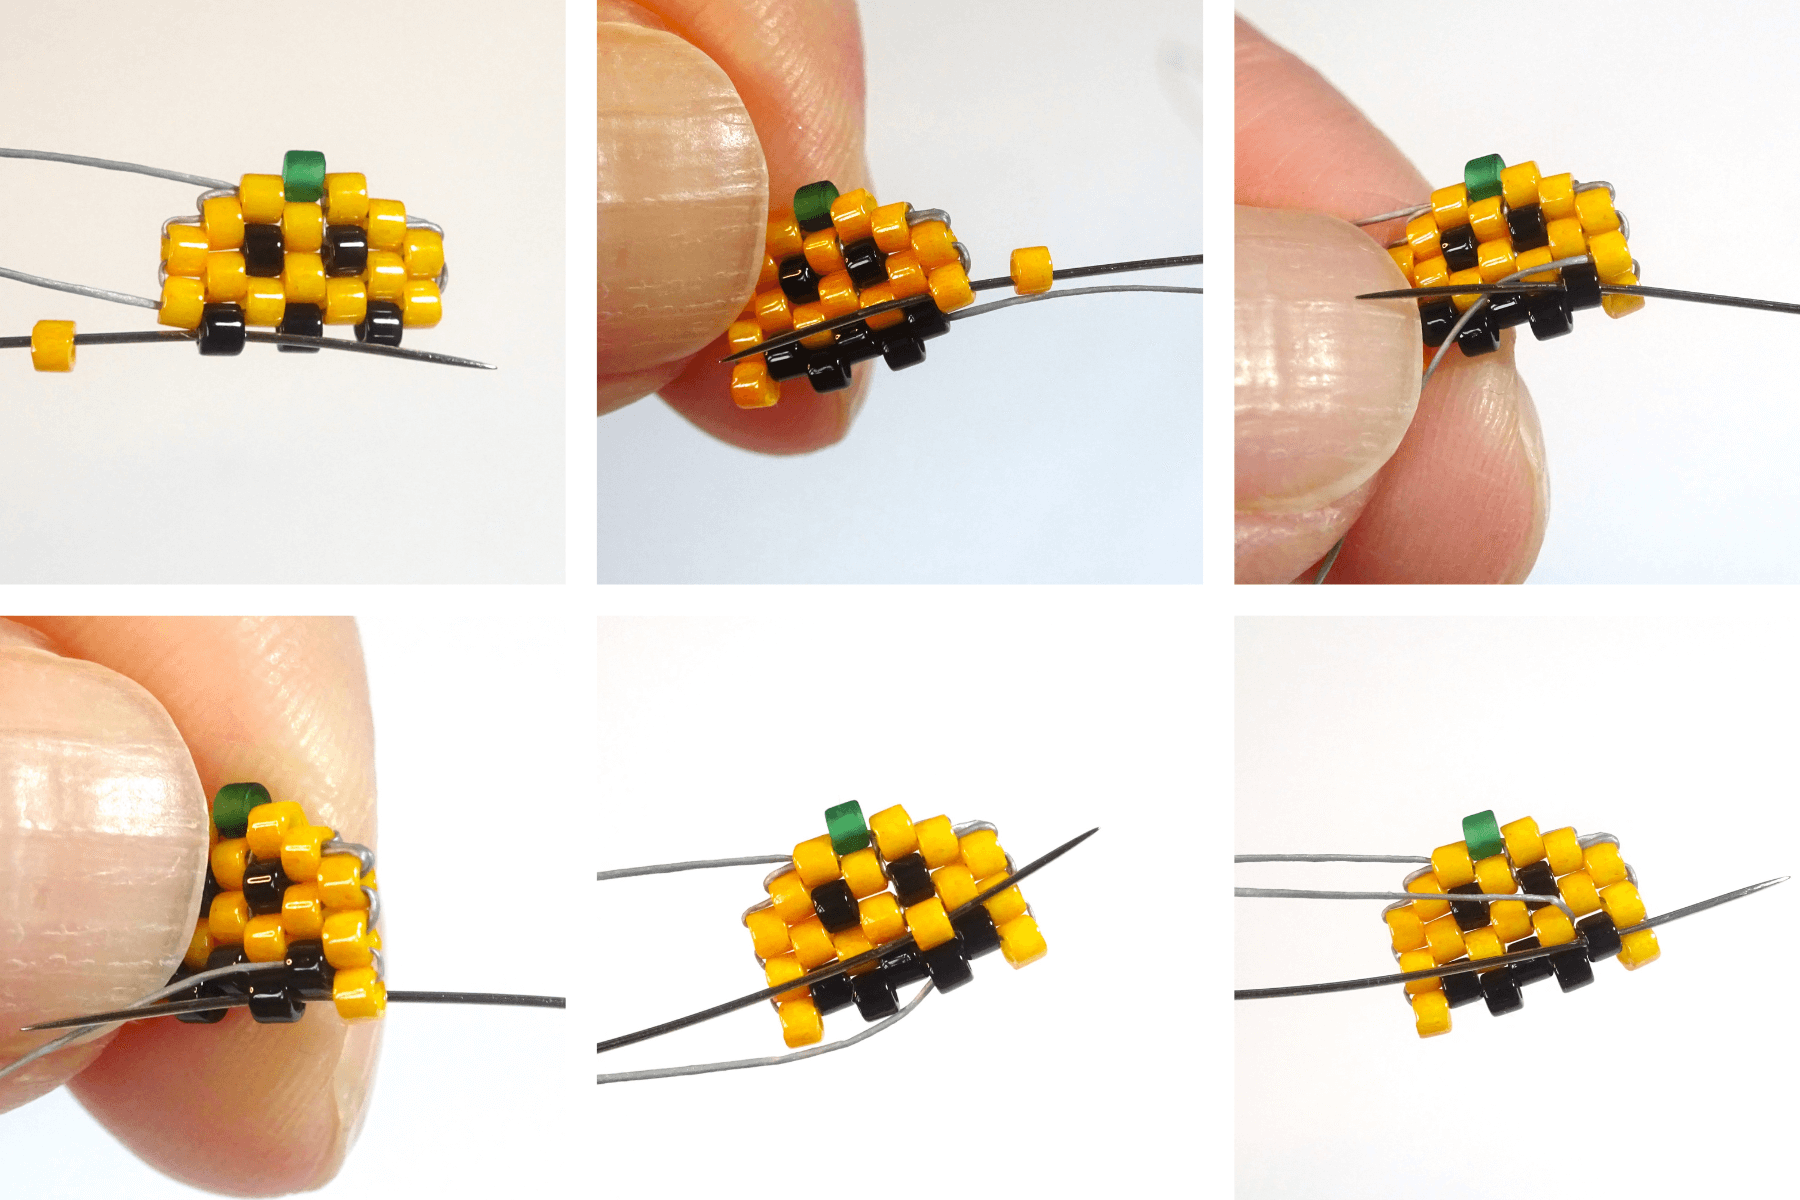
Step 6 –
- Pick up one orange bead and take the needle into the last black bead on the previous row.
- Add two more black beads to fill the gaps in between the black beads on the previous row. Pick up another orange bead and take the needle up into the orange bead on the end of the beadwork.
- We now need to turn the needle and thread round so take the needle into the next black bead along.
- Move down a row and into the next black bead along.
- Step the needle up by going into the orange bead above the black bead you are exiting from.
- Take the needle through the black bead again towards the outer edge of the beading.
Step 7 –
- Take the needle through the orange bead in the middle of the set of three orange beads on the outer edge of the beading.
- Take the needle down into the orange bead on the outer edge on the lower row of beading.
- Pick up an orange bead and take the needle into the black bead next along.
- Finish this row by adding a further two orange beads to fill the gaps between the black beads. When you have exited out of the orange bead at the end of the row, step the needle down into the outer orange bead on the row you have just finished.
- Fill the remaining two gaps around the black beads with two more orange beads.
- Take the needle off the working thread and put it on the tail thread. Take the needle up into the green bead.

Step 8 –
- Pick up another green bead and take the needle into the green bead on the pumpkin from the opposite direction to where you exited it from.
- Pull the thread tight so that the new green beads sits firmly on top of the lower green bead.
- Add your wire guardian to the top of the beadwork so that you can hang your peyote pumpkin on your earrings hooks. Alternatively, you can add more green beads to make a beaded loop.

Step 9 –
- Tie knots in your working and tail thread and cut off the excess threads ( more information on tying knots in the YouTube video).
- Add your earring hooks and enjoy your new mini peyote pumpkin earrings.
Peyote Pumpkin Video
If I still have you with me at the end of this post, then I just wanted to share my newest pattern on my Etsy shop seeing as it is a Halloween inspired Peyote pattern – I have imaginatively named it Peyote Boo and Bat Pattern .

This pattern is just too long to put out as a YouTube / blog post but I try to keep the cost of my patterns reasonably priced. This Boo and Bat pattern is a little more complicated than this pumpkin pattern so I have included two short videos in the price for the parts that I think would be more challenging. Saying that, some of the tricky bits are also covered in this peyote pumpkin tutorial.
Thanks for reading.
Hannah

