


I am well aware that it’s November and this seems to be a somewhat summery tutorial but I started it months ago and then never got around to sharing it.
I shared a while ago in my mini series of quick and easy seed bead bracelets a seed bead daisy chain bracelet tutorial where the beaded flowers all sit in a straight line with a small section of green seed beads in between each flower to join them together. I shared this on TikTok too and had the request for a wavy daisy chain instead, where the flowers all join together.
The finished results of the wavy daisy chain are cute but it is slightly more tricky to do than the previous daisy chain bracelet I shared as you really need to keep the beading tight in order for it to sit right. If the thread gets loose the flowers lose their shape and stop looking like flowers. You will also need to pay attention to which way you are beading as the needle can go in two directions but only the correct way will result in that wavy pattern.
With all that being said, once you figure the stitch out you are left with an impressive length of bead weaving.
If the beads are too summery in this tutorial then consider swapping them out for more autumnal colours – I think it would look lovely on browns and golds.
Tools and Supplies
For this tutorial you will need two different colours of seed beads. I used size 11 seed beads in white for the petals and yellow for the flower centres.
I have also used wildfire beading thread – this is my beading thread of choice every time as it is not a soft thread so, in my opinion, it helps to hold the beads firmly.
You will also need a beading needle.
How To Bead A Wavy Daisy Chain
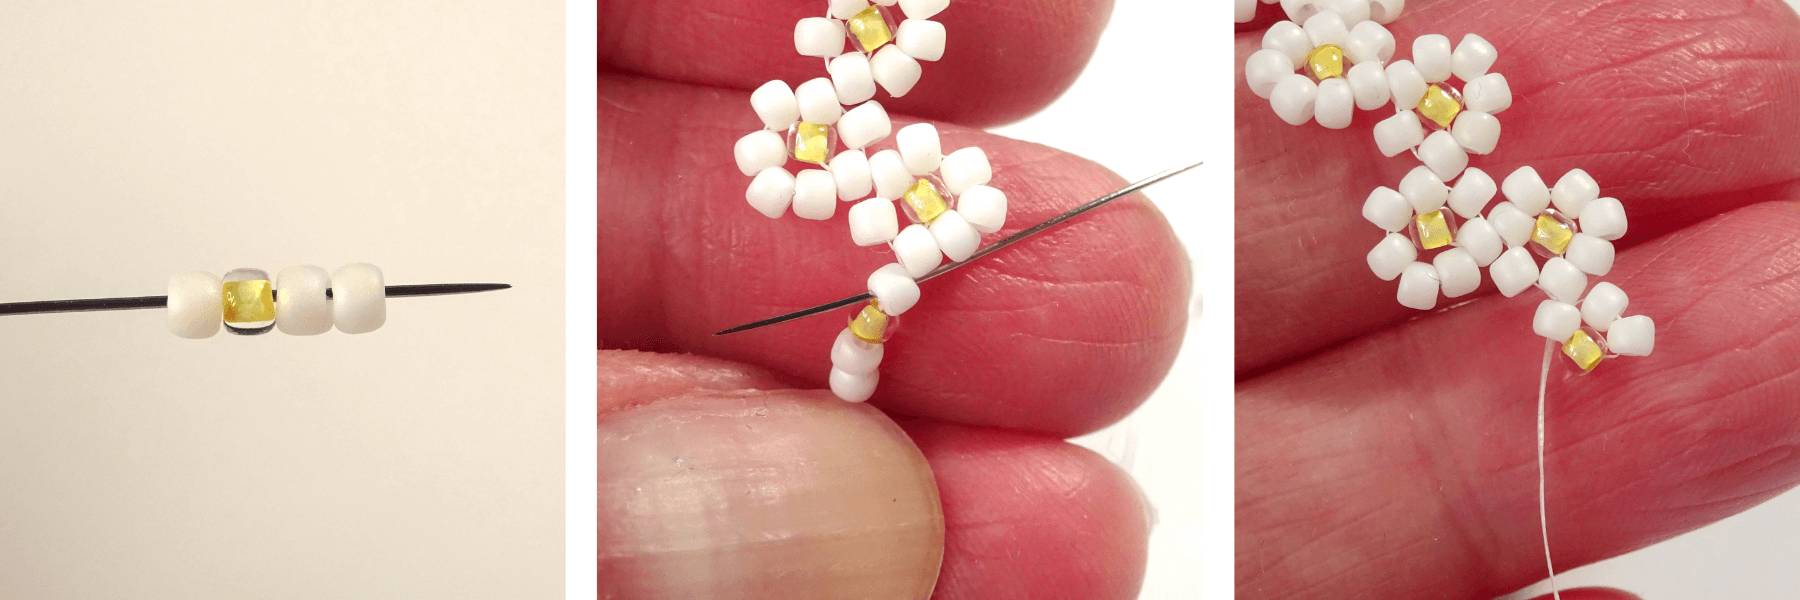
- Whether you are at the start of your beading or part of the way through, begin by picking up one petal colour (white in my case), one flower centre colour (yellow in my case), followed by two more white beads.
- Take the beads down the needle (leaving a tail thread if this is your first flower) and take the needle back through the first single white bead. You will need to think about direction here because the direction in which you take the needle through the white bead determines which way the flower lies. To do this, imagine there is a centre line running down the middle of the beading and take your needle through the beading and out to the edge in the direction that you want the flower to lie. It is clearer in the YouTube video at the bottom of this post how to do this.
- Once you pull the thread tight the two white bead that are after the yellow will be pulled to sit around half of the yellow bead.

- Pick up 4 more white beads.
- Take the needle back through the white bead that is now sitting at the bottom of the beading (added in the first half of the flower petals).
- Pull the thread tight and the newly added beads will sit around the yellow flower centre.

Continue working down your beading in this manner, making sure to alternate the direction that the bead goes back into the white seed bead on the first half of each flower, in order to achieve that flowing wavy pattern.
How To Bead A Wavy Daisy Chain Video Tutorial
If you have any suggestions as to what you would like to see let me know and I’ll try my best.
Hannah x


So pretty! I love it!
Thank you. It make a very cute bracelet.