

Please note, this post contains affiliate links. All such links are clearly marked as such.

Are you ready to tap into your inner artist and create a stunning piece of jewelry? Look no further! In this blog post, we’re about to embark on a journey into the enchanting world of wire jewelry making. Brace yourself as I guide you through the step-by-step process of crafting a mesmerizing wire heart necklace. Regardless of your experience level, this project will ignite your creativity and leave you with an exquisite accessory to treasure. So, get your artistic juices flowing and let’s dive in!,
Gather Your Supplies
To get started on your wire heart necklace, you’ll need to gather all the necessary supplies. Don’t worry if you’re new to jewelry making – I’ve got you covered with a simple list of items that will make this project a breeze.
First and foremost, you’ll need some spools of wire. Look for a wire that is sturdy yet pliable, such as a copper or silver wire. For this project I have used silver plated wire in 18 gauge (1mm) and 26 gauge (0.4mm).
Next, grab a pair of wire cutters and some round-nose pliers. These tools will come in handy when it’s time to shape the wire and make those perfect curves for your wire hearts. If you don’t have these tools on hand, don’t worry – you can easily find them at your local craft store or online.
Texture is what brings dimension and interest to your wire heart necklace. It can transform a simple wire pendant into a captivating piece of art that truly reflects your personal style. For this project, you will need a chasing hammer and steel block.
If you are new to hammering then experiment first with different hammering techniques, such as light taps or more forceful strikes, to achieve the desired effect.
Lastly, you’ll need a chain to complete your necklace along with silver plated jump rings and a clasp. I used 6mm jump rings to link the hearts and necklace together.
With all your supplies gathered, you’re now ready to embark on the next step of this creative journey – creating the heart shape. Get ready to shape and mould the wire into a stunning heart.
Links below for products used are Affiliate links for Amazon (UK and United States). This just means that if you use my link to buy a product I earn a very small commission, at no extra expense to you (you pay the same regardless how you find the item). Every little extra helps me to offer free tutorials.
UK –
Please note this is not the exact wire I use in this tutorial but will be what I but next!
18 Gauge (1mm) silver plated wire and 26 Gauge (0.04mm) silver plated wire
Steel block and chasing hammer
USA –
Please note this is not the exact wire I use in this tutorial but will be what I but next!
18 Gauge (1mm) silver plated wire and 26 Gauge (0.04mm) silver plated wire
Steel block and chasing hammer
Create the Wire Heart Shape
With all your supplies gathered, you’re now ready to embark on the next step of this creative journey – creating the heart shape. Get ready to shape and mould the wire – Let’s bring your vision to life!

1) To create the heart shape for your necklace, you will need a pair of round-nose pliers and a wire cutter. Start by cutting a piece of wire that is about 1.5″ (4cm) long.
2) Once you have your wire, take one end and position it towards the top of your round nose pliers (where the pliers are larger).
3) Push against your thumb whilst you roll the pliers inwards to start forming a loop. You may need to reposition your pliers in order to complete the loop comfortably.
4) You will now have a loop at one end of the wire. Remember to take your time and make adjustments as necessary. If you’re not satisfied with a curve, simply use your pliers to reshape it. The beauty of wire jewelry is that it allows for flexibility and creativity.

1) Add an identical loop on the other end of the wire.
2) Find the middle point of the wire with your round nose pliers. Position the wire at the smaller end of the pliers.
3) Pull the two loops towards each other.
4) You have successfully created the heart shape for your wire necklace necklace. Now, it’s time to move on to the next step and add texture and design to make your necklace truly unique. Let’s dive in and take your creation to the next level.,
Add Texture and Design
Now, it’s time to move on to the next step and add texture and design to make your necklace truly unique. Let’s dive in and take your creation to the next level.
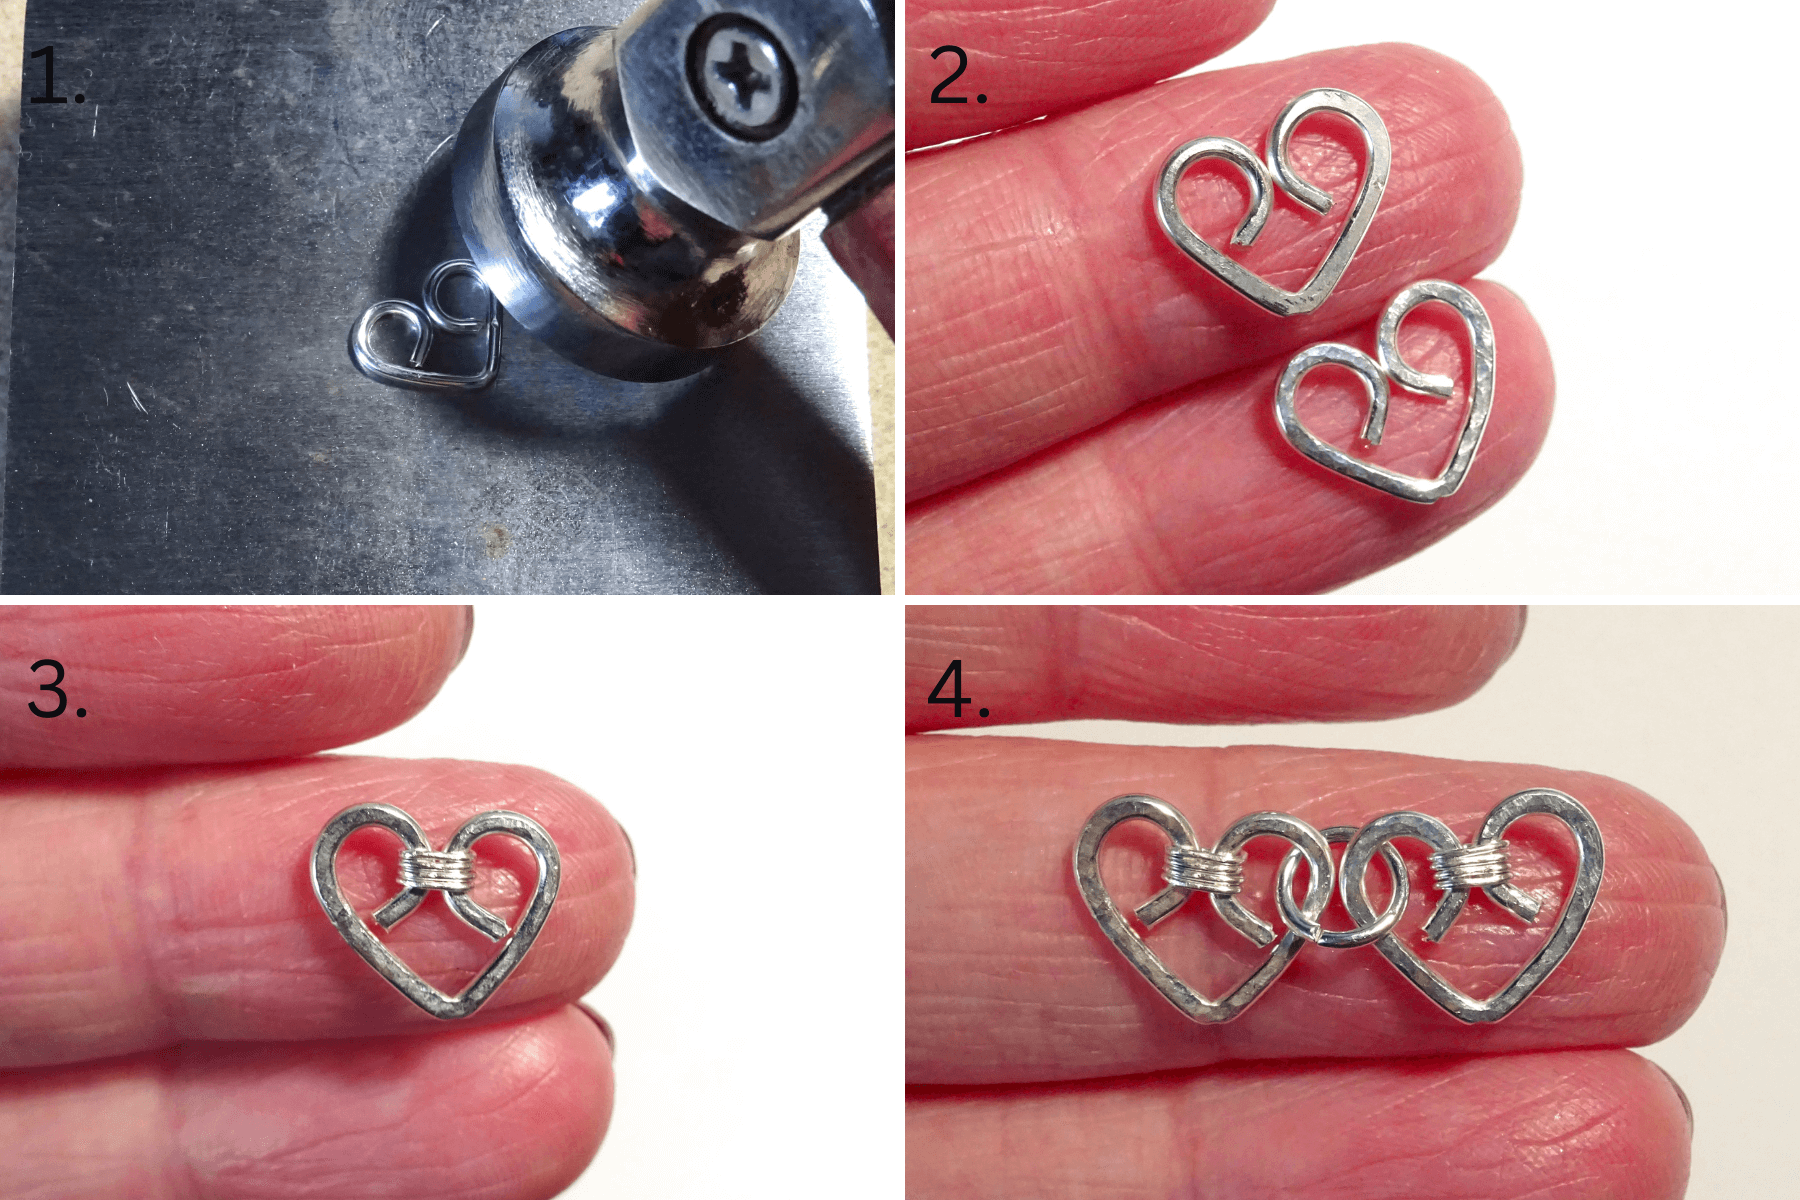
1) Place your wire heart on your metal block and use the flat side of your hammer to flatten the wire.
2) You can either leave the wire heart smooth or turn the hammer over to add a little texture. The top heart in the picture shows the wire left smooth and the lower heart shows the wire with some texture.
3) Using a small piece of 26 gauge wire, wrap it around the two wire heart loops to join them together.
4) Use 6mm jump rings to join your hearts together. Continue making wire hearts until you have enough for your necklace.
Once you have added texture to your wire heart pendant, take a moment to step back and admire your handiwork. The textured surface will add depth and character to your necklace, making it truly one-of-a-kind. Now, let’s move on to the next section and learn how to attach the necklace chain, bringing your wire heart necklace to completion.
Attach the Necklace Chain
Now that you have created a beautifully textured wire heart pendant, it’s time to take the next step and attach the necklace chain. This final touch will bring your creation to completion, adding both elegance and practicality to your wire heart necklace.

To begin, gather your necklace chain and the necessary tools, such as pliers and jump rings. Choose a chain that complements the style and size of your hearts, whether it be delicate and dainty or bold and statement-making.
Start by opening one of the jump rings using your pliers. To do this, grip the jump ring on either side of the opening with your pliers, and gently twist in opposite directions. Avoid pulling the jump ring apart as this can weaken its structure.
With the jump ring open, slide one end of the necklace chain onto it, ensuring that it is securely attached. Next, thread the open jump ring through the outer loop of your wire heart pendant, and then close the jump ring by twisting it back into place.
Take a moment to inspect your work, making sure that the jump ring is closed tightly and that the necklace chain is properly attached. If necessary, use your pliers to adjust the jump ring and ensure a seamless connection.
Repeat this process on the other side of the pendant, attaching the remaining end of the necklace chain to the second jump ring. Again, double-check that both jump rings are securely closed and that the necklace chain is evenly attached. Add a clasp to the end of the chain to complete your necklace.
Customize and Personalize
You could take this tutorial a step further and customize and personalize your necklace to truly make it your own. Adding your own unique touch will not only make the necklace one-of-a-kind but also reflect your own style and personality.
One way to customize your necklace is by incorporating charms or pendants that hold special meaning to you. Maybe it’s a small initial charm representing your own or a loved one’s initials, or a birthstone pendant that symbolizes a special month or person in your life. These additions can add an extra layer of sentimental value to your necklace and make it a meaningful keepsake.
Another way to personalize your necklace is by selecting a unique chain style or length. Experiment with different chain styles such as a delicate cable chain, a chunkier curb chain, or a trendy rope chain. Each chain style gives a different look and feel to the necklace, allowing you to tailor it to your own aesthetic preferences.
Consider the length of the chain as well. Opt for a shorter length if you want the pendant to sit higher on your neckline, drawing attention to the delicate heart shape. On the other hand, a longer chain can create a more bohemian or layered look. Play around with different lengths to find the one that suits your desired style.
Additionally, you can explore different metal options for your necklace. If you prefer a classic and timeless look, go for a sterling silver or gold-filled wire. For a more modern and edgy vibe, consider using copper or brass wire. The choice of metal can drastically alter the overall appearance of the necklace, so choose one that resonates with your personal style.

Lastly, don’t be afraid to add some color to your necklace. Incorporate colorful beads or gemstones into the design to create a vibrant and eye-catching piece. Whether you prefer subtle pastel hues or bold and vibrant shades, adding pops of color can make your necklace stand out even more.
By customizing and personalizing your wire heart necklace, you can turn it into a truly unique and meaningful accessory. Remember, it’s all about infusing your own style and personality into the design, so feel free to experiment and let your creativity guide you.
In just a few simple steps, you can unlock your creativity and fashion a stunning wire heart necklace that truly reflects your unique style and artistic flair. Experimenting with different wire gauges, colors, and embellishments will allow you to create a one-of-a-kind piece that is sure to impress. Whether you choose to keep it as a personal treasure or present it as a heartfelt gift, this wire jewelry project is a testament to your creativity and passion. So seize the opportunity to embrace your artistic side, and let your imagination run wild as you embark on the journey of making your very own wire heart necklace.
Thanks for reading,
Hannah x


Leave a comment