
Please note, this post contains affiliate links. All such links are clearly marked as such.

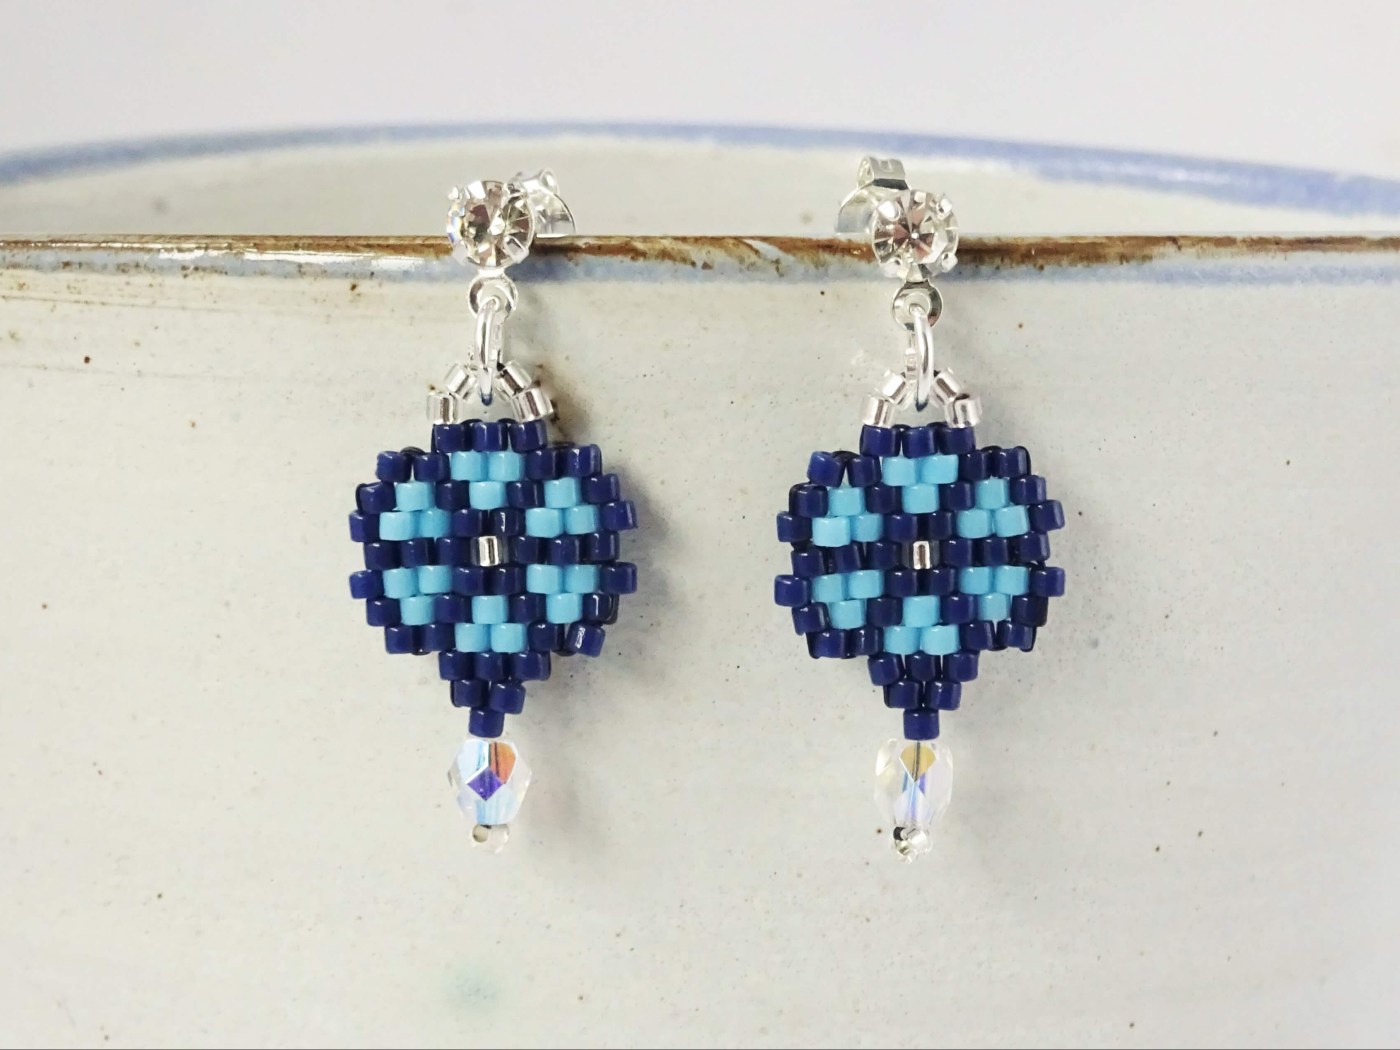
I’m back today with another bead weaving tutorial and what better way to round off the summer months than with an easy brick stitch flower pattern. I decided to go a little further for this tutorial and added a little beaded drop to the bottom of the brick stitch flower with a faceted bead with an AB finish. I also found these crystal stud earring findings in my beading stash and thought they would really tie the whole look together, especially as the flower centre is a silver lined Delica bead.
I have a pdf available for the basic flower pattern –
I have used size 11 Delica beads in two shades of blue for this tutorial, but you could obviously just choose any colours that you prefer, and your flower earrings will look just as lovely. I plan on making a purple and pink version for myself as I have clothes that they would really go with.
When choosing alternative colours just make sure there is enough of a contrast between the beads so that you get the definition between the outline of the flower and the inner petals otherwise, they will blend into one and you will lose definition. I also chose the silver lined Delica for the flower centre as the contrast between the opaque blue beads and the shiny silver meant that the middle popped and gave a definite flower centre.
I have made this brick stitch tutorial a little different in that I have started beading from the middle line of bead work and stitched it in two halves so to speak. I did this simply because I felt it was easier. If I was to start at the bottom of the flower and work my way up, by the second line I would have had to do some slightly fancier steps to add an extra bead onto each end of the beading row over and above the increase that I would have done easily. It seemed like a really awkward and unnecessary step so early on in the tutorial.
For this brick stitch flower tutorial, I have used Delica, size 11, in Duracoat Opaque Nave, Light Blue and Silver Lined. To add the beaded drop, you will also need a 4mm clear faceted bead with an AB finish for the sparkle. I have also used Fireline beading thread because I absolutely love it!
Brick Stitch Flower Earrings Tutorial
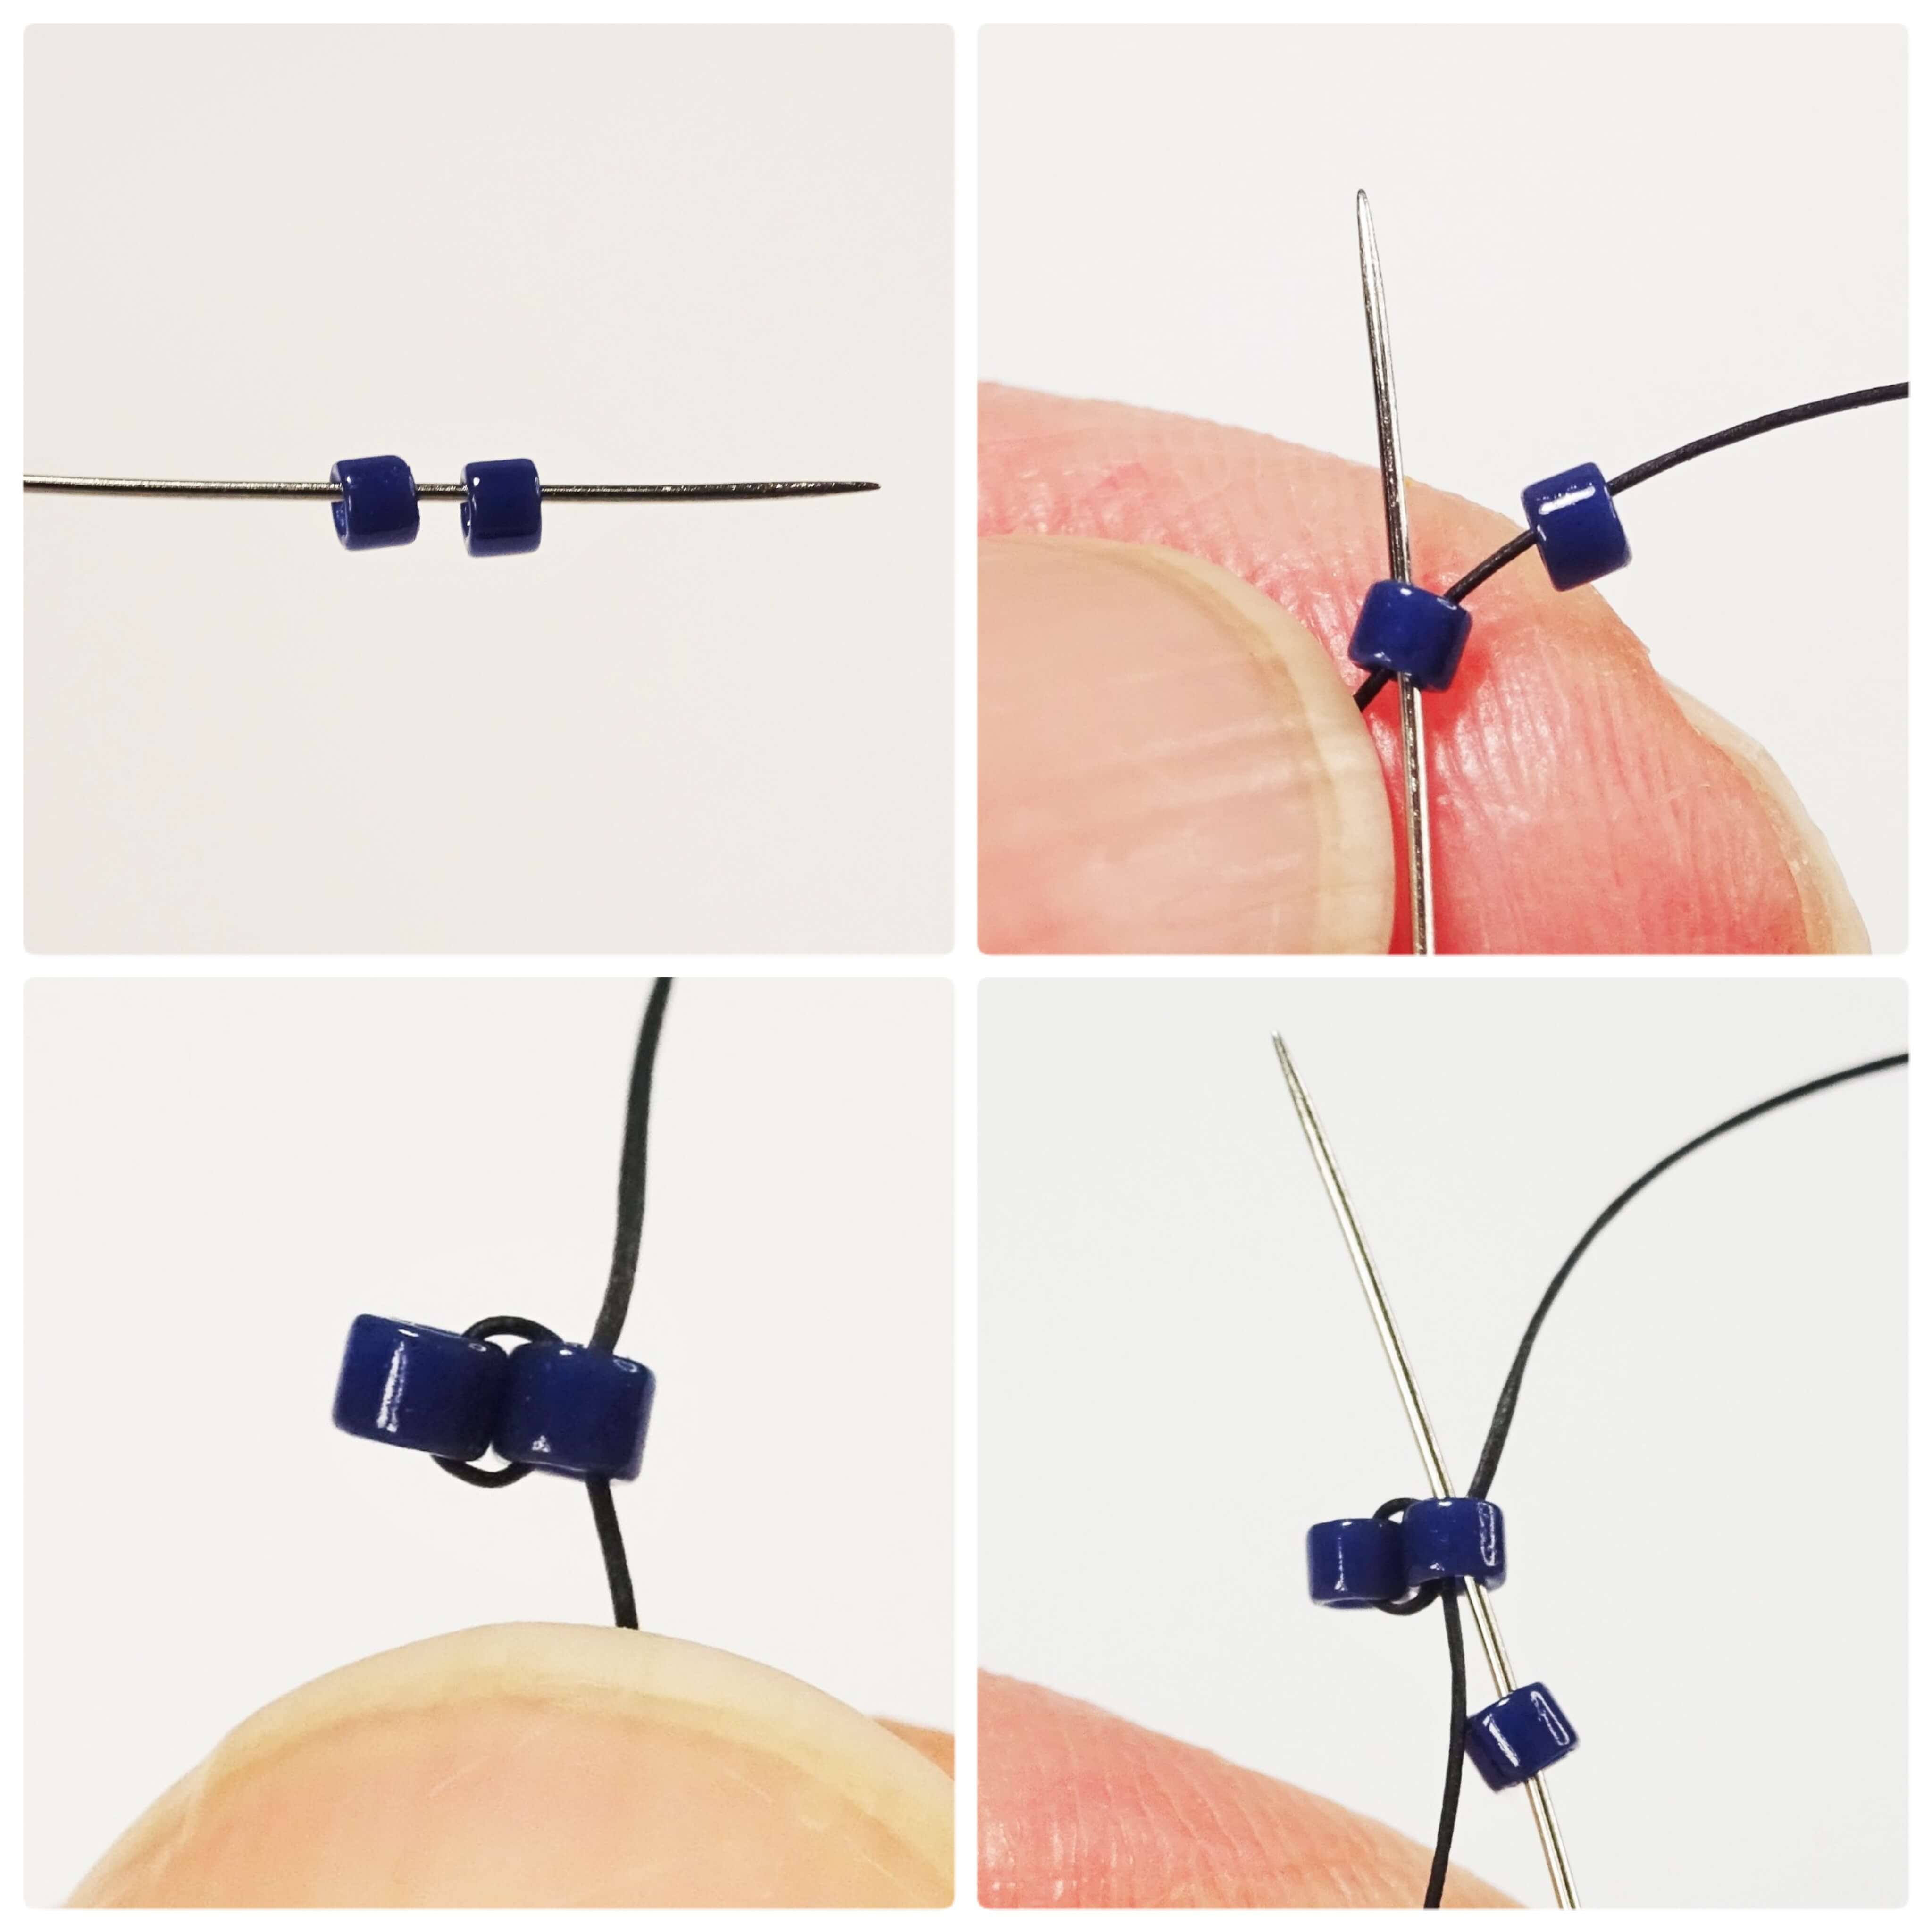
- Begin by cutting a length of beading thread (just under an arm span should be more than sufficient) and thread a needle on one end.
- Pick up 2 navy beads and take them down to the middle of the thread – this will leave half the length of the thread as tail thread.
- Take the needle back up through the first bead and pull tight. This will make the beads sit side by side.
- Pick up another navy bead and take the needle back up through the bead you were exiting from. Pull the thread tight.

- The needle will be exiting out the middle bead and it needs to be on the end to continue the beading so take the needle into the newly added navy bead again.
- Pick up 1 silver lined Delica and take the needle back into the top of the bead you were exiting from and pull the thread tight.
- Move the needle along into the same silver lined bead again to continue the beading.
- Continue in this manner until and further 3 navy blue beads have been added.
- Pass the tail thread through the navy bead on the other end of the beading so that both threads are now exiting out of different sides of the beads. One thread will bead one half and the other, the other half.

- To begin the next row, pick up 1 navy and then 1 light blue Delica. Take the needle under the bridging thread sitting between the first two beads on the previous row. (We are picking up two beads to begin this row as the row length in increasing).
- Pull the thread through and pass it back up from the bottom of the light blue bead and pull tight to get the beads to sit in position.
- Pick up another light blue bead and take the needle under the next bridging thread along.
- Pull the thread through and take the needle back up through the light blue bead.
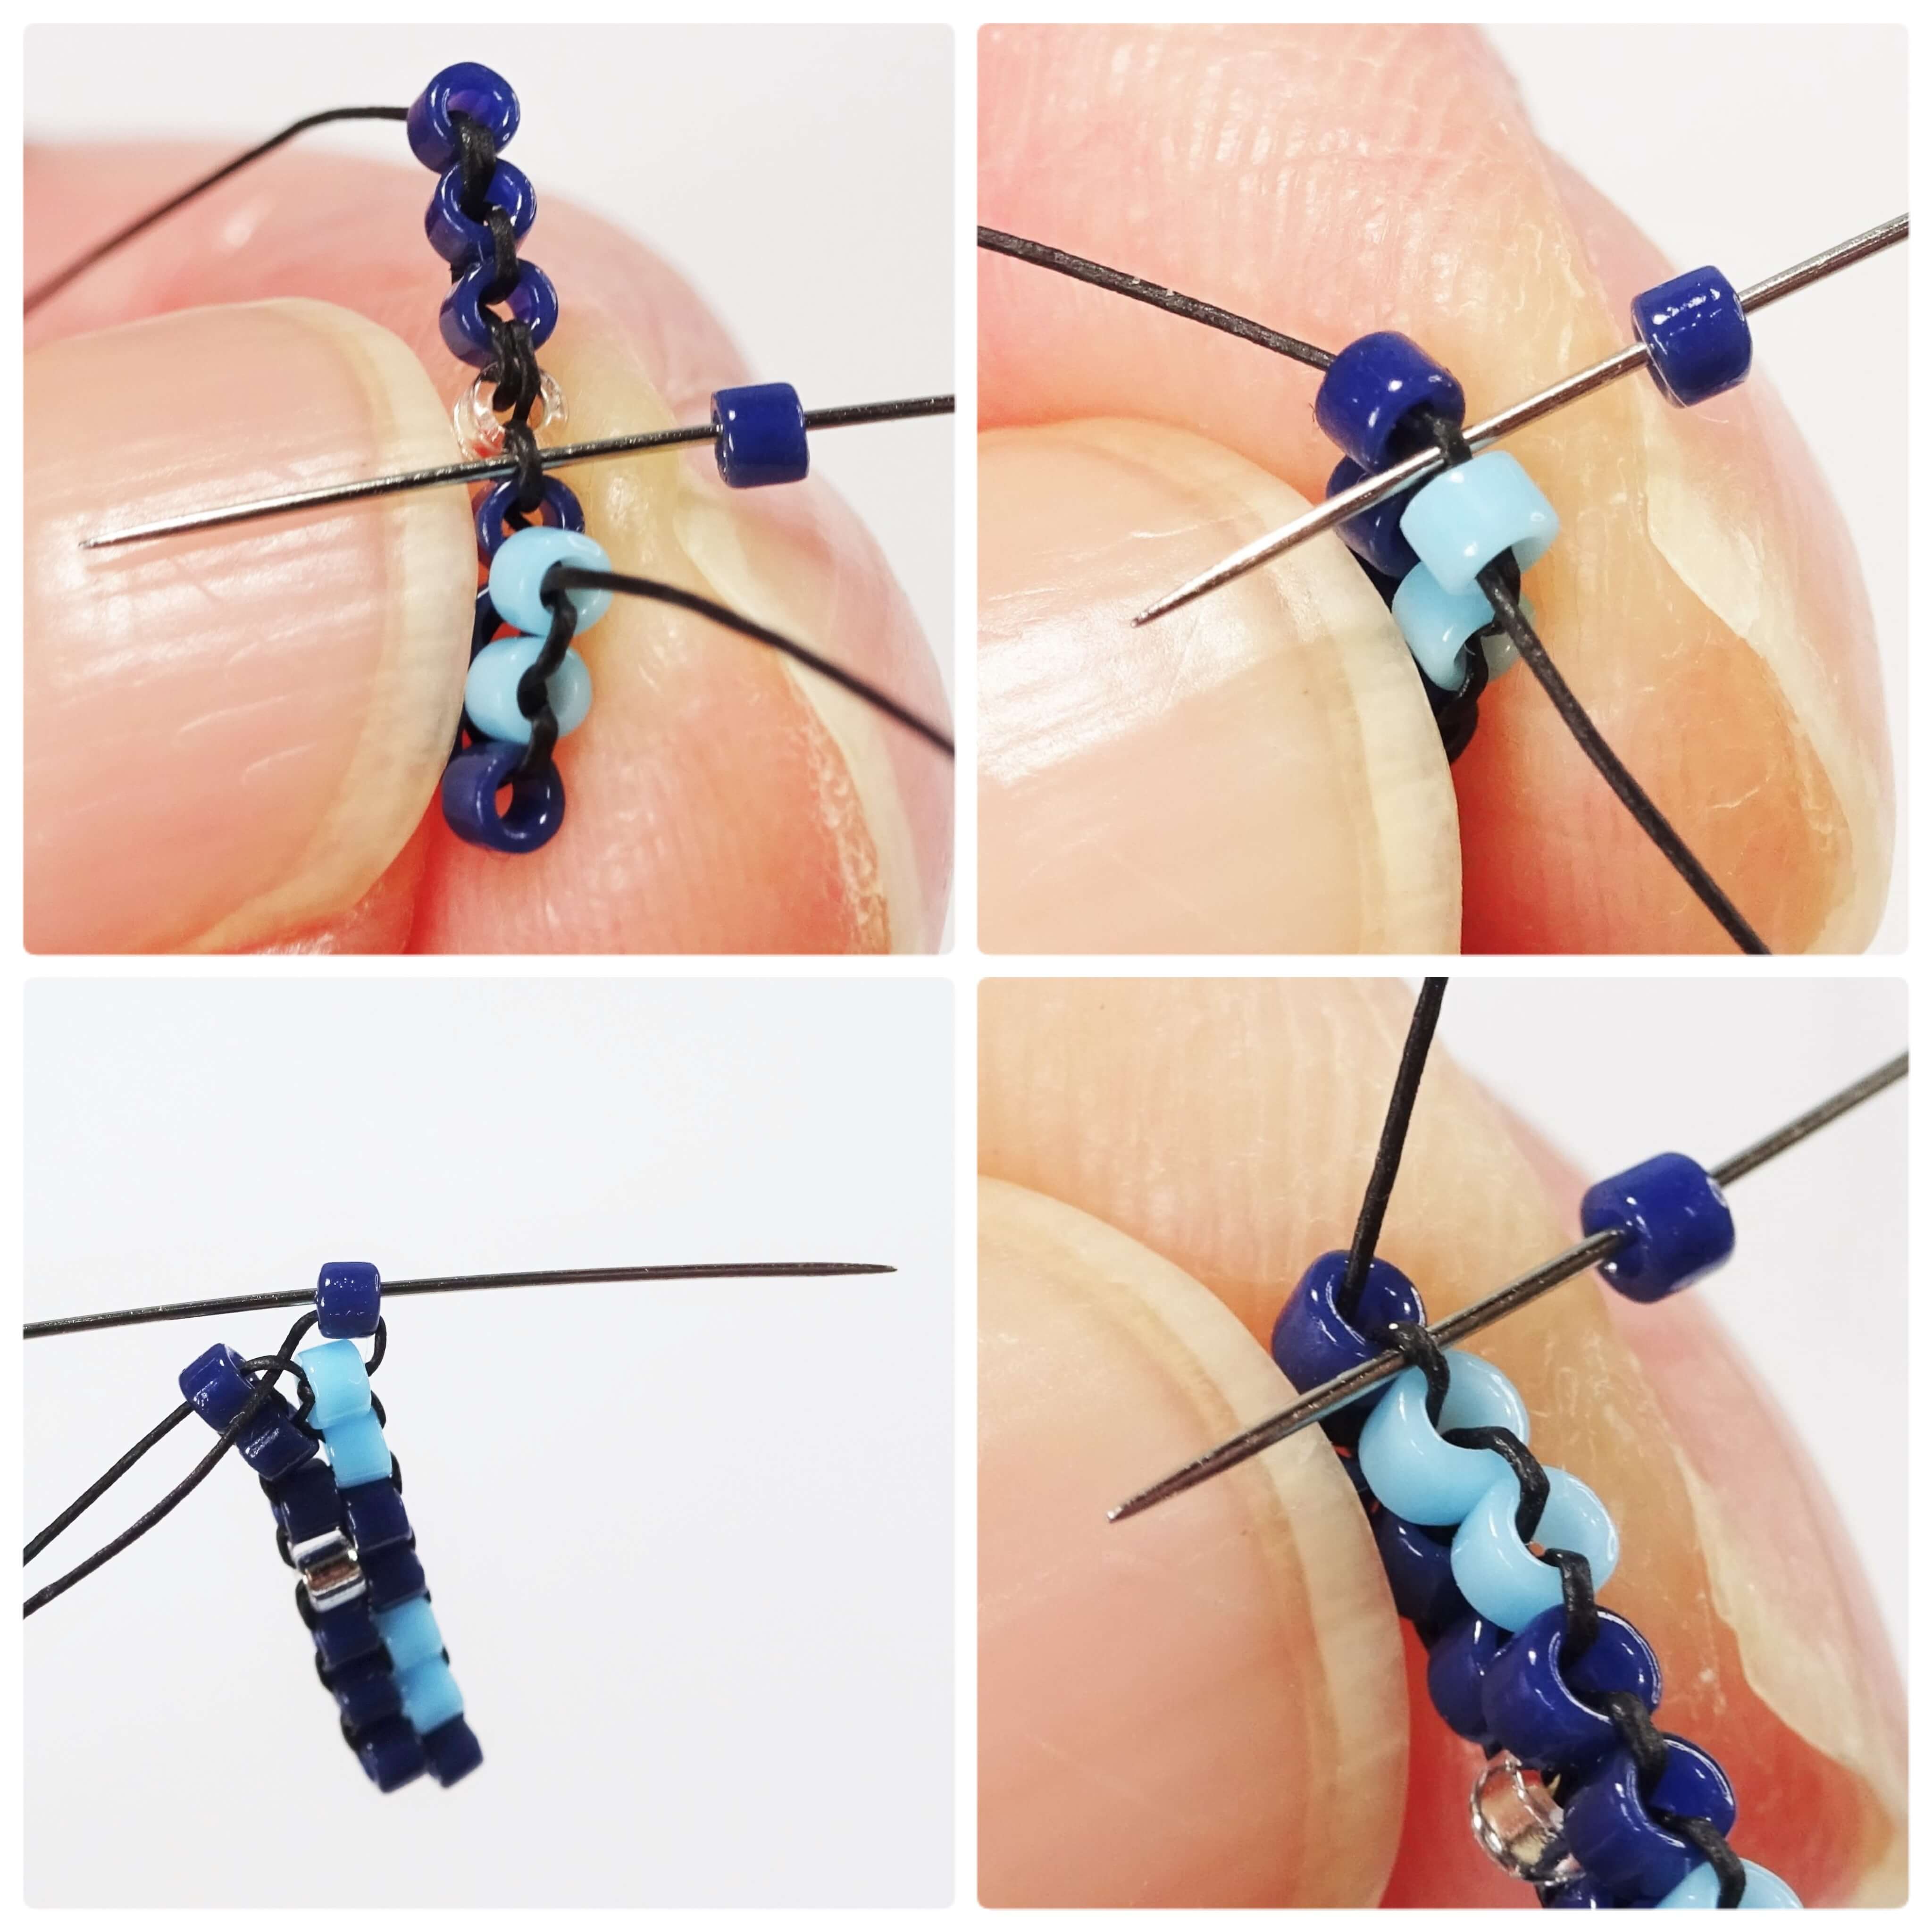
- Continue this row by adding a further 2 navy beads and 2 light blue beads, one at a time, and add them using the bridging threads.
- Pick up 1 more navy bead. There are no bridging threads left now so pass the needle under the thread that passes up and into the nearest light blue bead.
- Take the needle back up through the bottom of the navy bead and pull tight. This new bead should now sit alongside the others.
- To begin the next row, pick up 1 navy bead (the row is decreasing now) and take the needle under the bridging thread between the first two beads on the row below.
- Take the needle back up through the new navy bead so secure in place.
- Continue the row by adding, one at a time, 1 light blue, 1 navy, 1 light blue, 1 navy, 1 light blue, and 1 navy. The last bead on this row is added to the last bridging thread.
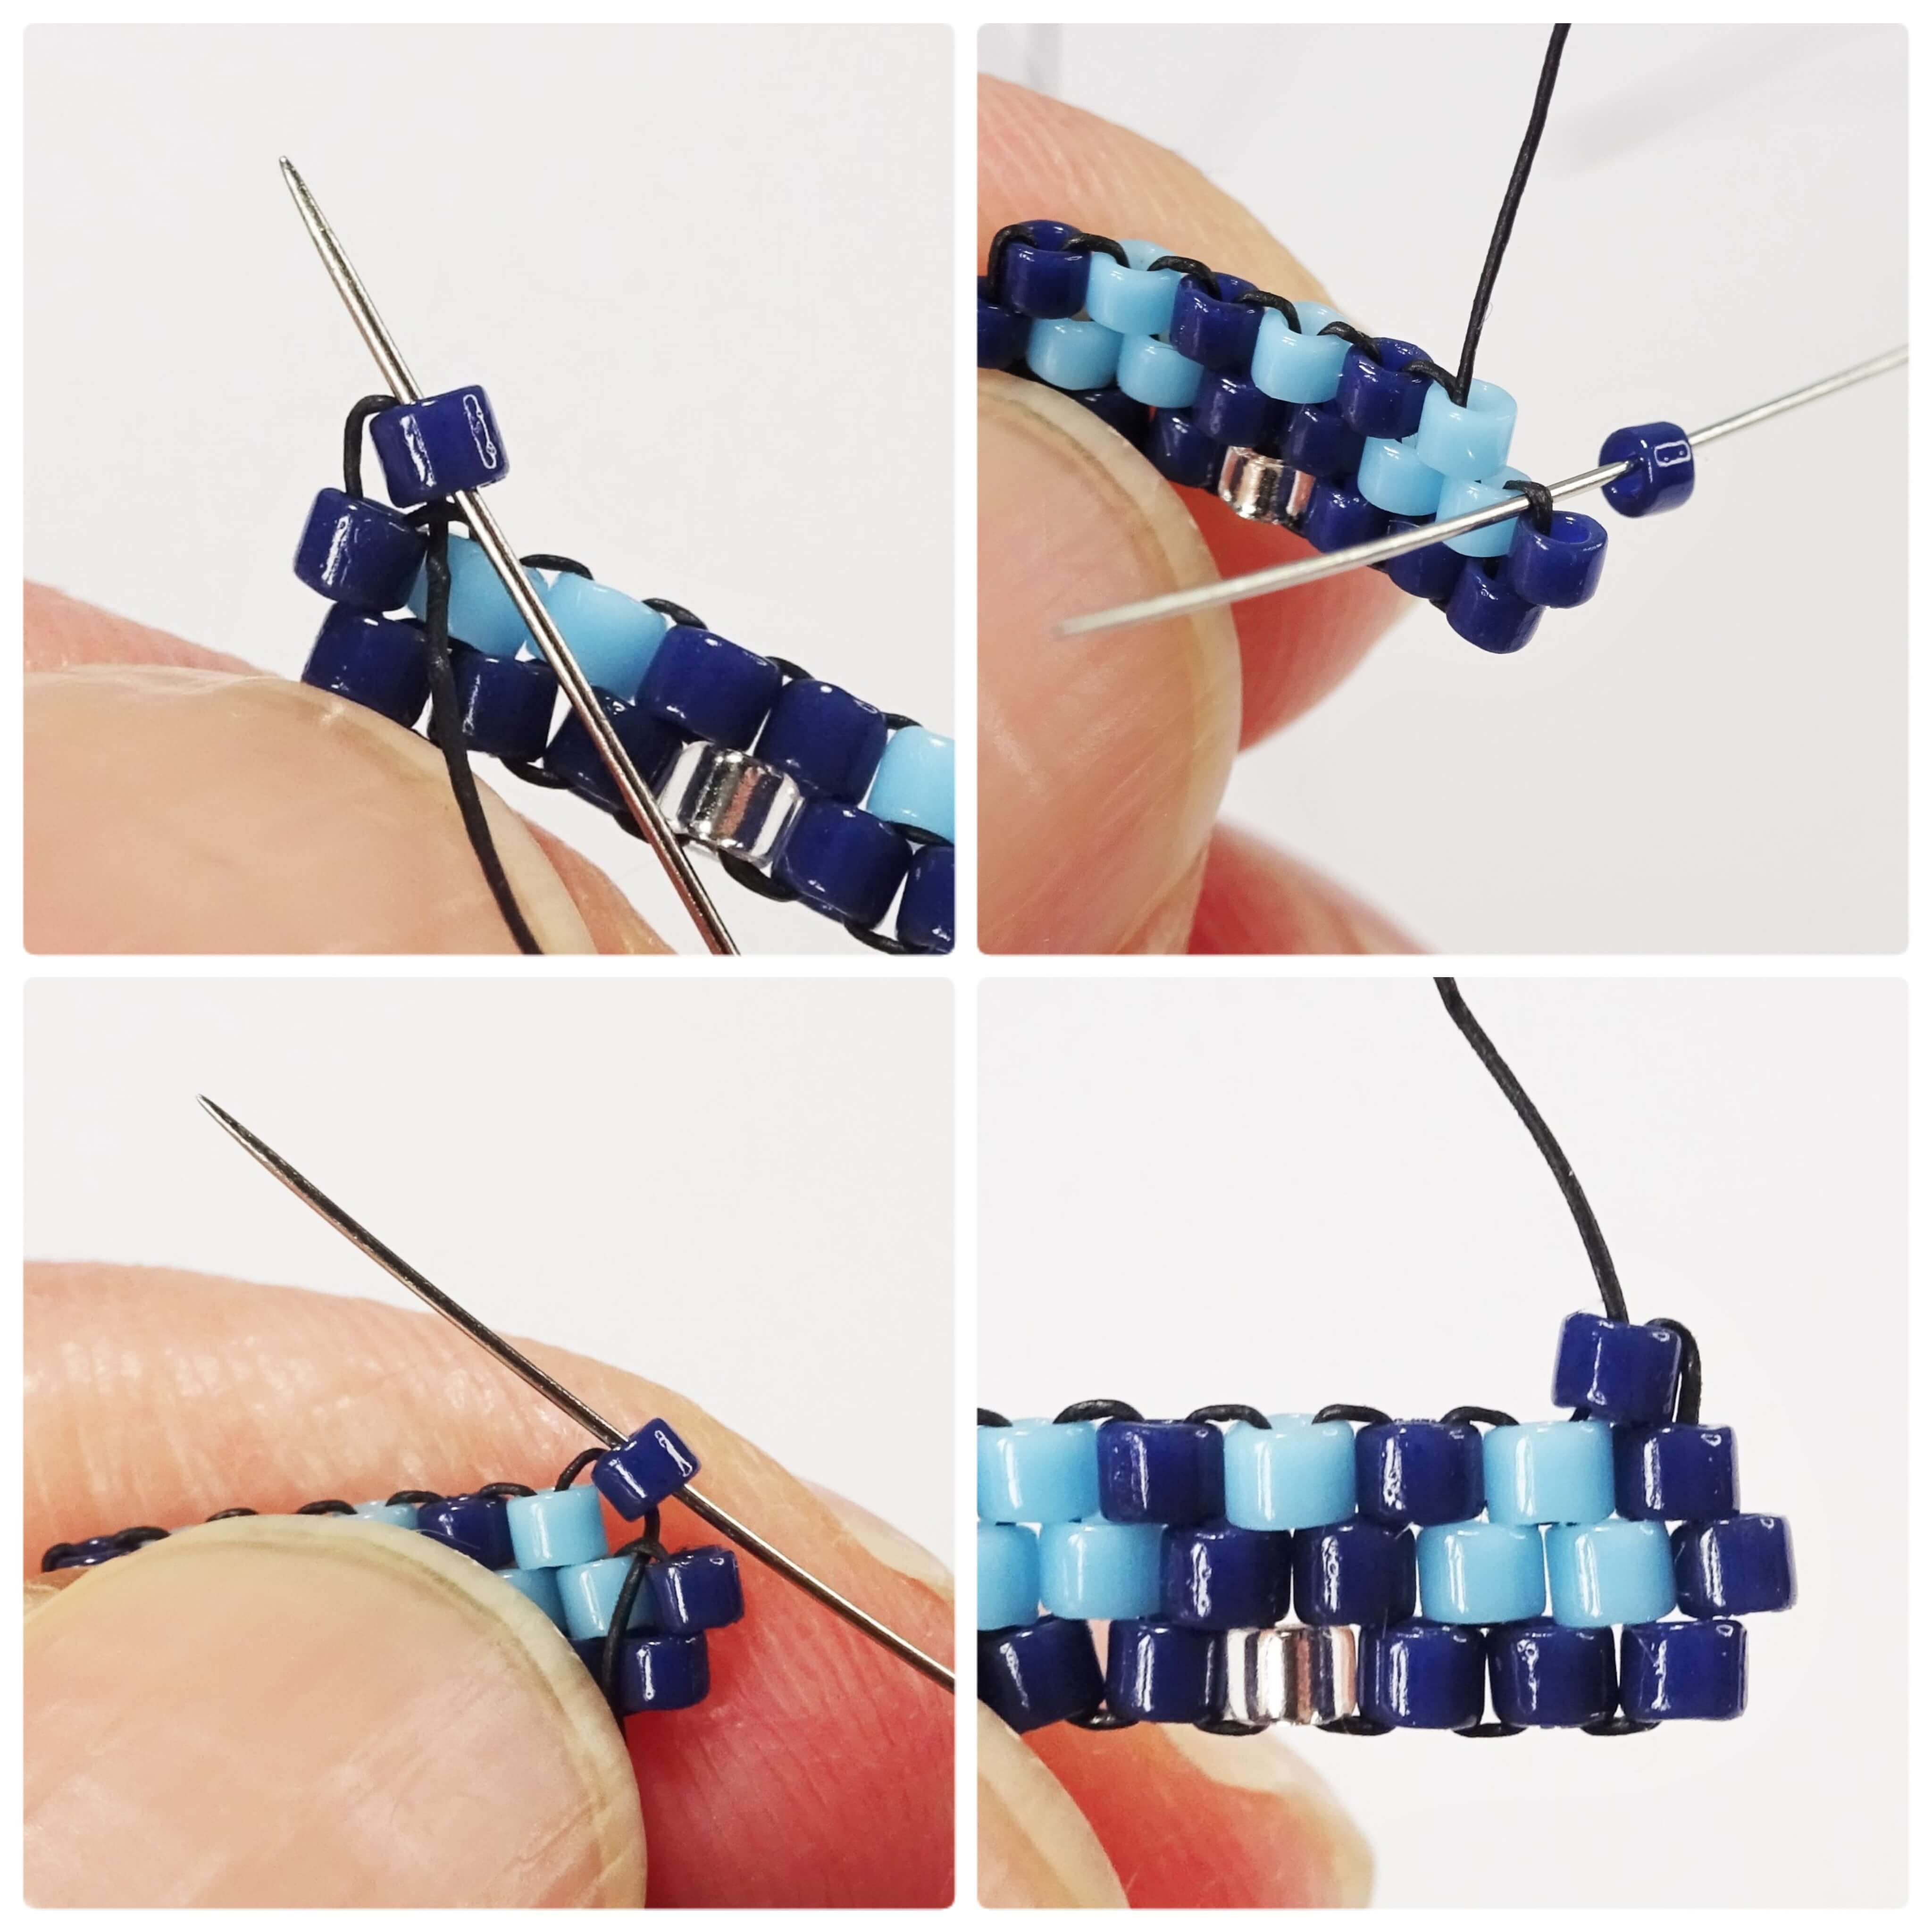
- To begin the next row, pick up and add 1 navy as before.

- Continue with this row so that there are 2 navy beads, followed by 2 light blue beads and a further 2 navy beads.
- We need to move the needle along now without adding a bead so take your needle straight down into the second navy along.
- Next, pass the needle between the top of the two beads on the row below. The idea here is that we are passing the thread under the bridging thread that is sitting between these two beads.
- Take the needle back up the same blue bead and you are now ready to continue with the next row.

- Finish the top row by adding 3 navy blue beads, one bead at a time.
- To make the beaded loop at the top, pick up 5 silver lined Delica and take the needle into the third navy along on the other side.
- Pull the thread tight to form the loop. Move your way through the beading to reinforce the thread (this is shown clearly in the YouTube video).

- Take you needle off the thread you have been working with and put it onto the long tail thread that was left at the start. We are now going to bead the other half of the brick stitch flower.
- Pick up 1 navy bead and 1 light blue and begin the next row by taking the needle under the first bridging thread.
- Complete the row by adding a further 1 light blue bead, then 2 navy beads, 2 light blue and finish the row with 1 navy.
- Move up to the next row by adding 4 navy beads alternating with 3 light blue beads, starting with the navy and adding one bead at a time.
- Add another row of 2 navy, followed by 2 light blue and finishing with 2 more navy beads, picking up each bead one at a time.

- We need to reposition the needle and thread again so pass the needle straight down into the next navy along.
- Take the needle under the navy bead in order to pass it under the bridging threads on the beads below it.
- Take the needle back up into the navy bead.
- Add 3 more navy beads, one bead at a time. If you don’t want to add the beaded drop to the earring then your flower is complete, and you just need to knot your threads
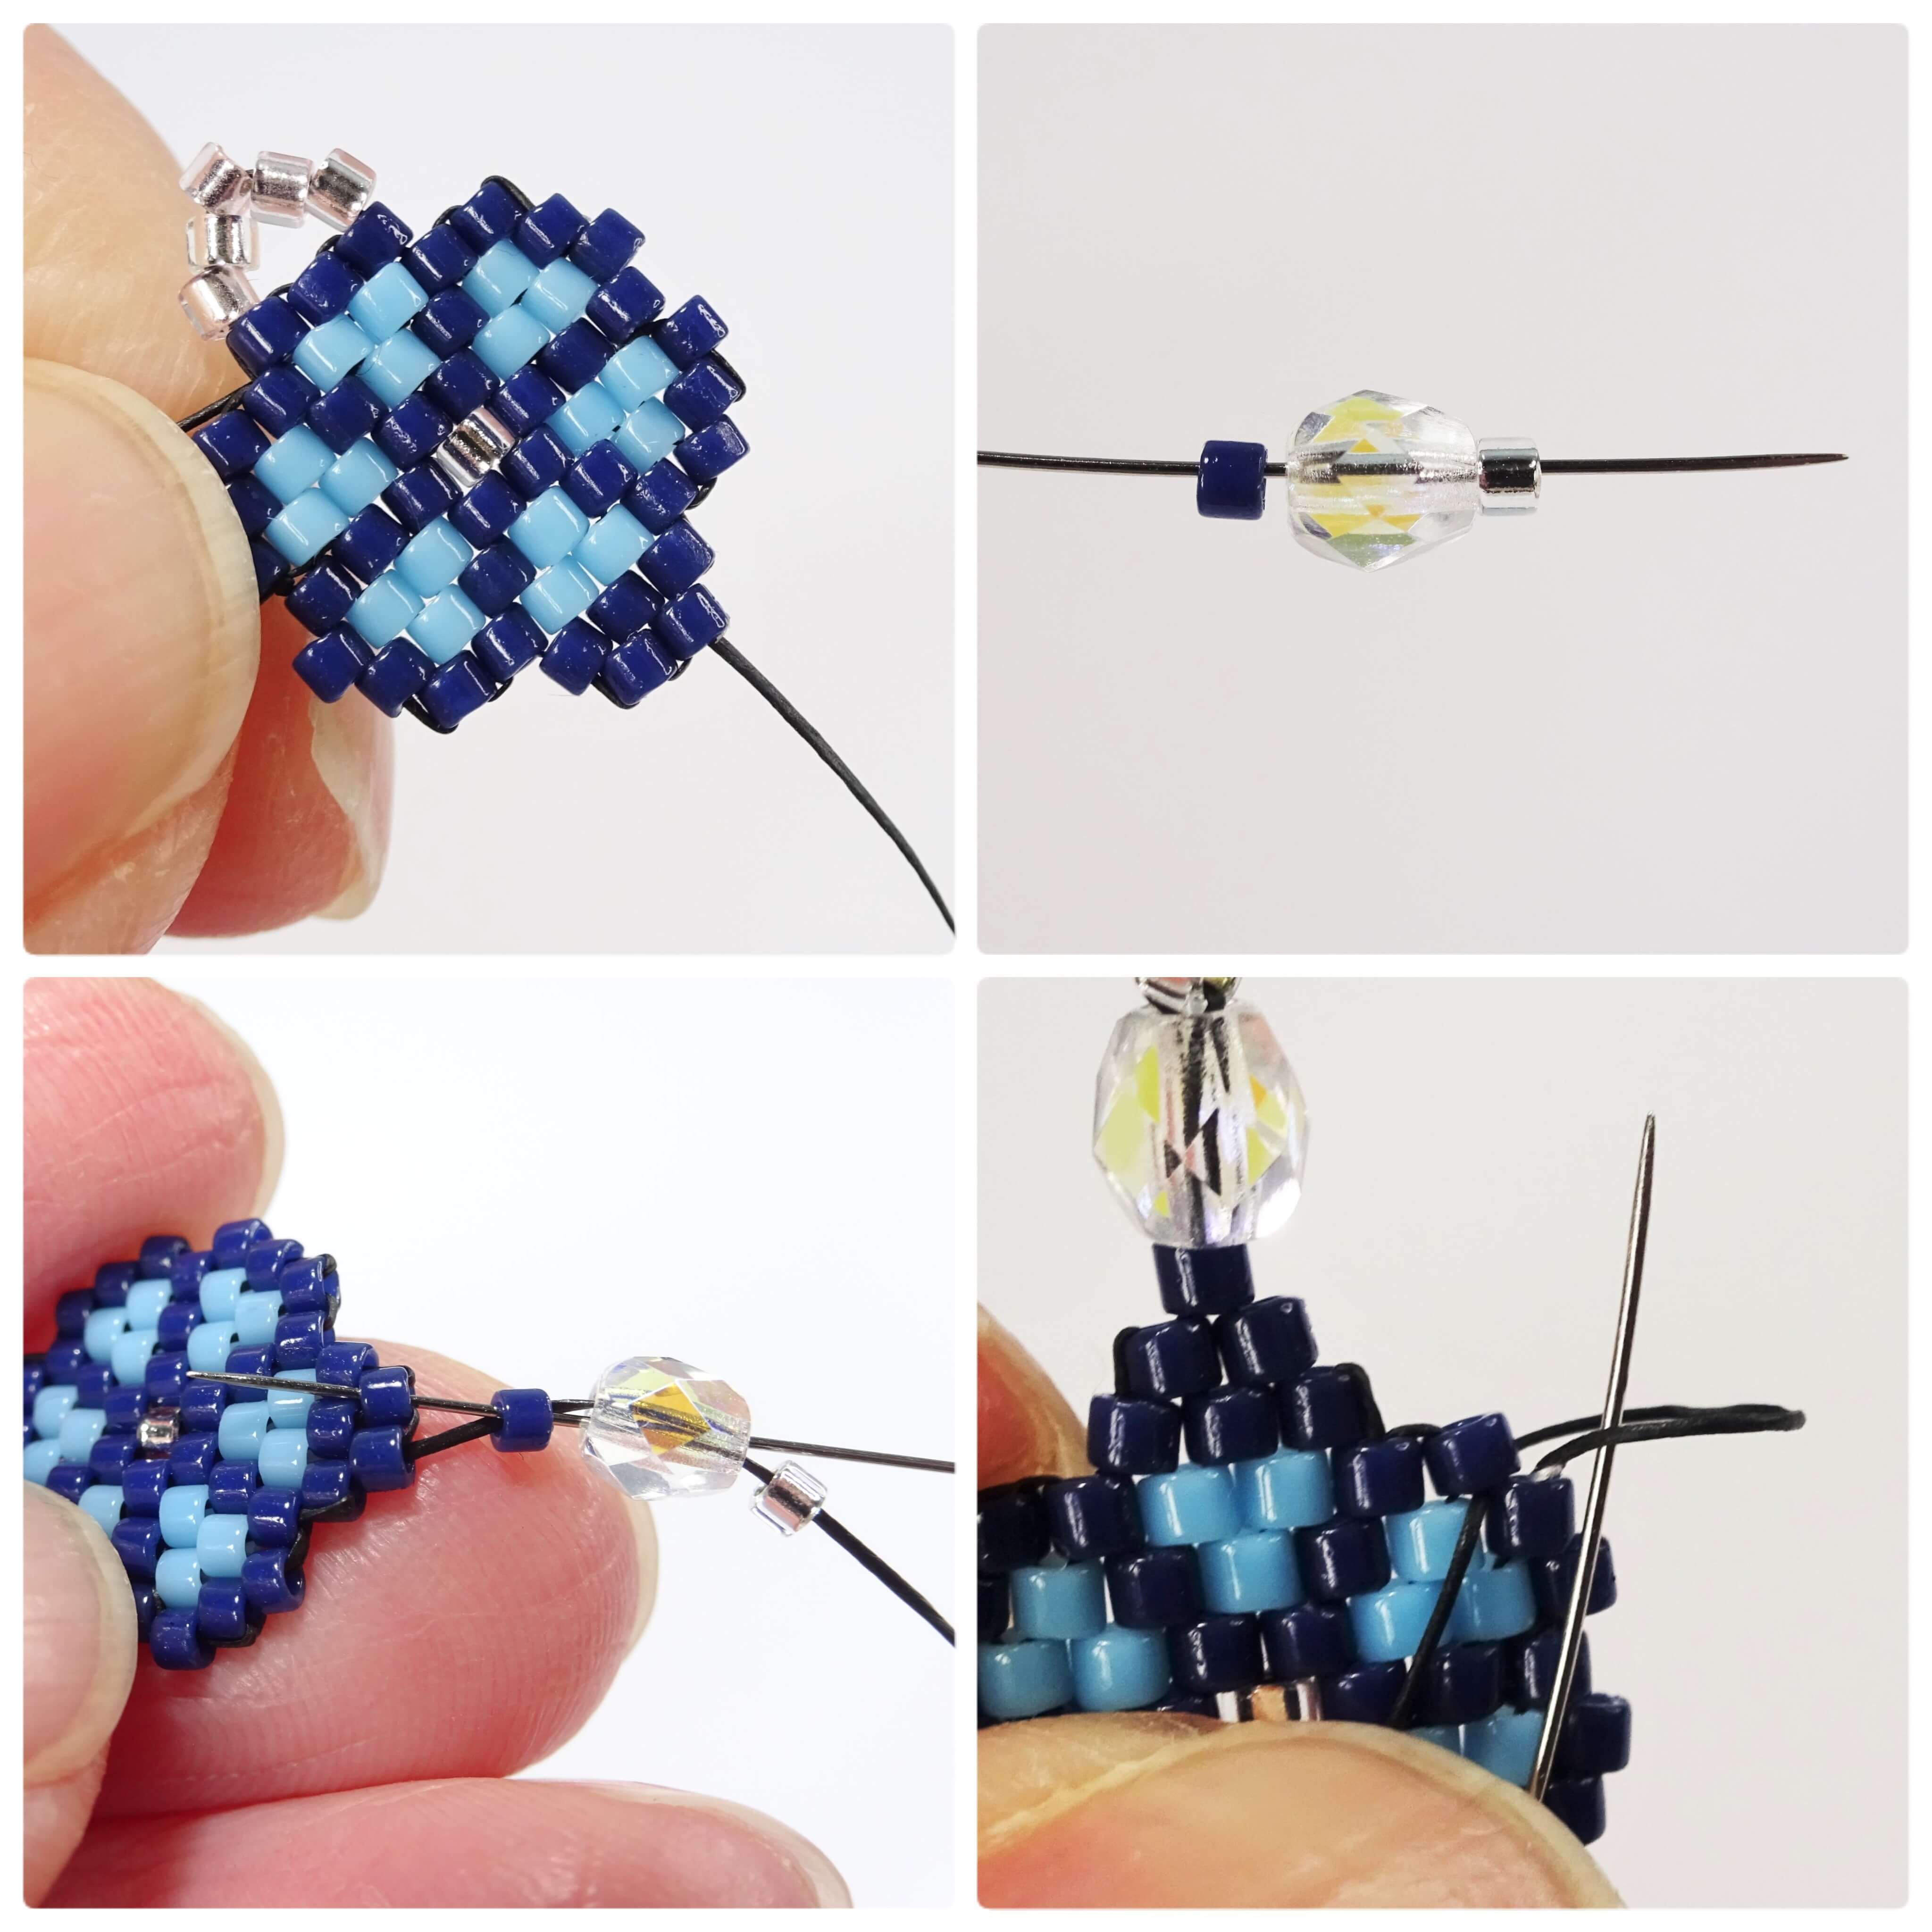
- To add the beaded drop to the earring add 2 more navy Delica on top of the three just added.
- On your needle, pick up 1 navy, 1 4mm faceted bead and 1 silver lined bead.
- Take your needle back up into the faceted and navy bead. Do not take it into the silver lined bead again or all your beads will fall off the thread!
- Take the needle up into the second navy Delica on your brick stitch flower.
- Tie knots and weave in both the working thread and tail thread.

- Add your earring findings and enjoy your new earrings.
Links below for products used are Affiliate links for Amazon (UK and United States). This just means that if you use my link to buy a product I earn a very small commission, at no extra expense to you (you pay the same regardless how you find the item). Every little extra helps me to offer free tutorials.
UK
- Delica size 11 Opaque Navy
- Delica size 11 Opaque Light Blue
- Delica size 11 Silver Lined
- Wildfire in Black 0.006″
USA
- Delica size 11 Opaque Navy
- Delica size 11 Opaque Light Blue
- Delica size 11 Silver Lined
- Wildfire in Black 0.006″
Before you go off to raid your stash of beads to get started, don’t forget to check out my other brick stitch tutorials. I am slowly building up my bead weaving tutorials so any ideas for future projects are always welcome.
Thanks for reading,
Hannah x


Leave a comment