


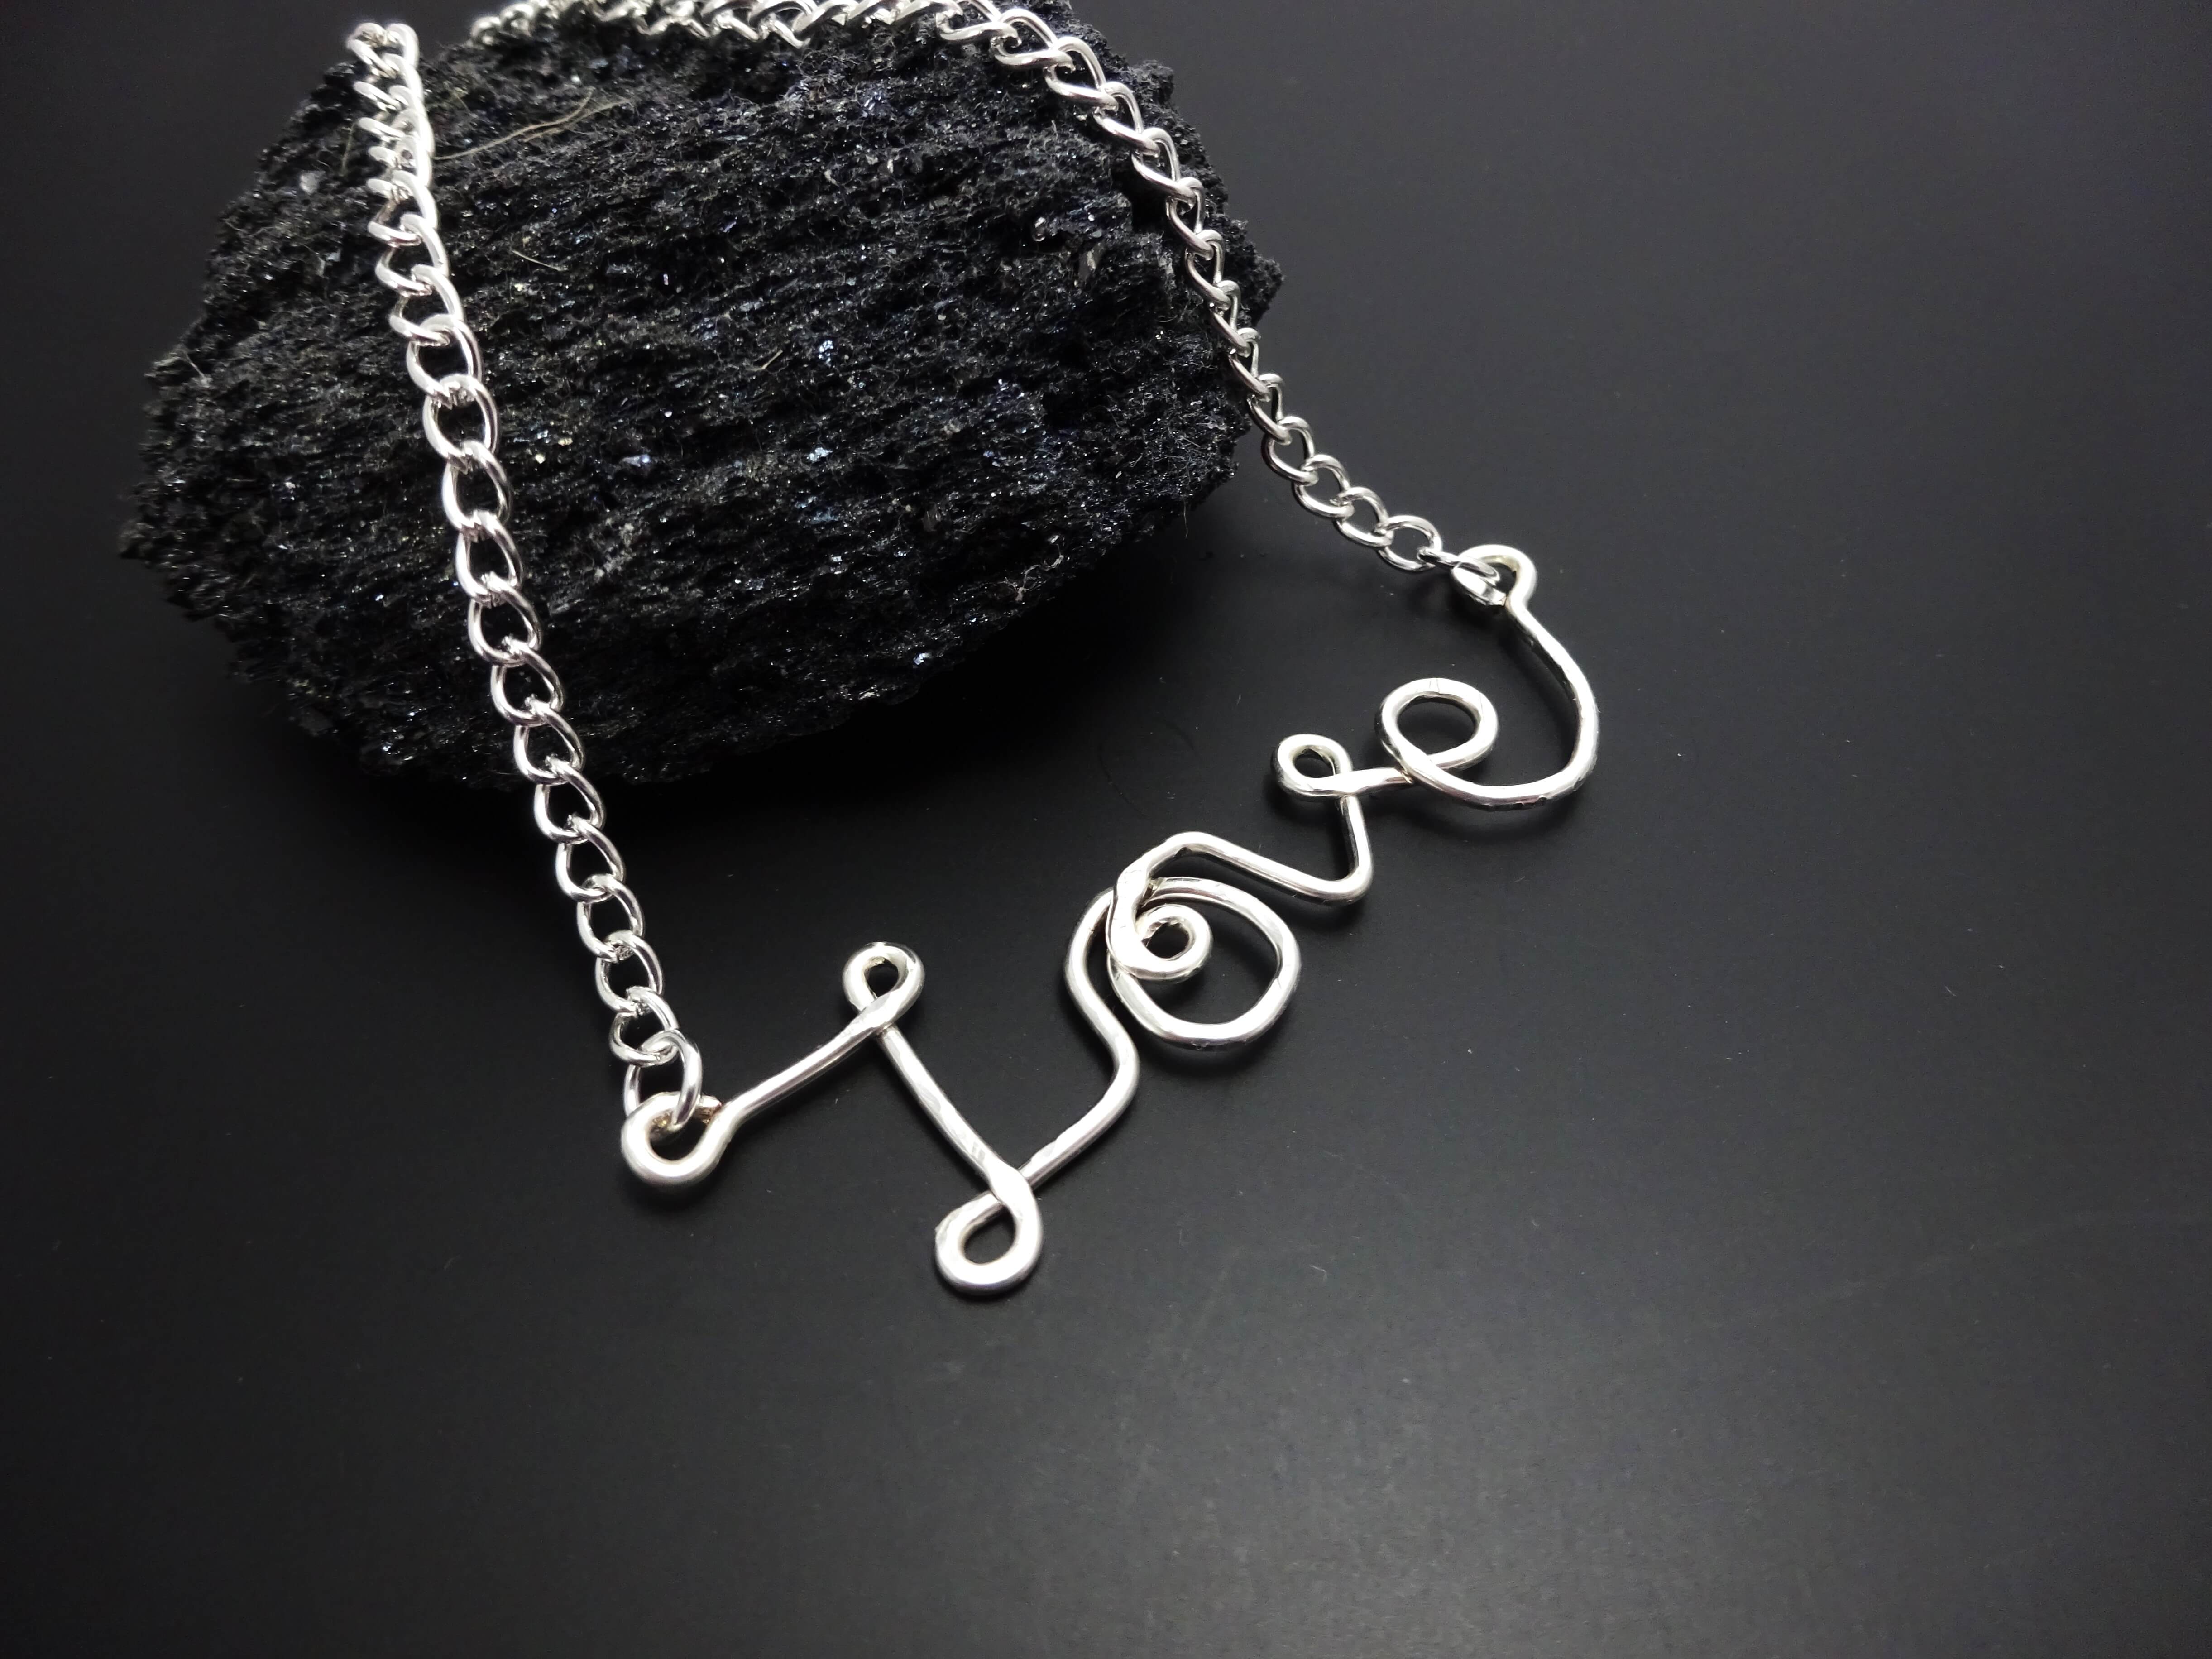
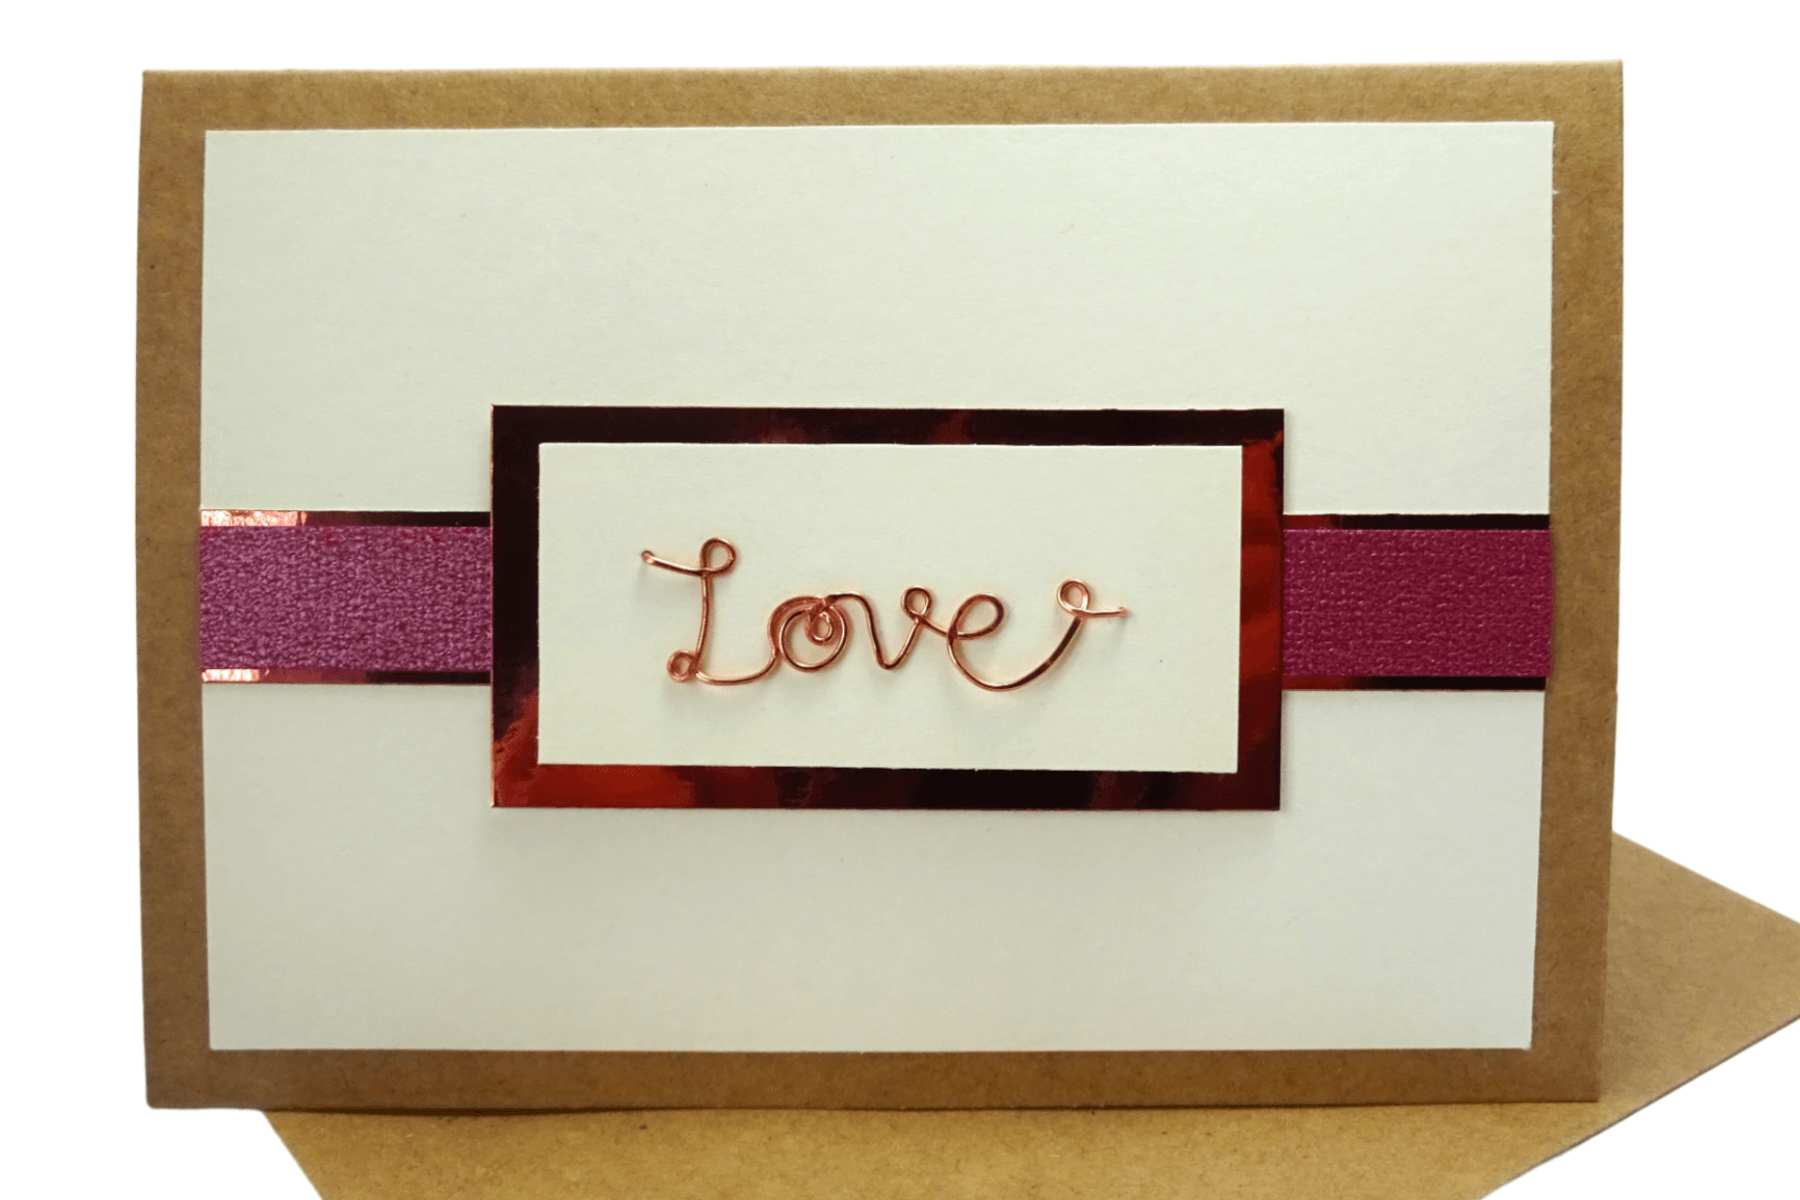
Express Love in a Unique Way: A Wire Writing Tutorial
If you’re searching for a unique and creative way to make a lasting impression, I have just the solution for you. In this wire writing tutorial, I will guide you through the steps of creating a stunning word art piece that spells out the most powerful emotion: ‘Love.’ Whether you’re a beginner or an experienced wire artist, this tutorial will equip you with the inspiration and knowledge to craft a wire creation that can be used in various forms, from jewelry making to card decorations and beyond. So, grab your wire and tools, and let’s dive into the world of wire writing to unleash your inner creativity and express love in a truly extraordinary way.
Materials Needed
To begin the process of wire writing, you will need a few materials to ensure a successful and enjoyable experience. Here is a list of the essential tools and supplies you’ll need to get started:
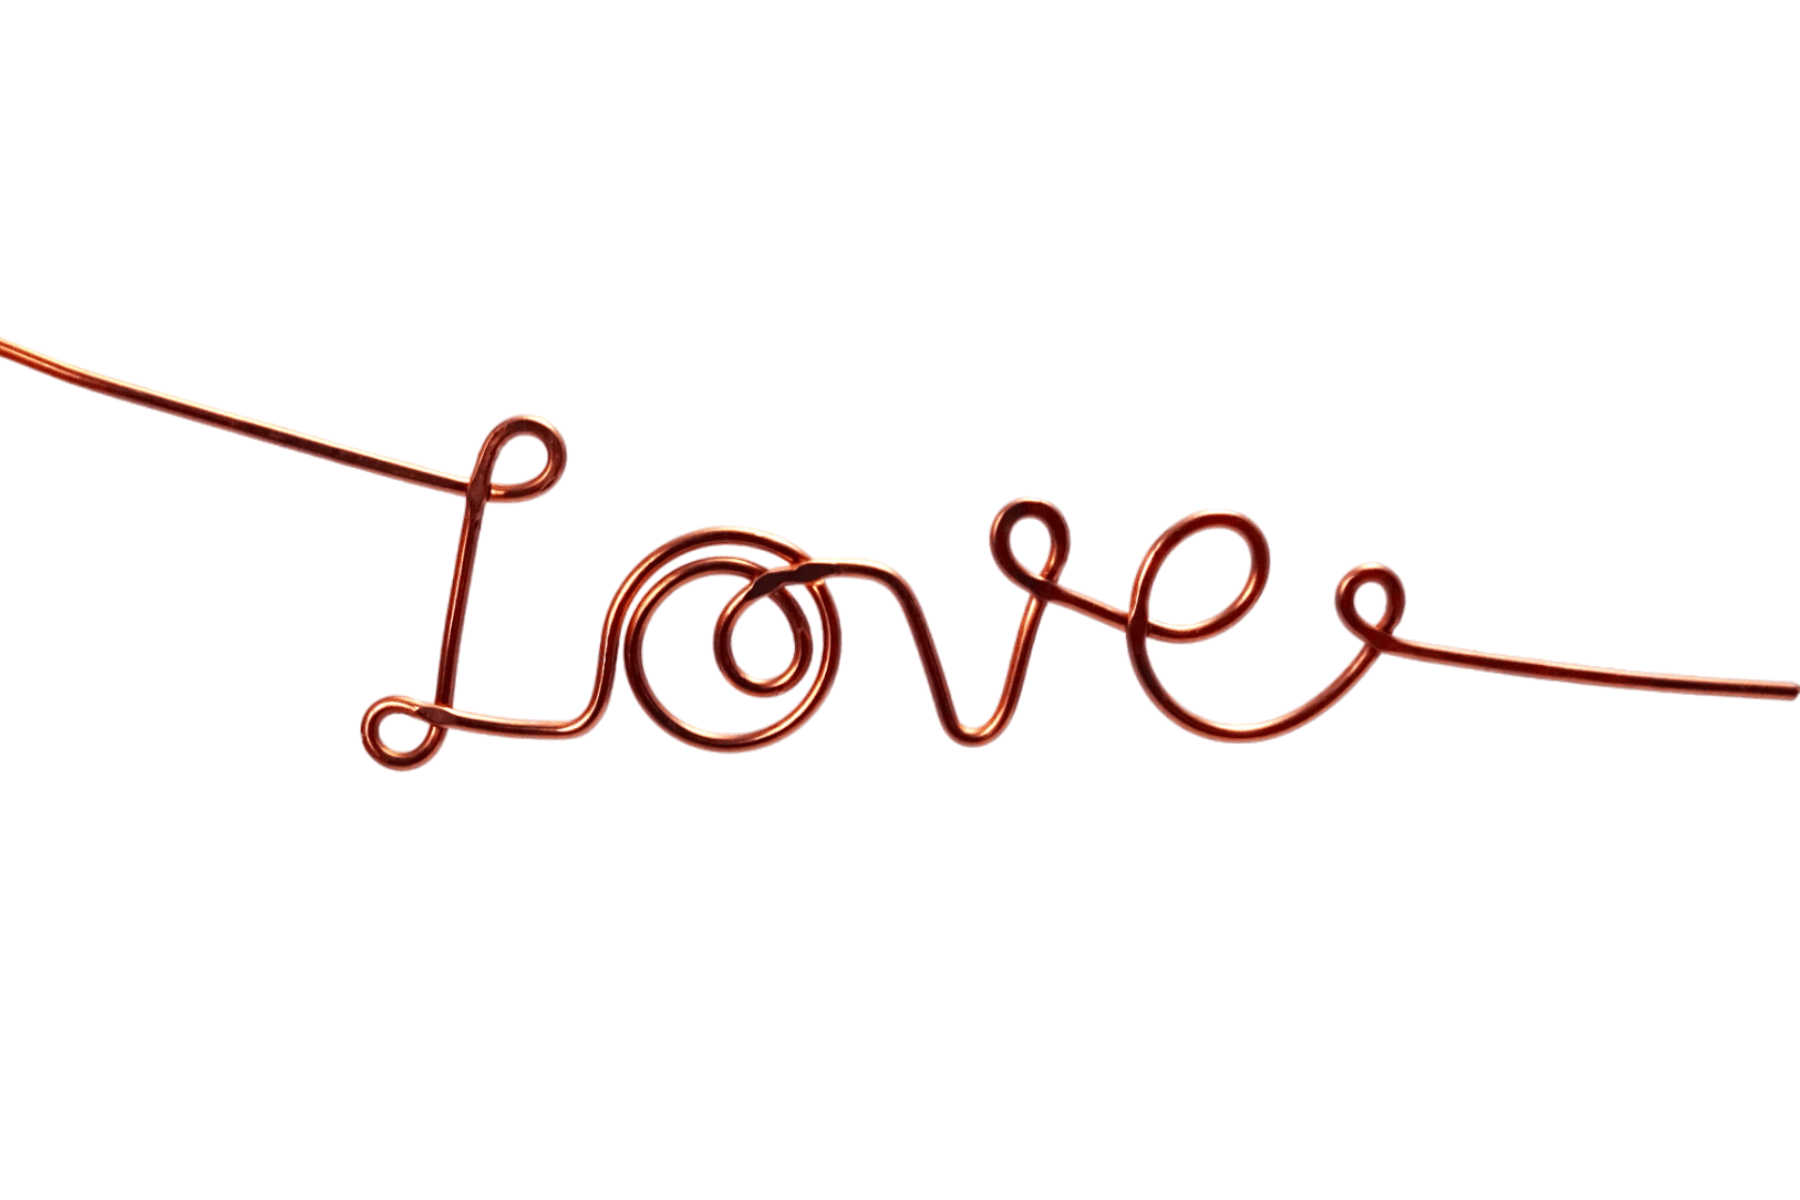
First and foremost, you’ll need wire. Look for a pliable yet sturdy wire that is easy to manipulate. A good starting point is a 20-gauge wire, but feel free to experiment with different thicknesses as you gain more confidence in your wire writing skills. For this step by step tutorial, I have used 20 gauge (0.8mm) copper wire and this is a perfect weight for card making. If you are looking to make a wire ‘Love’ pendant then 18 gauge or higher would be much more suitable.
Next, you’ll need wire cutters to trim the wire to the desired lengths. Make sure to choose a pair of wire cutters that are suitable for cutting through your chosen wire gauge.
In addition to wire cutters, a pair of round-nose pliers is essential for shaping the wire and creating intricate designs. Look for pliers with a comfortable grip and a pointed tip for precision work. I also use bail making pliers so shape the ‘o’ and ‘e’ in this tutorial and these are great as they can easily shape different and consistent sizes circles. If you don’t have bail making pliers then you can use a pencil (as shown in the YouTube video at the bottom of this post)
To smooth out any rough edges or sharp points on the wire, consider using a file or sandpaper.
You may also want a steel block and chasing hammer to flatten and strengthen your wire writing. This is especially important if you wish to make a necklace pendant as this will help hold the word in shape.
Now that you have all the necessary materials, you’re ready to embark on your wire writing journey. In the following sections, I will guide you through each step of the process, starting with preparing the wire. So, grab your wire and tools and let’s dive into the fascinating world of wire writing.
Step 1: Preparing The Wire
To ensure a smooth and successful wire writing experience, it’s important to start with the right materials and make some necessary preparations. Begin by choosing the appropriate wire for your project. Depending on your desired outcome, you can opt for a thin wire for delicate and intricate designs or a thicker wire for bolder statements. Additionally, consider the color of the wire, as it can add a unique touch to your finished piece.
Once you have selected your wire, it’s time to prepare it for shaping. Straighten the wire by gently pulling it between your fingers or using a pair of pliers, removing any kinks or bends. This step is crucial as it ensures that your letters form smoothly and maintain a consistent appearance. Take your time during this process to achieve the best results.
Next, measure and cut the wire to the desired length for your project. It’s a good practice to add a few extra inches to account for any adjustments or mistakes along the way. You can make use of wire cutters, ensuring a clean and precise cut. I use 8″ of wire in this tutorial.
With your wire straightened and cut, you’re now ready to shape the letters and bring your design to life. So let’s move on to the next step and unleash your creativity in shaping beautiful wire letters.
Step 2: How To Write ‘Love’ With Wire
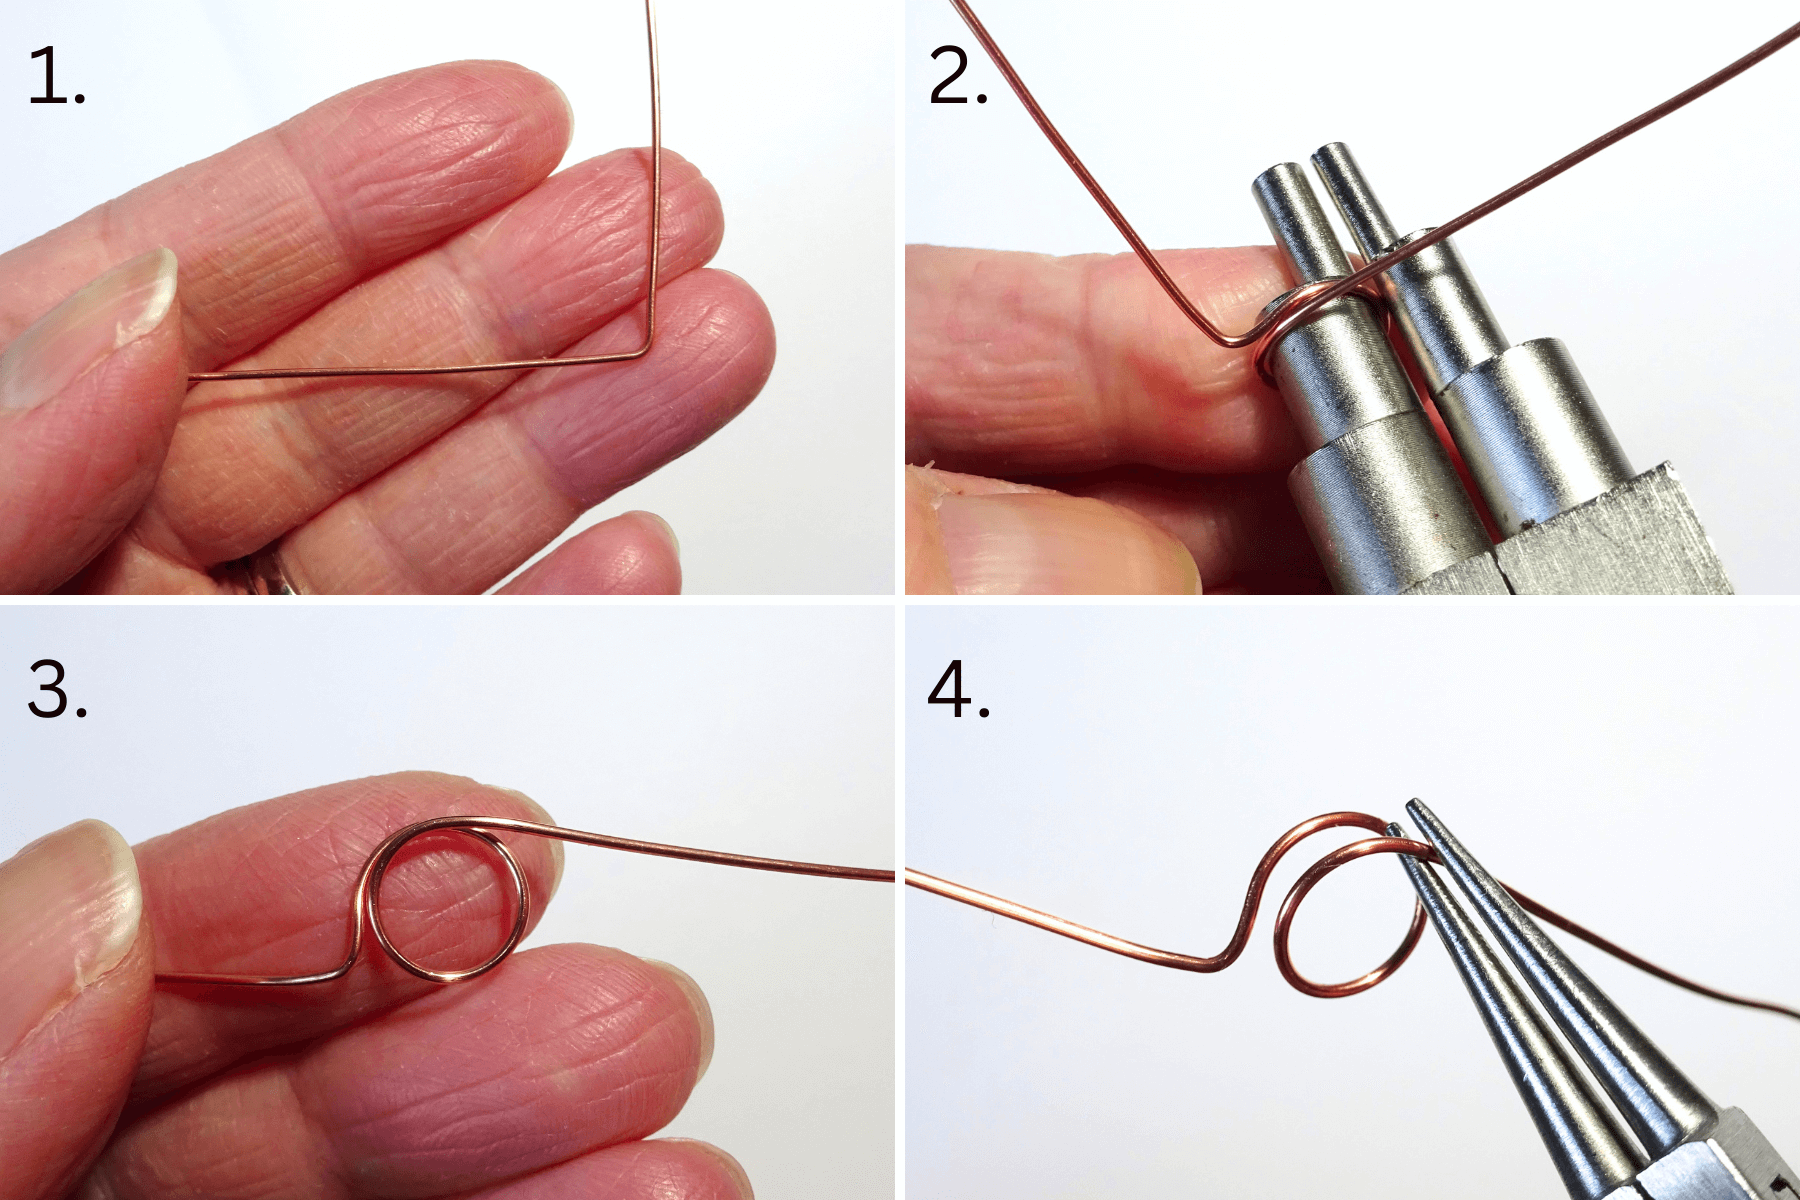
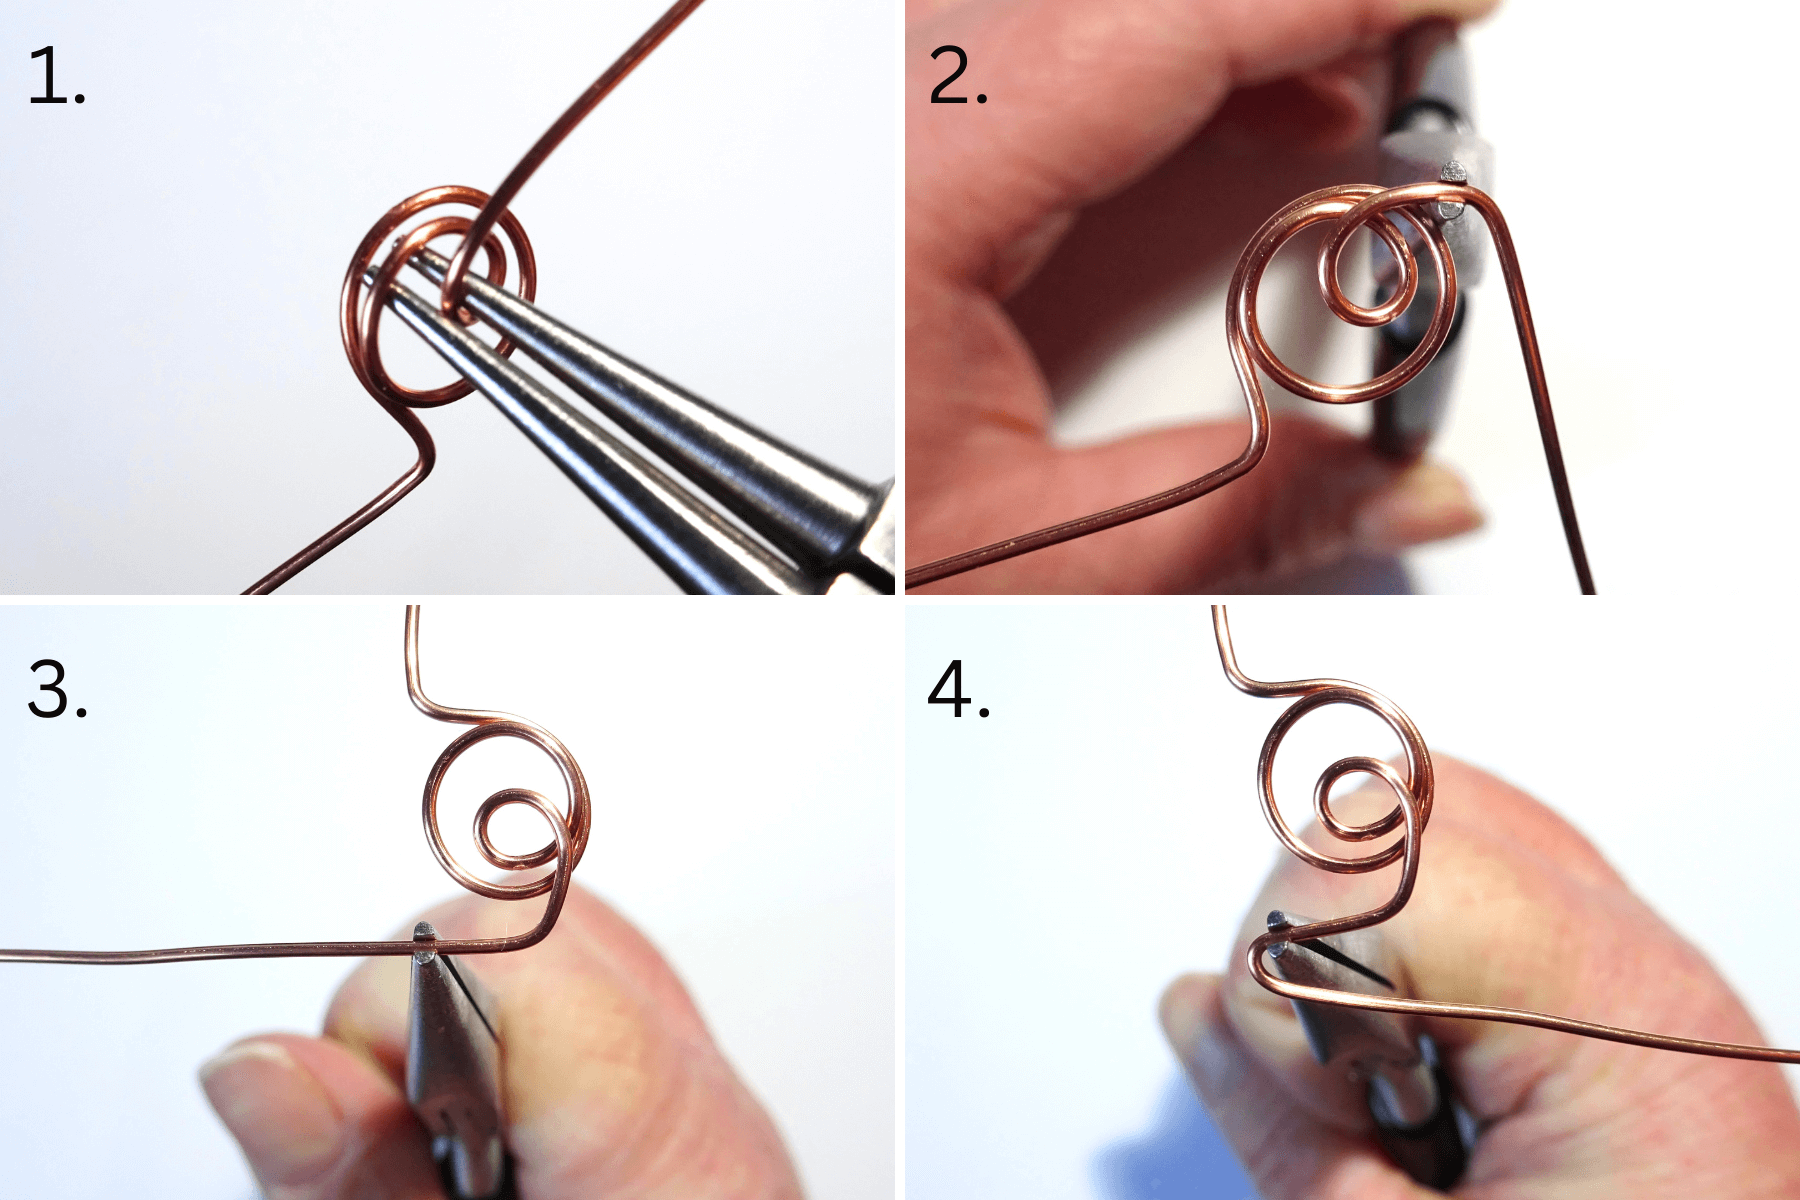
1 – With your wire cut (I have used 8″ of wire) and straightened, use your flat nose pliers to make a right angle leaving 2.5″ of wire at one end. We are going to shape the ‘o’ first so the shorter length of wire (approximately 2.5″) will be used to shape the ‘L’.
2 -Using either a pencil or bail making pliers, wrap the longer length of wire around making sure the length of wire is at the front of the ‘o’ shape.
3 – The ‘o’ is now formed and the length of wire should be sitting at the top of the shape.
4 – Pull the front section of wire forward a bit and hold the wire, at the very top of the shape, in the tip of some round nose pliers.
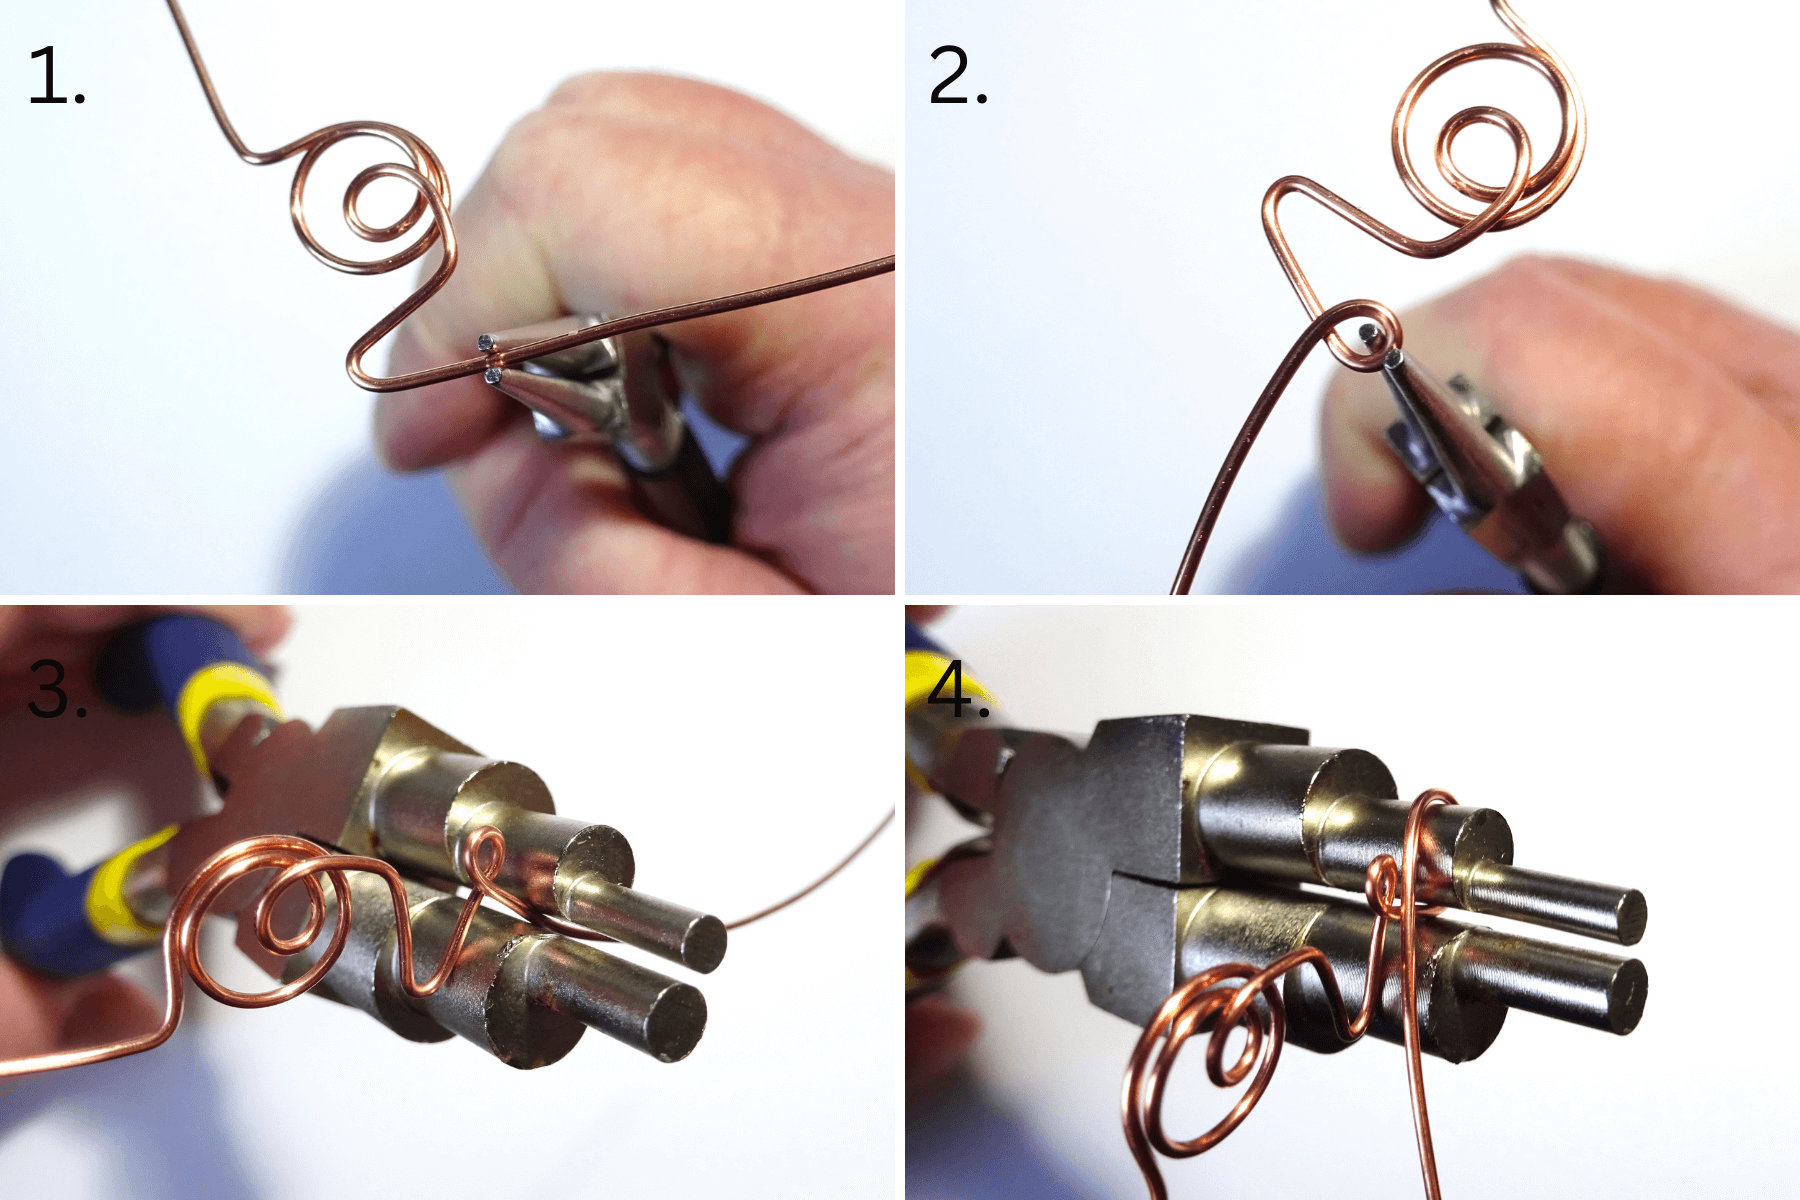
1- Wrap the wire under and over the round nose pliers to form a loop. The wire should be back to where it started from – perpendicular to the ‘o’.
2 – Hold the wire close to the ‘o’ is your flat nose pliers and bend the wire down. This is forming one half of the ‘v’.
3 – Hold the wire in your flat nose pliers again roughly level with the bottom of the ‘o’.
4 – Keeping the flat nose pliers in place, bend the wire back up to form the other side of the ‘v’.
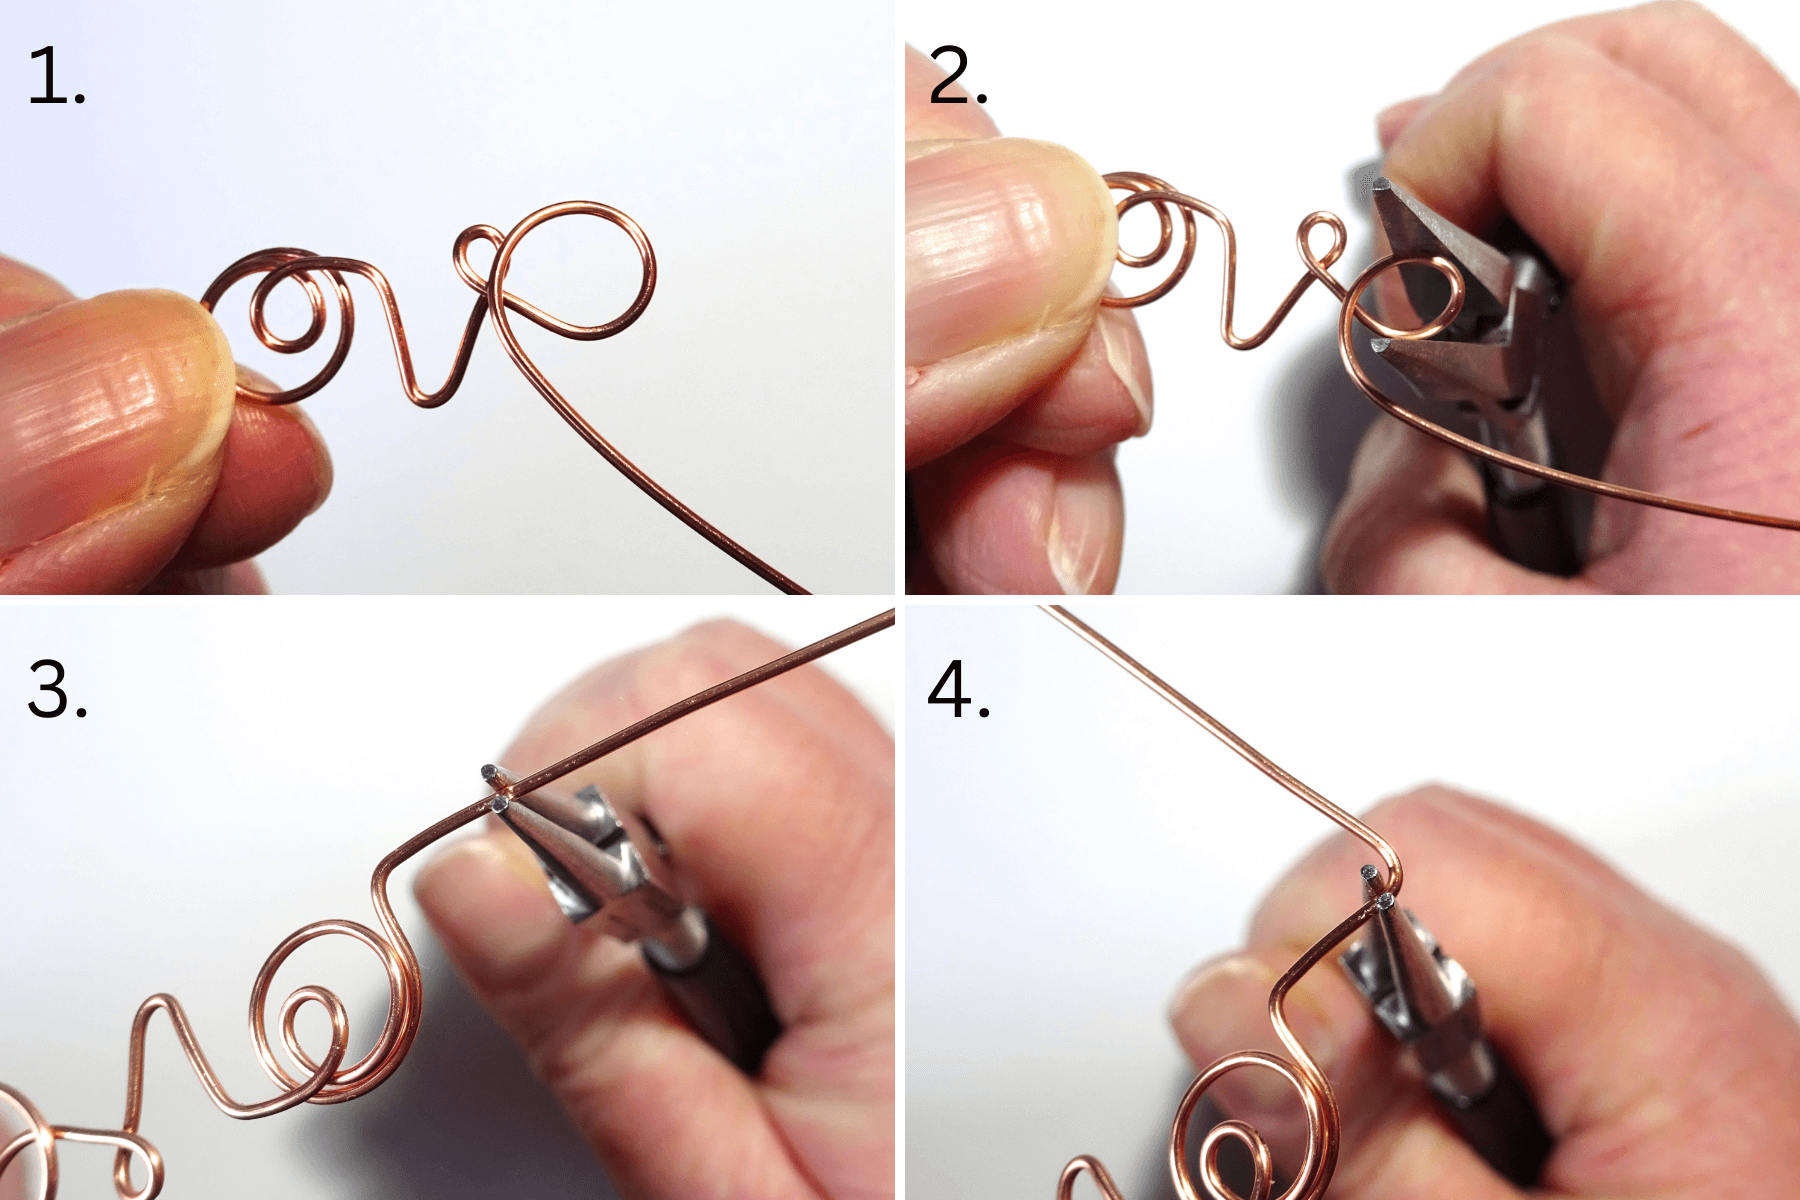
1- Hold the wire in your round nose pliers level with the top of the ‘v’ on the other side.
2 – Bend the wire back towards the formed letters and then continue to bend the wire around the round nose pliers so that a loop is formed at the top of the ‘v’.
3 – Position the wire, close to the ‘v’, in your bail making pliers again (I used a slightly smaller shape for this) or use the pencil again.
4 – Wrap the wire around the shape, moving up and over towards the letters first before looping under.
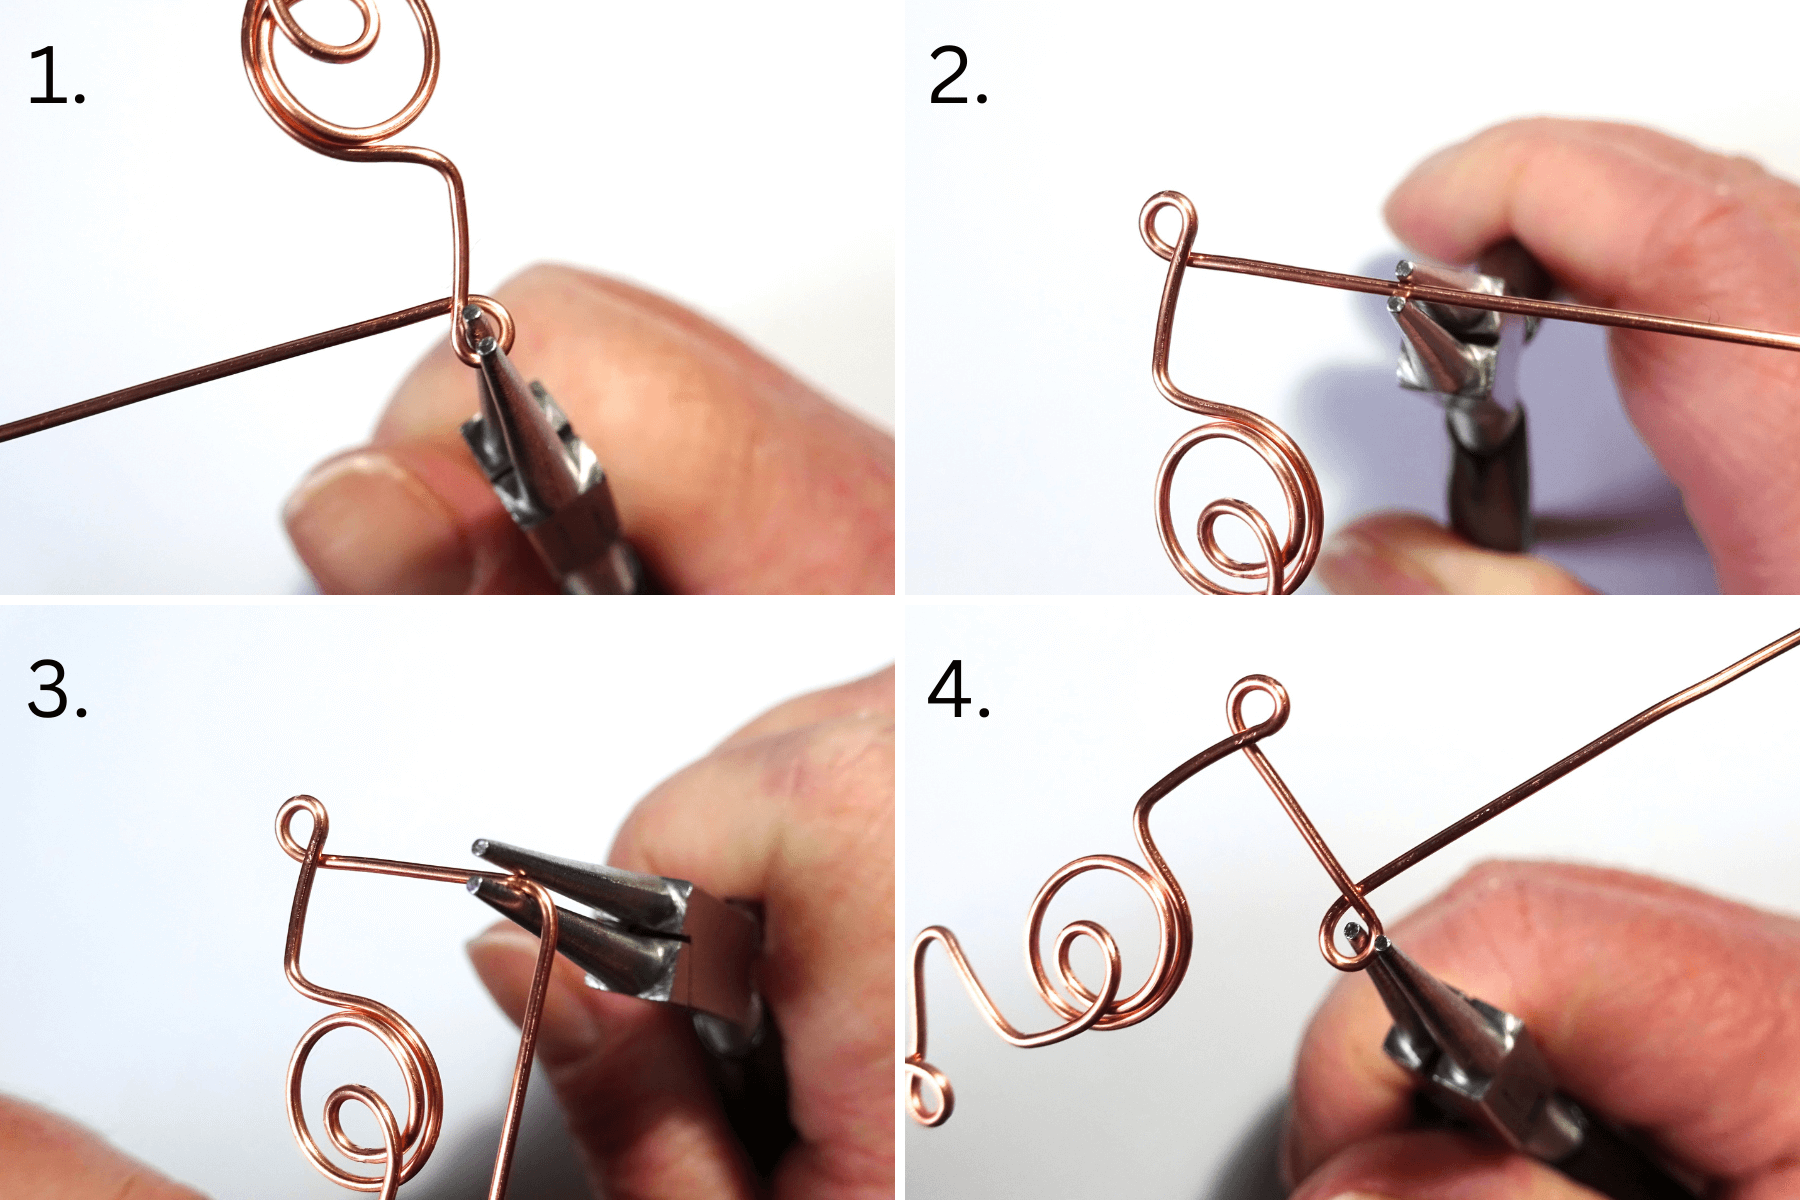
1 – Remover your pliers or pencil and you will now have the rough shape of the ‘e’.
2 – Using your flat nose pliers, gently squash the round shape to form the ‘e’.
3 – Now that the ‘o’, ‘v’ and ‘e’ are formed we are returning to the length of wire that was left at the beginning. Position your round nose pliers on this wire, carefully positioning them so that you leave enough room for the bottom part of your ‘L’.
4 – Bend the wire down.
1 – Wrap the wire around the round nose pliers moving towards the formed letters and then up to form the upright part of the ‘L’.
2 – Hold the wire with your round nose pliers at the top of where you would like your ‘L’ to be.
3 – Bend the wire forwards.
4 – Wrap the wire around your round nose pliers by moving the wire down towards the letters before continuing round so the the wire is at the front of the ‘L’.
Once you’ve shaped all the letters, take a step back and admire your work. You’ve brought your design to life, and the wire now embodies the love and sentiment you seek to convey. In the next step, we’ll look at how to add some decorative elements to further enhance the beauty and personal touch of your wire writing masterpiece. So, let’s continue on and discover how to elevate your creation to the next level.
Step 3: Adding Decorative Elements
In this section, we’ll look at how to add some decorative elements to further enhance the beauty and personal touch of your wire writing masterpiece. By incorporating these elements, you can elevate your creation to the next level and make it truly unique. Whether it’s delicate swirls, tiny hearts, or flower motifs, these decorative additions will infuse your wire writing with charm and personality.
The key to adding decorative elements is to ensure they complement the overall design without overpowering it. It’s all about striking a balance between simplicity and intricacy. By carefully selecting the right decorative elements and incorporating them in strategic places, you can enhance the visual appeal of your wire writing without detracting from its core message of love and affection.
Consider the size and scale of your decorative elements in relation to the letters. You want them to be noticeable but not overwhelming, so they harmoniously integrate into the overall composition. Play around with different shapes and sizes until you find the perfect balance that resonates with your artistic vision.
Remember, these decorative elements should be an extension of your personal style and taste. Feel free to experiment and explore different ideas. Perhaps you want to incorporate gemstones or colorful beads to add a touch of sparkle and vibrancy. Or maybe you prefer a more minimalistic approach with subtle twists and turns of the wire. The choice is yours, and it’s what will make your wire writing truly one-of-a-kind.
Step 4: Finishing Touches
One option to consider is adding delicate loops or swirls to certain letters in your wire writing. This can create a whimsical and romantic effect, adding an extra element of charm to your design. Experiment with different sizes and shapes of loops to find what resonates with your personal style. The key here is not to overcrowd the letters but to add just enough loops to enhance the overall aesthetic.
Another technique to consider is adding a touch of color to your wire writing. You can achieve this by incorporating colored wire or beads. This can create a visually striking contrast against the metallic wire and bring an extra dimension to your creation. Choose colors that resonate with the message you want to convey, whether it’s a soft pastel palette for a gentle expression of love or bold, vibrant hues for a more passionate statement.
Furthermore, don’t be afraid to experiment with different wire thicknesses. Thicker wire can add strength and boldness to your wire writing, while thinner wire can create a delicate and intricate look. Remember, the wire is your artistic medium, so play around with different possibilities to find the perfect balance for your expression of love.
Lastly, consider adding a special finishing touch such as a small charm or trinket that holds significance to your relationship or to the person you’re expressing love to. Whether it’s a heart-shaped charm, a birthstone, or a meaningful symbol, this extra detail can add an extra layer of sentimental value to your wire writing masterpiece.
Before we conclude, let’s take a moment to reflect on the personal journey you embarked on while creating this unique expression of love.
In this wire writing tutorial, we have explored the creative and unique ways to express love. From preparing the wire to shaping the letters and adding decorative elements, we have provided a step-by-step guide for you to create a stunning wire ‘Love’ piece. Now equipped with the basics of wire writing, it’s time for you to unleash your creativity and let your love shine through your handmade creation.
Whether you choose to make jewelry, decorate cards, or create wall art, the possibilities are truly endless. Imagine the joy your loved one will feel when they receive a heartfelt gift made with your own hands. The beauty of wire writing lies in its versatility and personal touch, capturing the essence of your love in a truly memorable way.
So, gather your wire and tools, and let your imagination take flight. Follow the steps outlined in this tutorial and bring your unique expression of love to life. Remember, there are no limits to what you can create. Your handmade wire ‘Love’ creation will not only be a testament to your artistic abilities but also a reminder of the depth of your affection.


That looks great! It looks hard to shape them too. I’ve tried it before but I cannot get it to look nice especially when it comes to curving or bending it.
Thank you. Shaping the silver plated wire was much harder than the copper. The copper is so soft it’s lovely to work with. I 100% need the right tools to help shape the wire as it’s the only way I can get a nice finish