

I was full of cold the other week and struggling to concentrate on anything. Well, anything beyond the idea of making a polymer clay ring dish with a fancy edge and a moon and stars pattern. This thought had been swirling around my brain for a week or so. Every time I thought I would sit and make it, the demands of other things took over. Being unwell meant I was moving a lot slower so I took the opportunity to roll with it and make my idea a reality.
This is less of a rigid tutorial and more me just showing and talking about what I did and discussing what worked and what didn’t. Working this way gave me greater creative freedom as I didn’t plan it all out perfectly and I loved it.
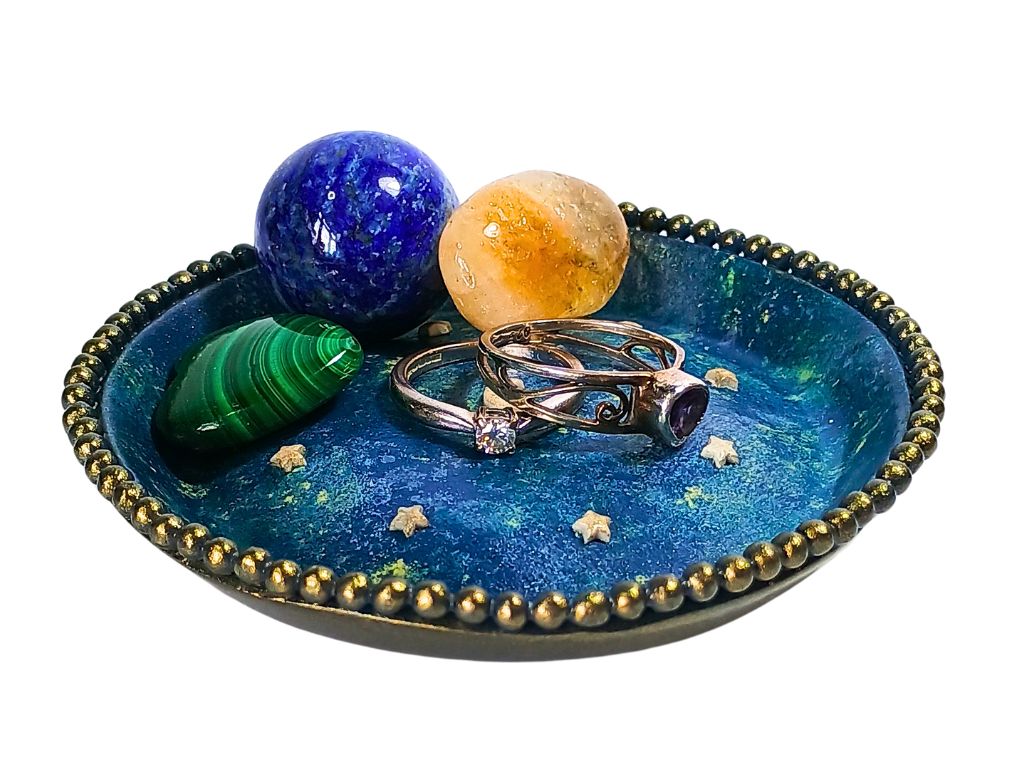
Adding Feet to the Polymer Clay Ring Dish
I had the idea that I wanted to make a ring dish that had little feet. My clay was very crumbly so I worked hard to condition it enough and I added plenty of clay thinner. The result was that my clay got maybe a little too soft and during baking the clay has bowed up in the centre. I am still not sure how or why this happened with the feet added but it is something to keep in mind for future projects.
To make my feet, I simply rolled small balls of clay and added them. I started with 4 and then added two more because I was unsure about the 4 holding the dish up. I think it would be fun, next time I make a ring dish, to maybe add larger feet. Something really playful and maybe a little silly. See how it makes the finished dish look and feel.
Adding feet to the dish has made the overall feel of it far more substantial which I like.

Adding Colour to the Polymer Clay Ring Dish
The base clay in this dish is a shade of mid blue. I wanted to add speckles of colour so that it wasn’t just one shade of blue. I also knew that I was going to add the moon and stars so making the background like a colourful night sky seemed an option. I also wanted to add yellow to contrast with the blue as an eye catching detail and to lift the overall tone of the piece.
To add this night sky detail I carefully scraped chalk over the surface of the clay being careful to move around with each colour so it was evenly covering the clay. I then lightly rolled it and pressed it down/ moved it around a little with my finger to help it adhere more to the clay.
The gold finish is a very healthy dusting of Perfect Pearls in Heirloom Gold. It covers the underneath of the whole dish and along the decorative edge.

Adding Details to the Polymer Clay Ring Dish
I wanted my dish to look a little bit fancy. A little different from a basic ring dish so I added the decorative edge using little balls of clay. I added a little bit of liquid clay to the edge of the dish before adding them which made the whole thing a lot harder! I hoped that the liquid clay would give a nice firm bond once the dish had been in the oven (and it has) but the little balls of clay kept sliding off. I had to remove any excess liquid clay before they would stick down.
I also added the moon and stars to the centre with liquid clay but this was far less problematic. These stars and moon were left over from another project. They were cut out some time ago and so the clay was quite dry. The chalk on the clay dish would also have meant that they would not have stuck down well so a little liquid clay under each one was an absolute necessity.
Moon and Stars Polymer Clay Ring Dish
Let me know, is this style of post still enjoyable and helpful as a tutorial?
I’m off to plan my next polymer clay project. I will maybe finish off my crystal and clay wands that I’ve been meaning to make for the past year!
Thanks for reading,
Hannah x


This turned out so pretty.
Love the blue sky background an stars.
Thank you so much. The background turned out so much better than I thought it would. I was so worried that the first coat of varnish had ruined it but once it dried it looked so good.
Dear Hannah, I really enjoy your posts and tutorials, so please continue to publish them. I love your work both with polymer clay and beads. Kind regards, Ellie Brands from Eindhoven, the Netherlands
Hello Ellie, thank you so much for such a lovely comment. I am so glad that you enjoy both my beaded and polymer clay work. I have so many ideas at the moment so I’m trying to find time to get them all out and into reality! It is so exciting to me that people from all over the world read my blog (I am in England) and that it links me with people who I would never get to chat to otherwise. Best wishes, Hannah x