

Well, at risk of boring everyone I’m back with another Alcohol Ink project. I wanted to play around a little more to see what else I could do so pulled out stencils and rubber stamps this time.
Crafty stash used:
- Ranger/Tim Holtz Alcohol Ink in various colours plus blending solution
- White tile
- Yupo paper
- Hero Arts musical note stamp
- Tim Holtz stencil – Bubble
- Ranger Stickles – I used Crystal, Gold and Cotton Candy but only because they are the only ones I have
- Dovecraft alphabet stamp
- Sizzix embossing folder with dots on
- Ranger Archival ink pad in Jet Black
- Black permanent pen (I used a Promarker)
- Free flower punch
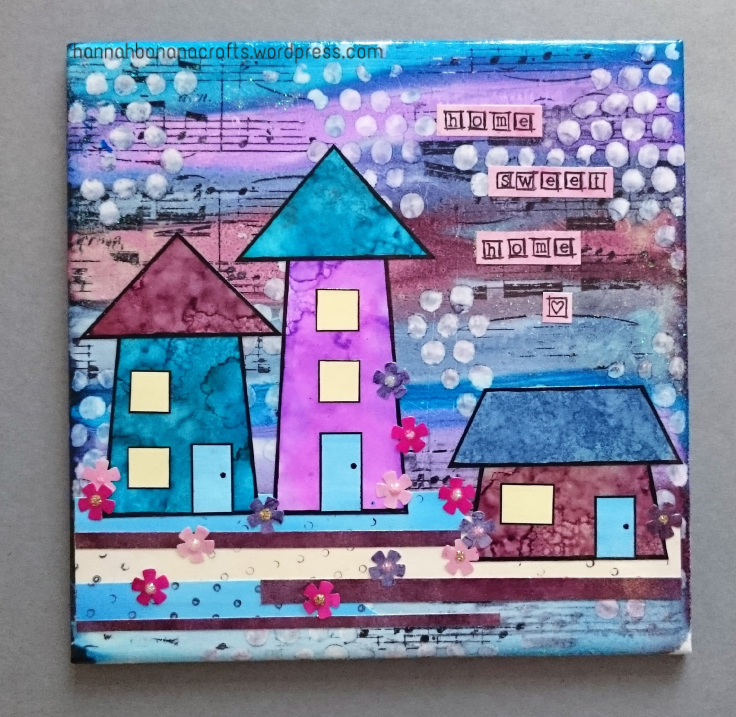
I started by holding the tile at an angle and squeezing various colours of alcohol ink onto the raised end of the tile. Once I had ink dribbling down the tile I squirted on some of the blending solution, at the raised edge, to help get the inks moving and blending. I carried on this way, playing mostly, until I had a result that I liked. I wish now that I had taken photos of the process as it was so much fun but looked quite unpromising at times.
When the inks were dry I randomly stamped the musical notes. I wanted to create more texture so used a cotton bud, dipped in blending solution, to wipe the tile through the stencil creating the white dots. I wasn’t too worried about removing all of the ink from these spots as I didn’t want it looking too perfect.
I drew the house shapes on the yupo paper (house and roof are separate and glued together), inked them with the alcohol ink, cut out and drew the heavy black line around them as they disappeared into the back ground too much. The doors, windows, flowers and ground pieces were made a similar way but for the ground I inked up one half of the embossing folders with the archival ink to add the small dots. The flowers have a dot of stickles in the centre. I stamped the ‘Home Sweet Home’ on some pink yupo and cut out.
Once I had all the components ready I used Ranger Gloss Multi-Medium to stick it all down, adding a final coat of glue over the whole tile to seal in the inks. Careful not to brush too heavily as the inks will come off the tile. I decided that it still wasn’t glossy enough so I finished with a coat of Deco Art Dura Clear Gloss Varnish. To be honest I had no idea if the glue and varnish would work but I had them in my stash so figured there was no harm in trying.
It’s turned into a bit of a ramble but thought I would go to the effort of explaining this tile as it may not be self explanatory.
Hannah x


Looks like fun! You are so creative! 🙂
Thank you. I mostly splodge stuff around until I like what I have 🙂
Ooh, I like that word, splodge!!! Do you mind if I create an imaginary bird with it?! I’ll reference your blog! 😄🐦
Ha ha, not at all. I look forward to seeing the result 😃🎨🐦