

This post contains affiliate links. All affiliate links are clearly marked.

I used to be really daunted by bead weaving. I would look longingly in bead shops at the rows and rows of colourful seed beads and feel like an imposter because I had no idea how to use them and how to get the most out of them. Then one day, whilst on holiday, I found myself in the most amazing jewellery making shop and I found those tubes of seed beads were calling out to me once more. Perhaps it was because I was on holiday, but my fear dissolved (I think my mentality here was that it’s nice to take souvenirs home from holiday and beads make me happy, so they make the most perfect holiday memory). My hands were soon full with the most delicious looking colours and I made my way giddily to the till. On the way I picked up some basic beading thread and needles. I was ready to go……..
So, why this trip down memory lane? Well, several years later and I still have some of these beads left (Ok, I lie, I visited the same shop again a year later and made sure to stock up!) and when I started to think about photographing and writing this blog post my hands landed on those enticing, colourful bead tubes and I got a little nostalgic for beach holidays in the sun. I think my choice of pastel colours for these peyote triangle earrings is my desperate attempt to wipe away the British winter and welcome in spring.
I have chosen to work with size 11 seed beads with a similar finish so that the sizes are consistent. The bead tubes do not show a specific brand but after a look online they appear to be Matsuno seed beads. Size 11 is my favourite size of bead for this as they are not too fiddly to work with but are not so big that they make earrings that little bit too bulky. I also recommend a good thread. I find some of the cheaper ones more difficult to use as they don’t hold the shape of the beadwork particularly well. I have linked my favourite beading thread after the tutorial (affiliate link)
Peyote triangles are such great stitch; You can play around with colours and alter the arrangement of bead colours within the triangles to get totally different results. To make a larger Peyote triangle just keep adding beads but also keep them dainty by adding less. It is also a really easy stitch as once you have figured out the basics it is the same steps repeated over and over.
I have taken this Peyote triangle stitch further and made it into a Peyote stitch triangle with twisted rope necklace. This necklace tutorial takes you from basic Peyote triangle and shows how to join them together to form a necklace all topped off with a two strand twisted rope.
I have added my YouTube at the end of this post so if there is anything in my pictures that is unclear then the video may make it easier to understand 🙂
Before you jump into the tutorial, I have a Peyote triangle rabbit with flowers pattern over on my Etsy shop so once you have mastered the basics you can hop over to check it out (did you see what I did there? Hop over….)
How To Make Peyote Triangle Earrings

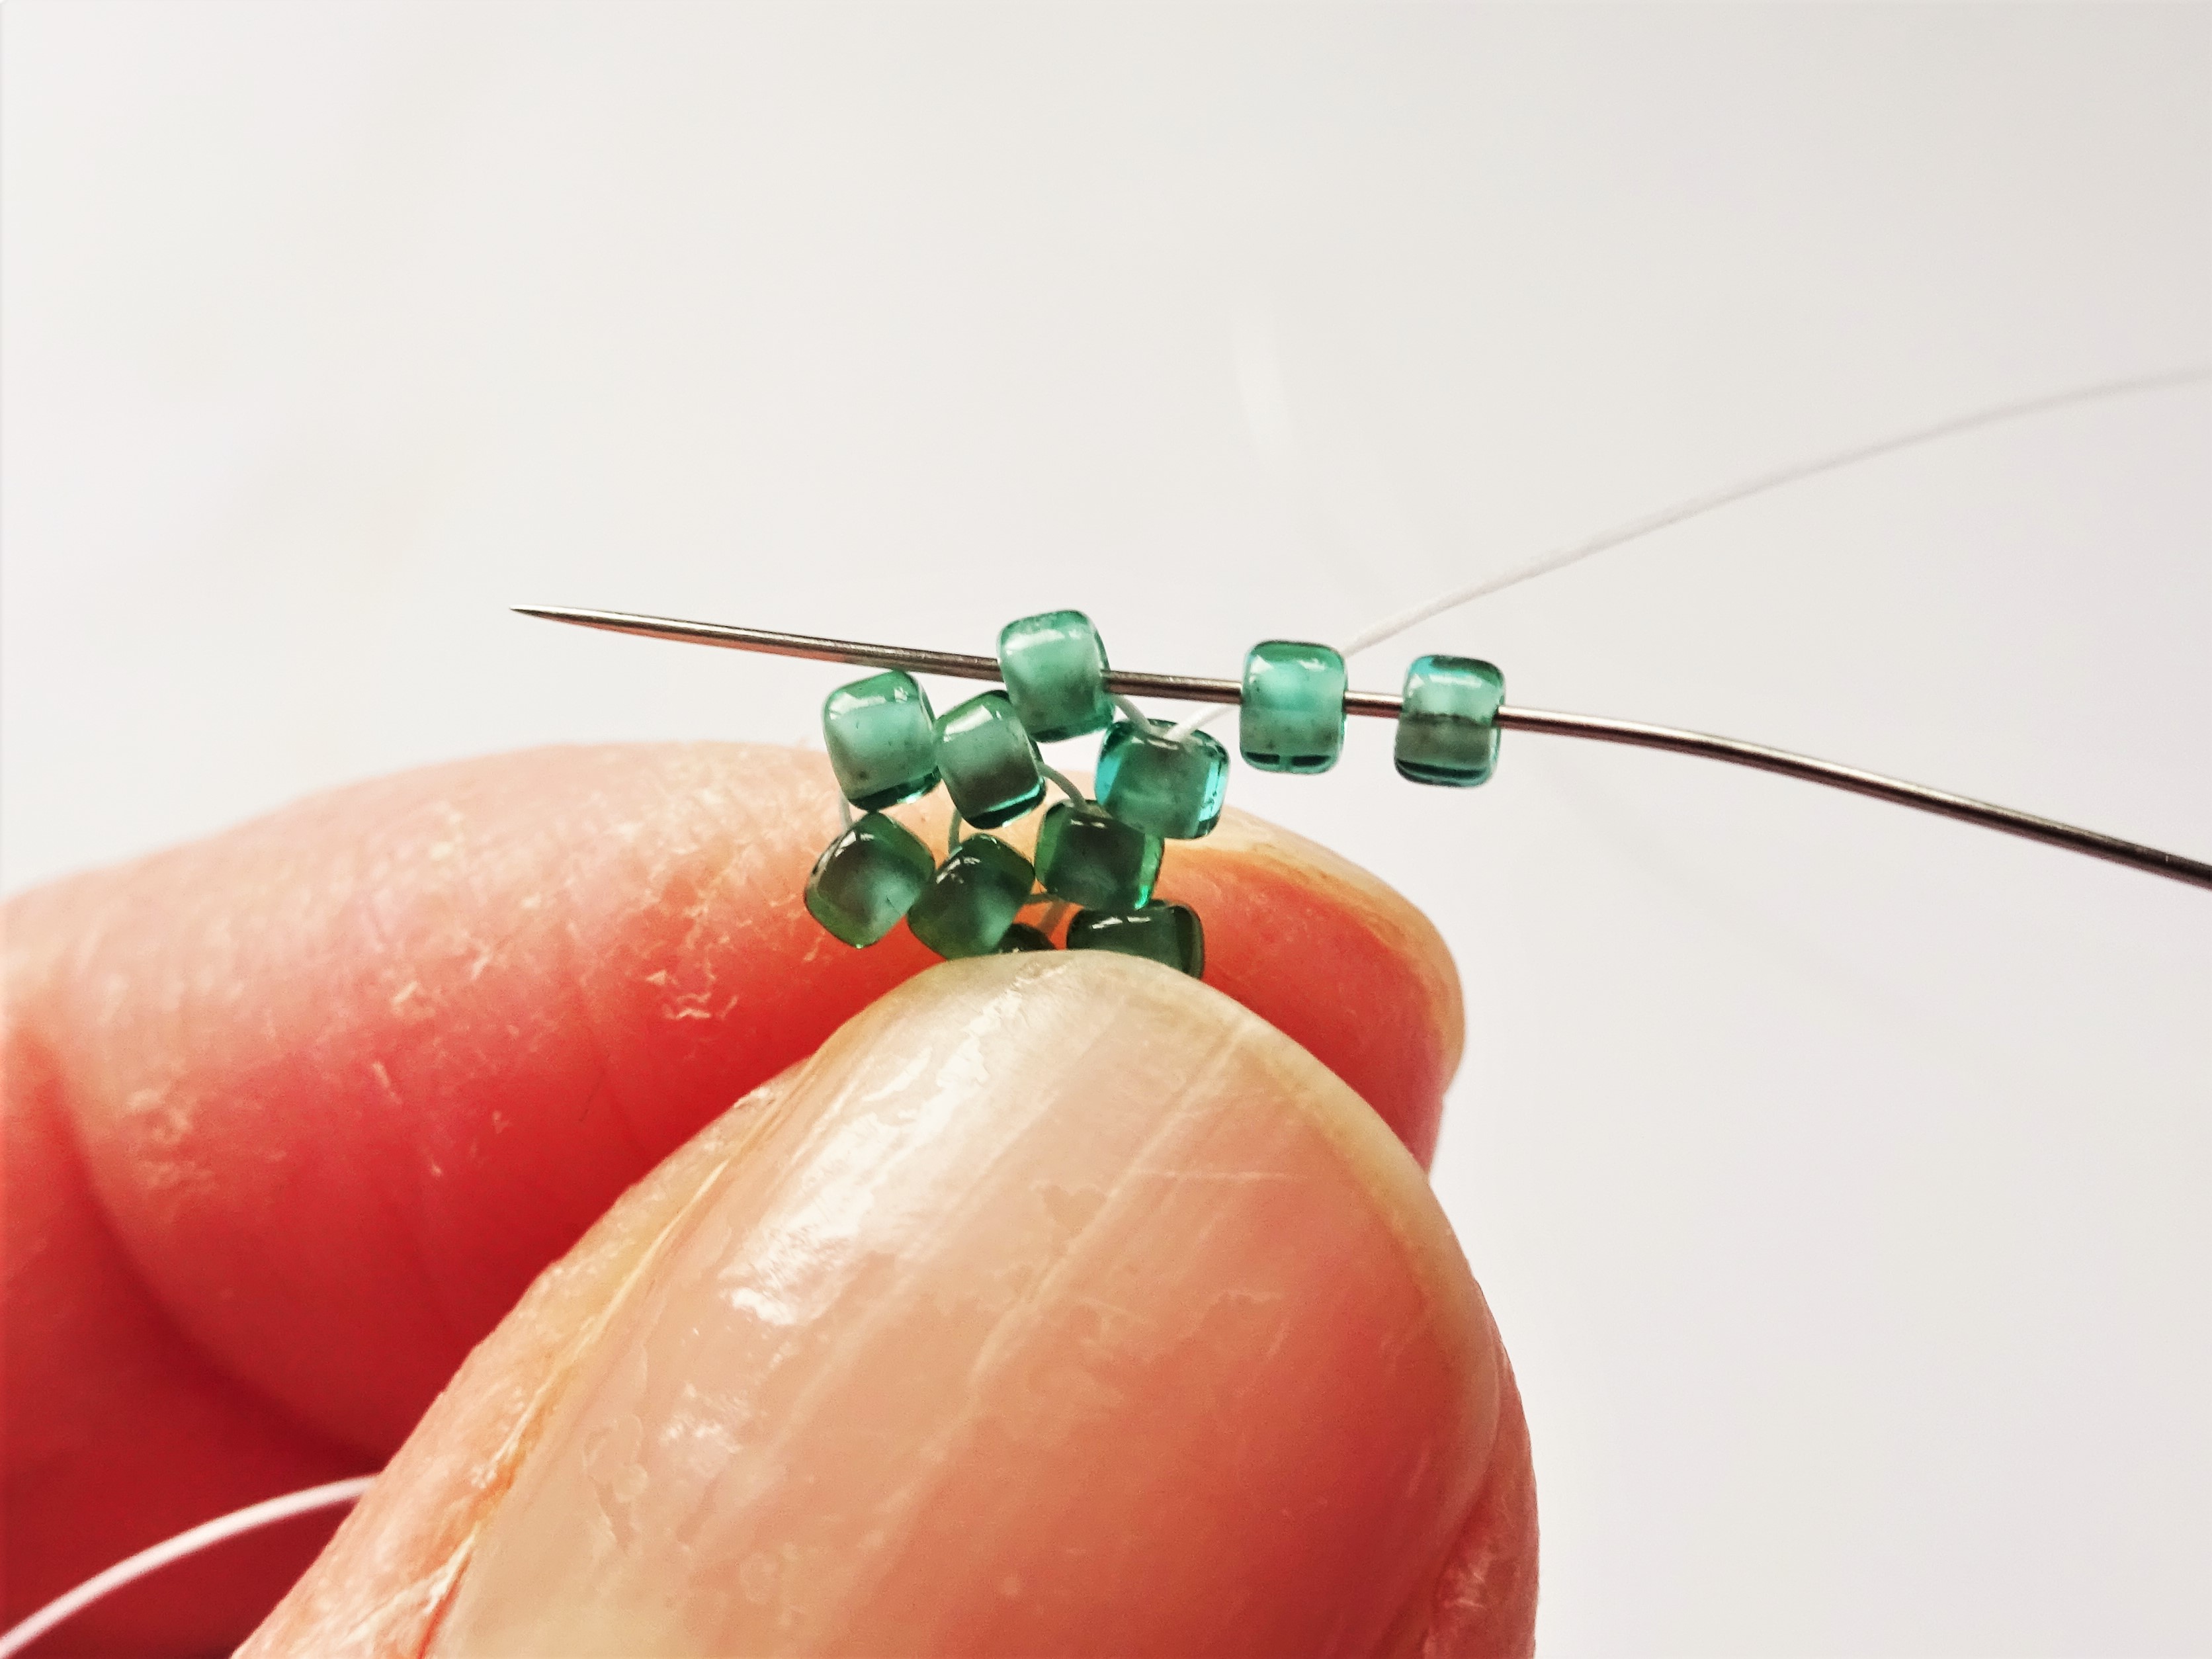
- Cut yourself just over half an arm span of beading thread and add a needle onto one end. Pick up 3 green beads (or whichever colour you have chosen for your centre colour). Take the needle back through the first bead added again to pull the bead together so that they form a triangle. Make sure to leave a tail thread at the end of the beading that can be weaved in and knotted at the end once the Peyote triangle is finished.


2. Pick up two more green beads and take the needle into the next green bead in the triangle. Pull the thread through so that the two new beads are sitting on top of the two beads below it.


3. Pick up a further two beads and take the needle into the next green bead along in the triangle of beads. Pull the thread through so the beads sit firmly on the lower layer of beads.


4. Repeat step 3 again by picking up two more green beads and take the needle into the next green bead along (on the inner green triangle). Next, take your needle up into the green bead that is sitting directly on top of the bead that the thread is exiting from. This step takes the needle and thread up to the next level of beading.

5. As before, pick up two more green beads and take the needle into the next green bead along. Pull the thread tight and pick up a pink bead. Take the needle into the next green bead along. The pink bead fills in the gap between the green sections.

6. Repeat steps 5 on the second side of the triangle by picking up 2 green beads and then filling in the space between with the pink beads with the needle exiting out of the green bead at the end of the row.

7. Repeat step 5 again for the third and final side of the triangle. On this side only, once the pink bead is added make sure the needle goes through the second to last green bead instead of the bead on top.

8. To begin a new row of beading, take the needle up through the bead directly above where the thread is exiting from and pick up two green beads. Take the needle into the next green bead along.

9. Pick up a pink bead and take the needle into the pink bead already weaved into the triangle (added in step 5). Pick up another pink bead and take the needle into the next, top green bead along.

10. Repeat steps 8 and 9 again on the second side of the triangle.


11. Repeat steps 8 and 9 again on the third side of the triangle making sure that once the second pink bead is added that the needle goes into the second lowest green bead and then up into the top green bead.


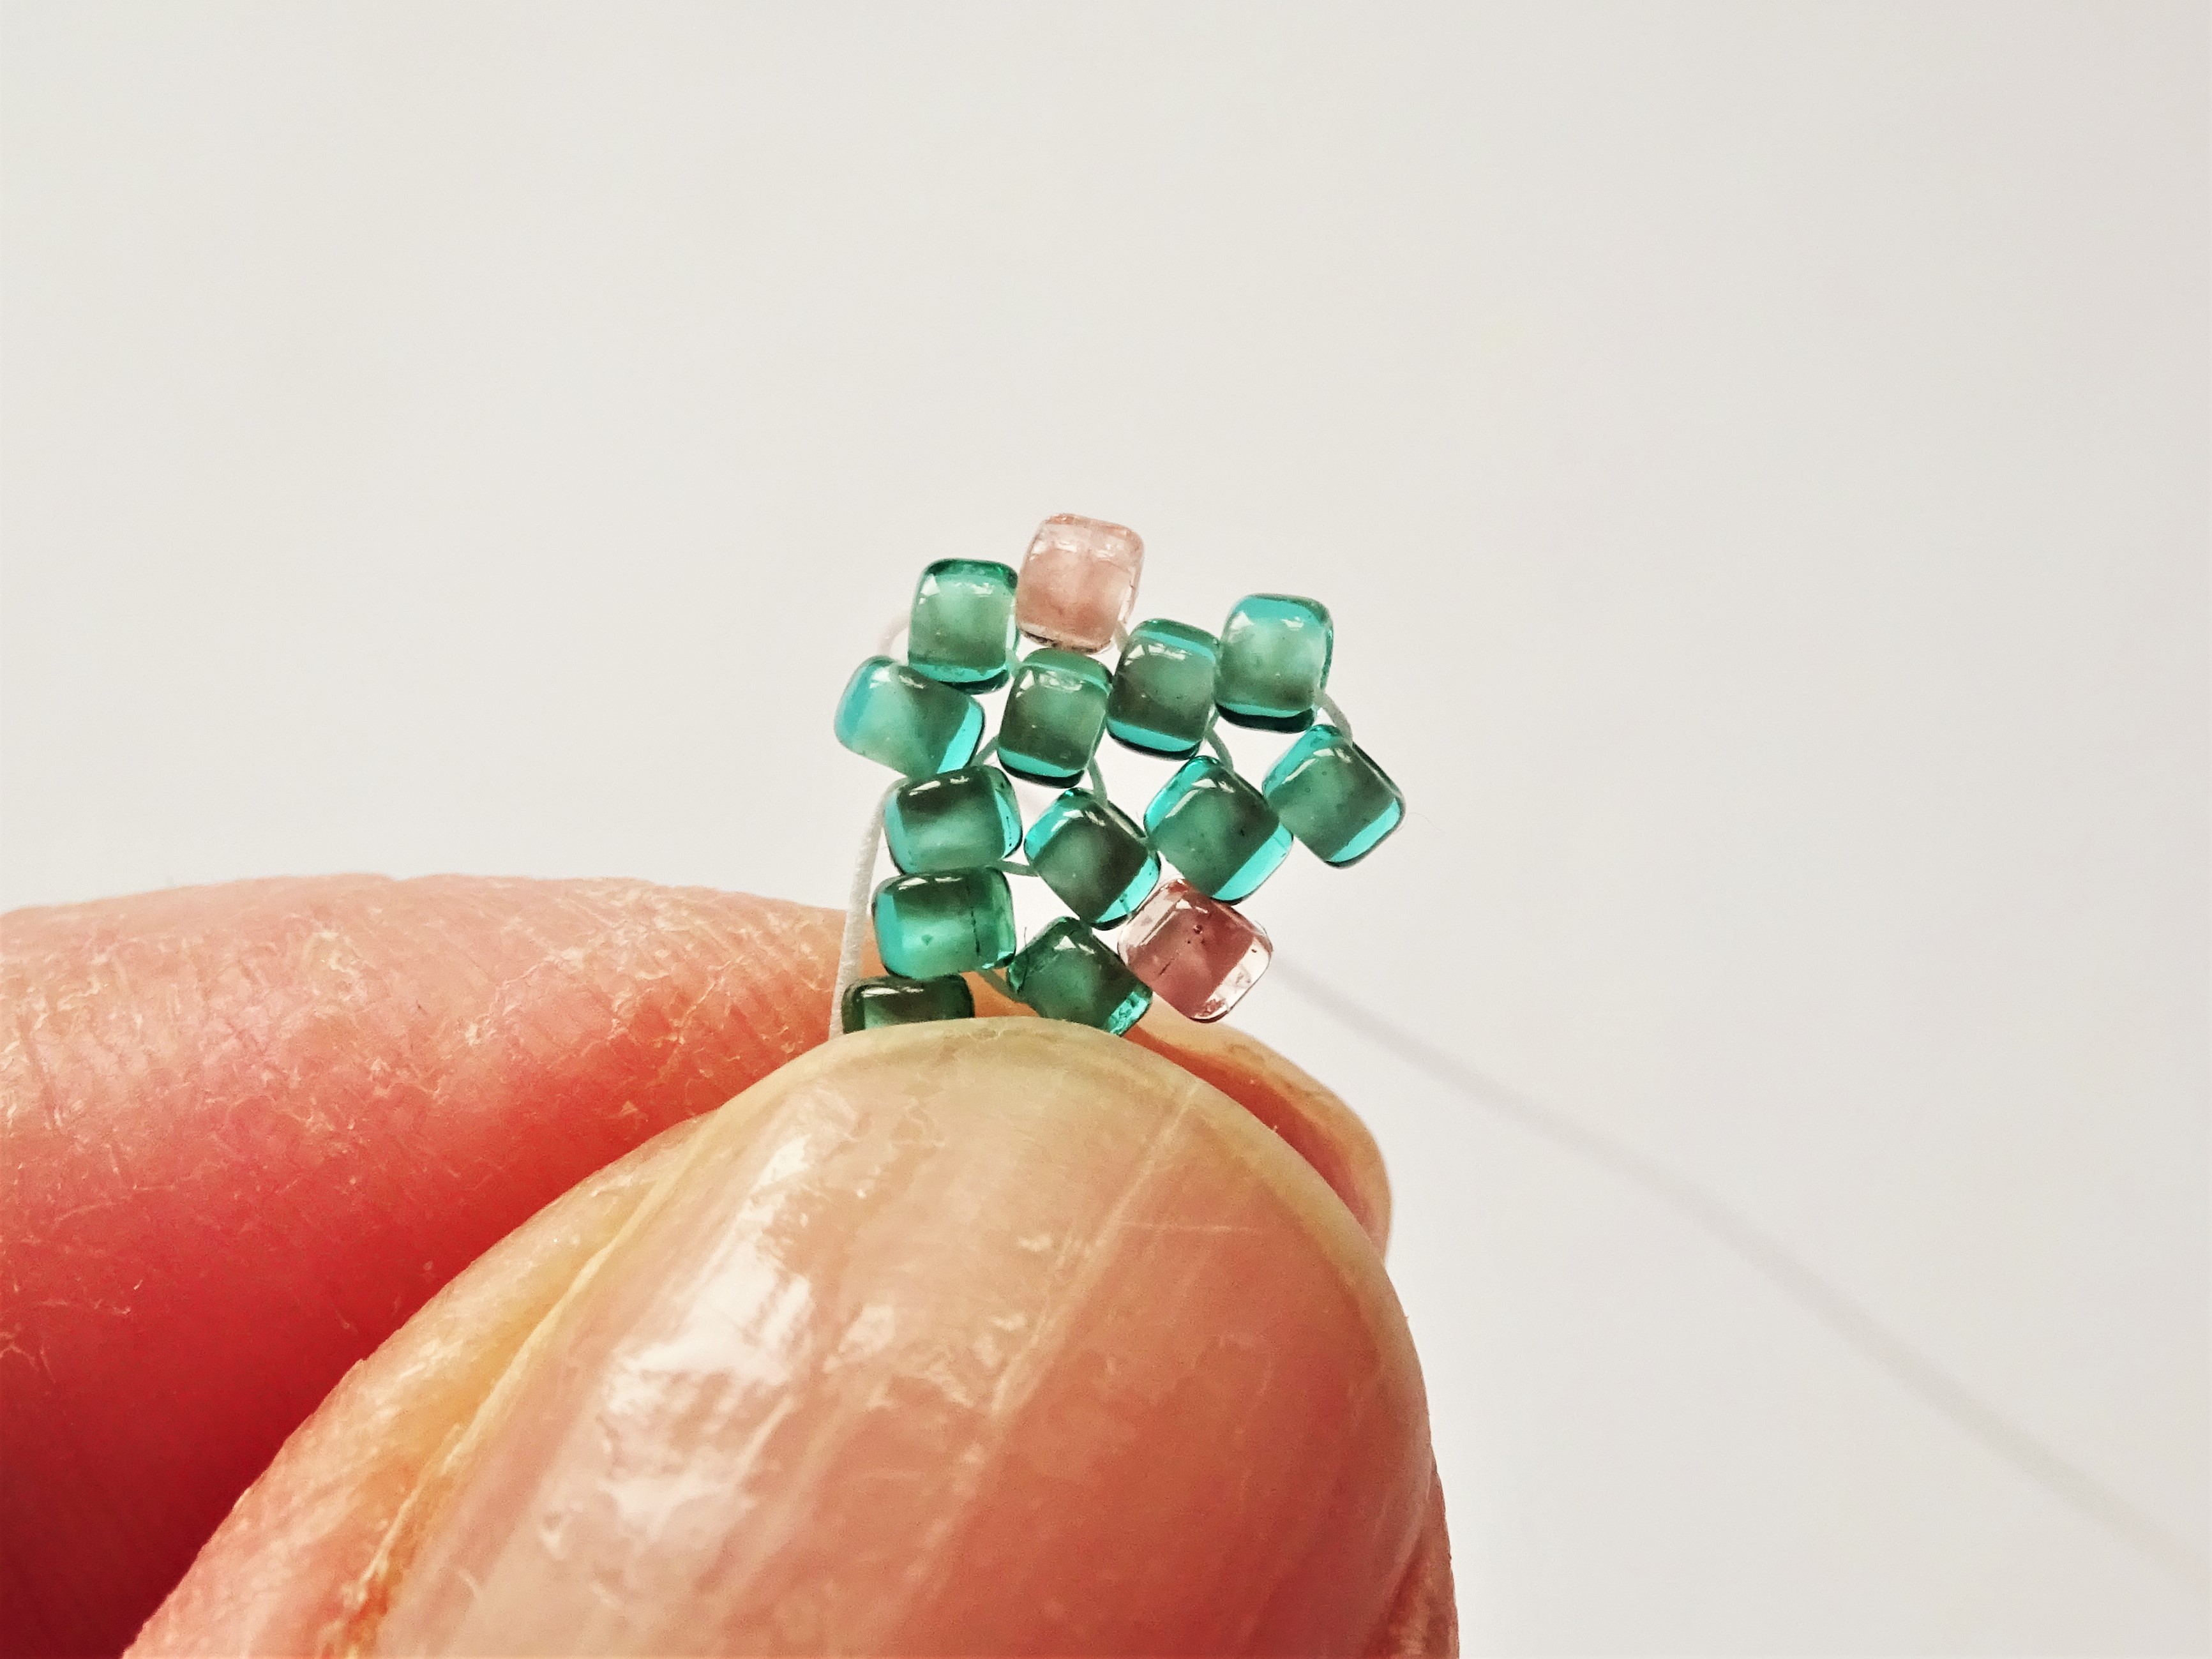
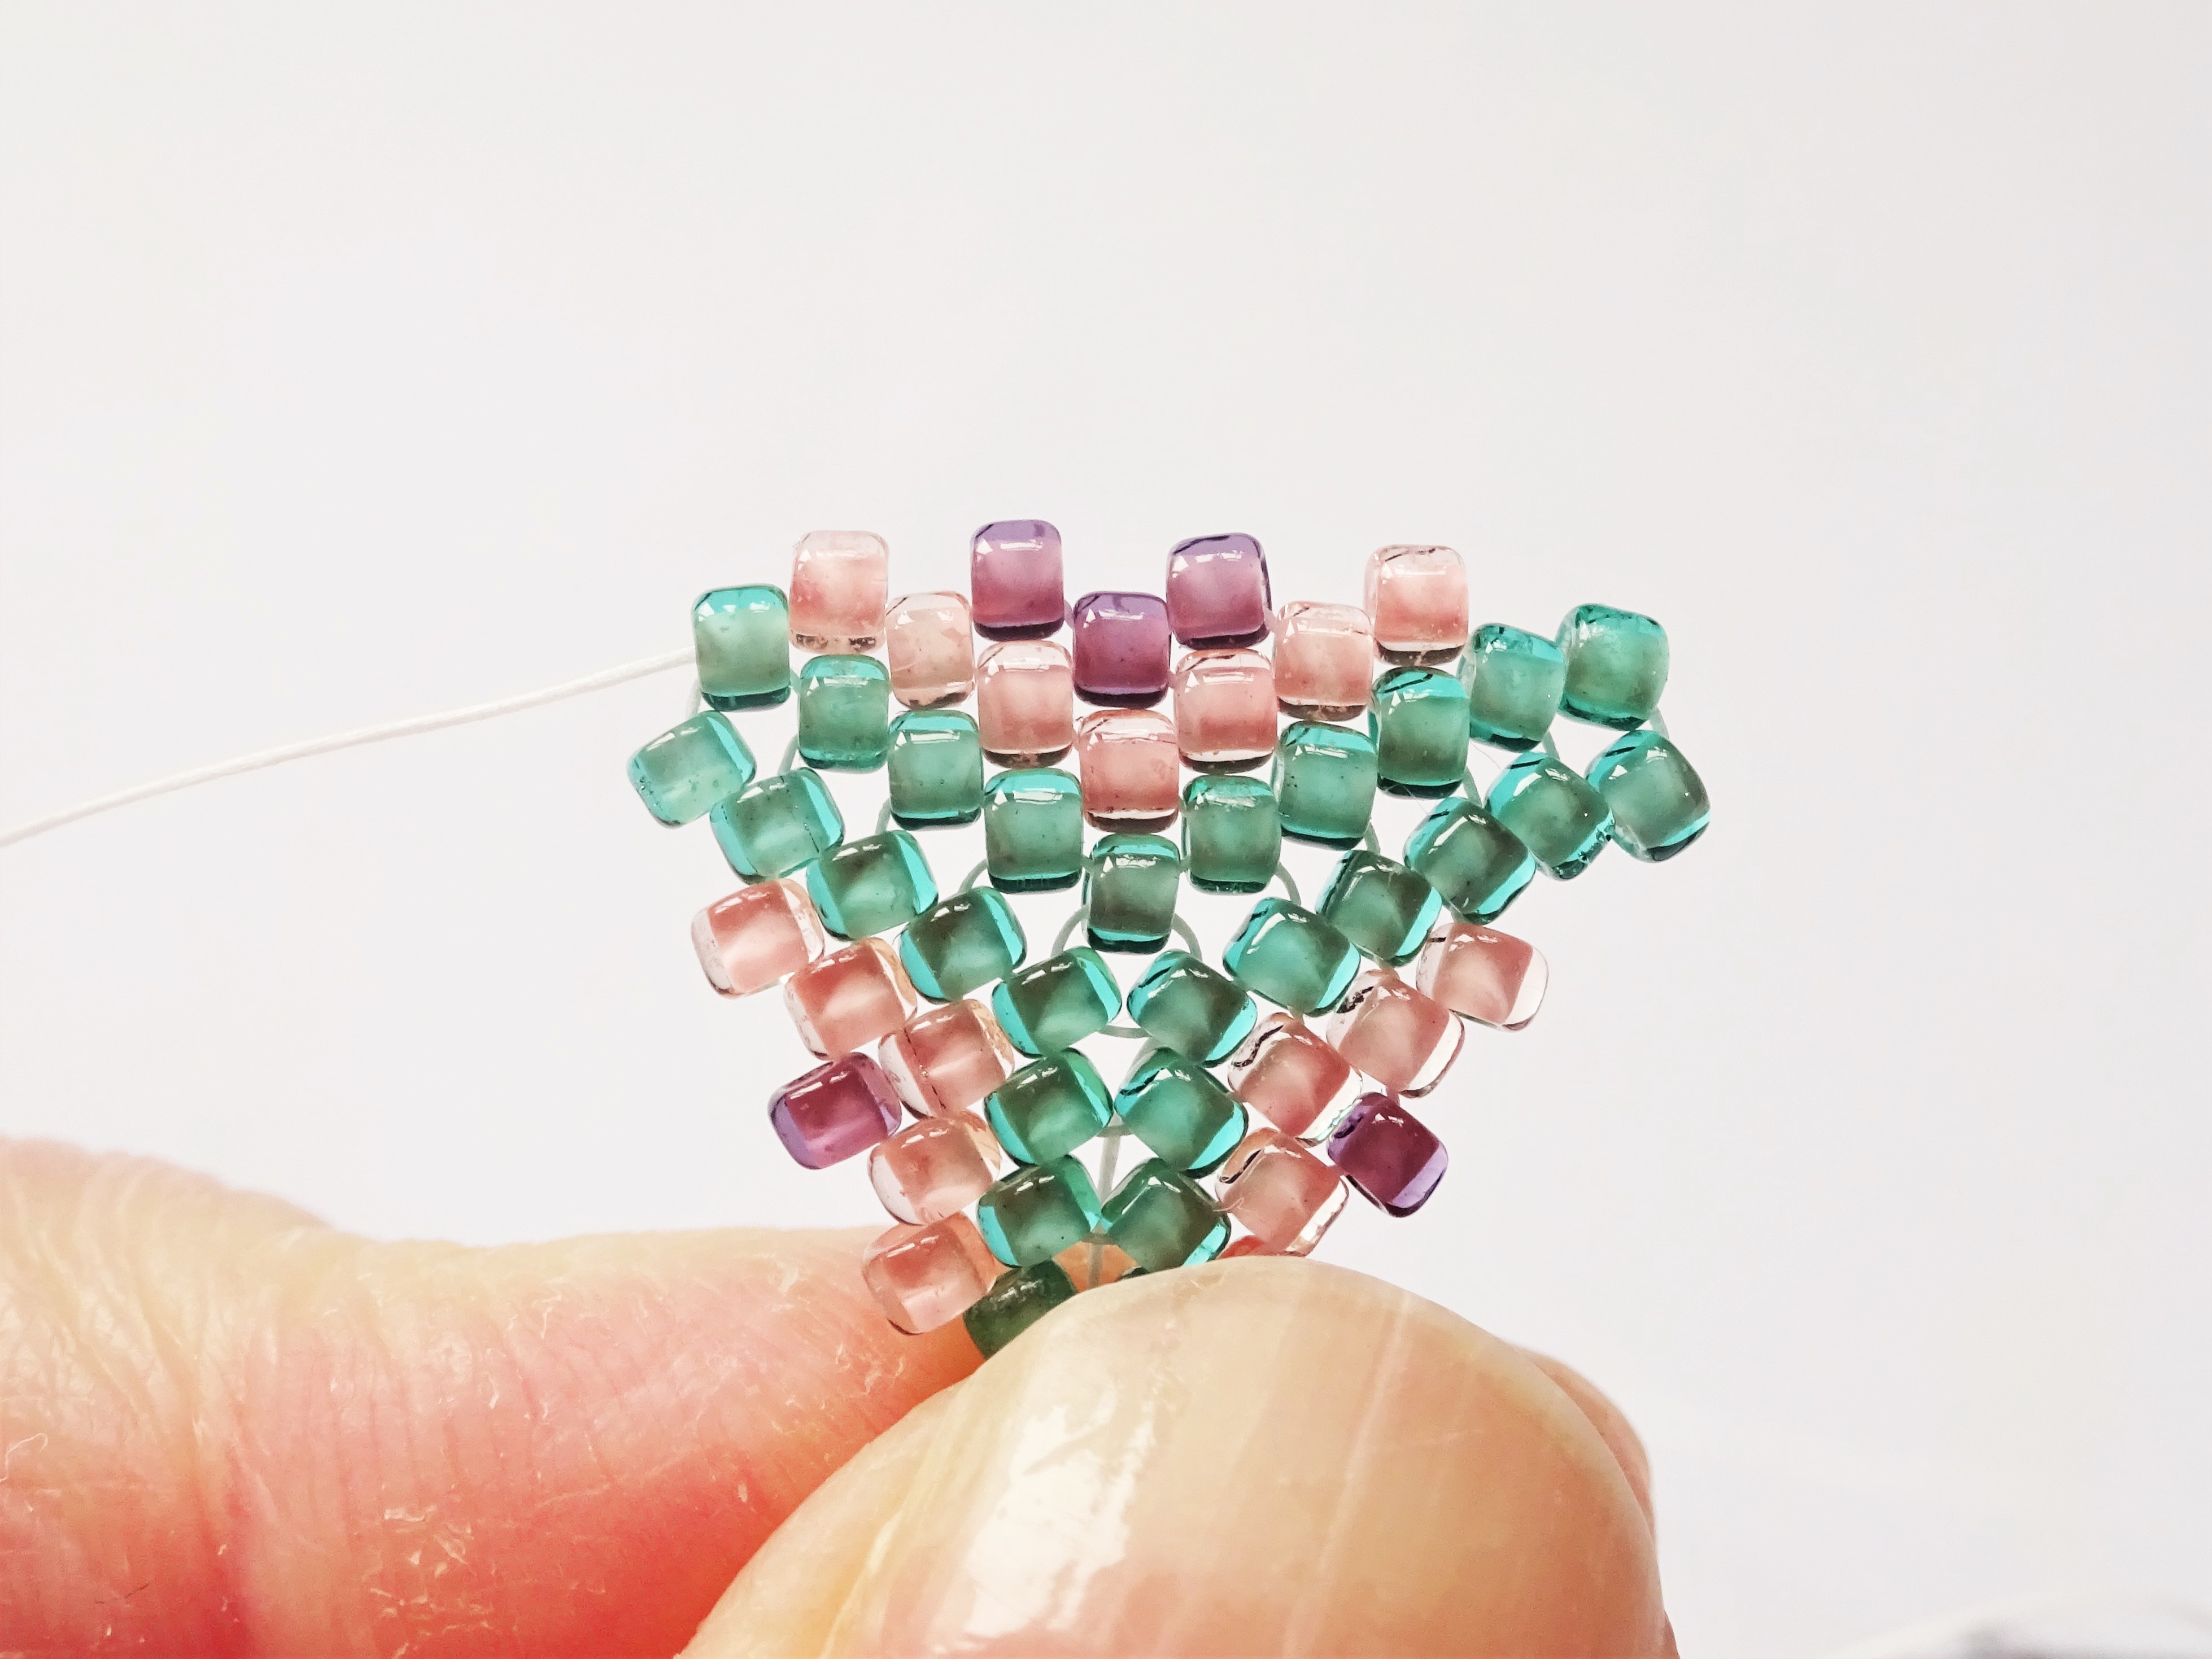
12. Start the new layer of bead work by adding two green beads and taking the needle into the next green along, on the triangle, as in the previous steps. From here pick up a pink bead and take the needle into the next pink along in the triangle, then pick up a purple bead and take the needle into the next pink along in the triangle and then pick up another pink bead and take the needle into the green at the end of the row.
Repeat this step on all three sides of the triangle making sure on the third side that the needle goes into the second to last green bead before stepping up into the top bead.
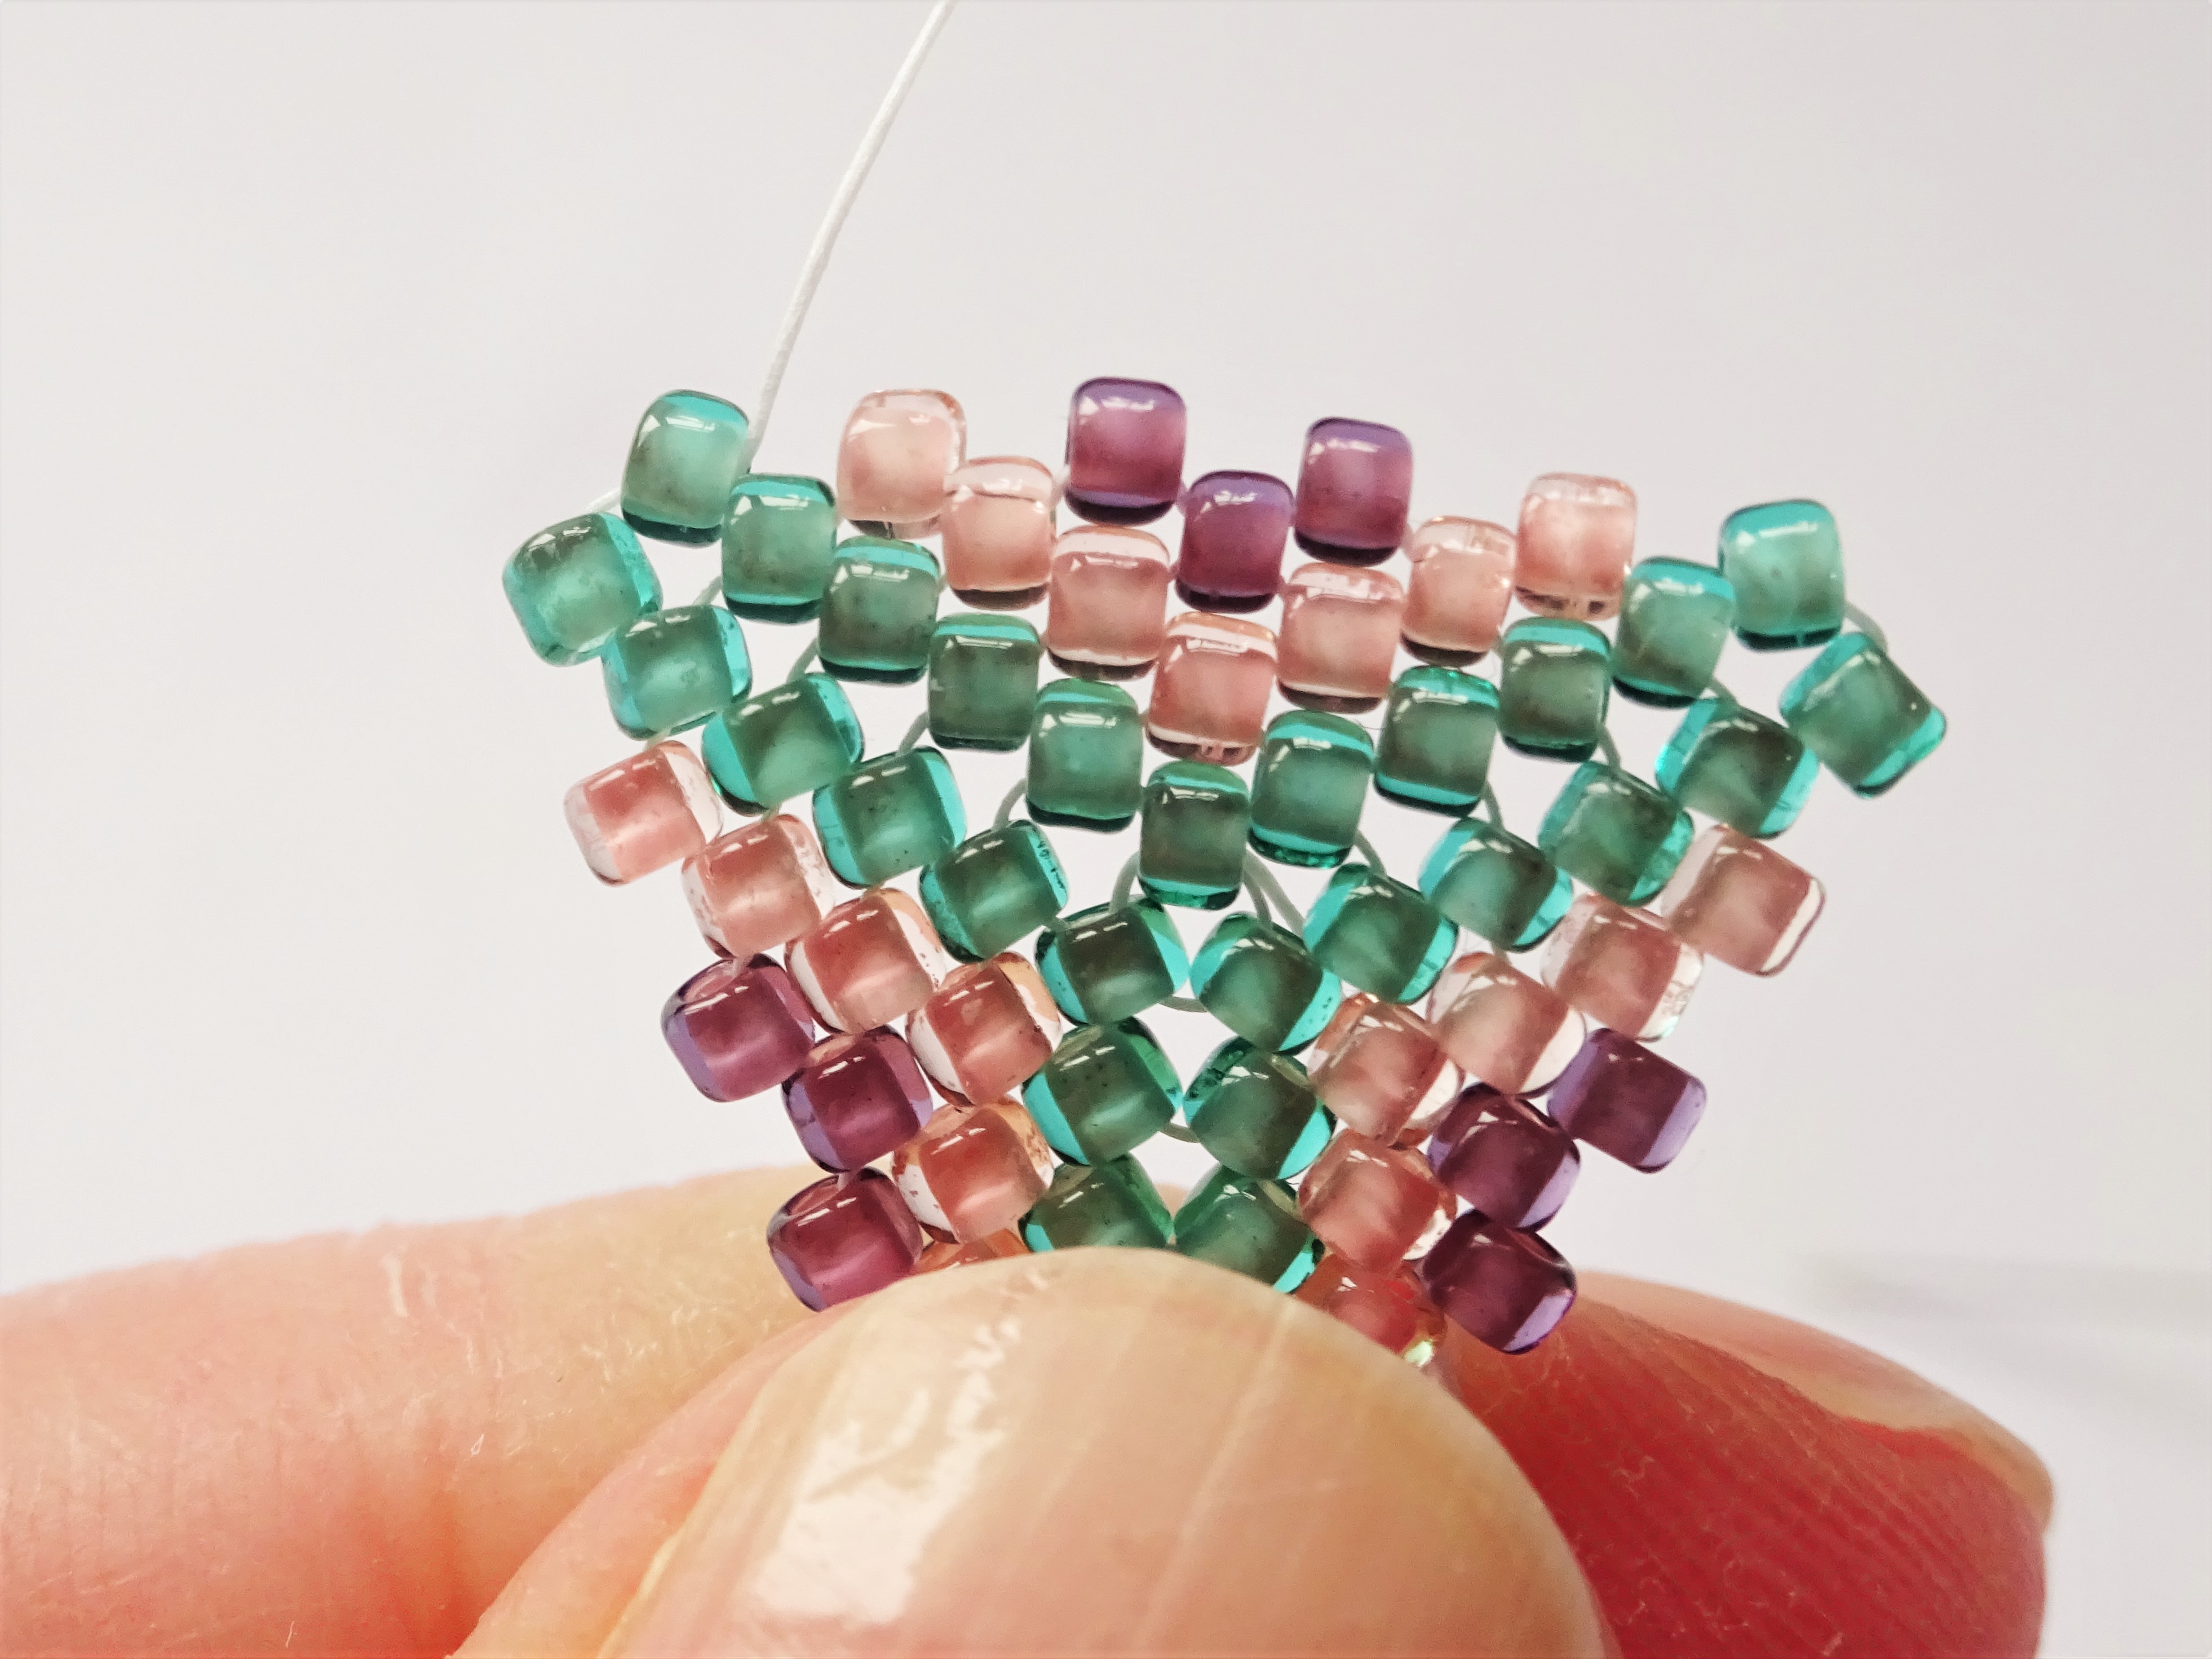
13. Continue on with adding two green beads as in previous steps and peyote 1 pink bead, 1 purple, 1 purple and 1 pink bead as described in step 12. Repeat this step on all three sides and finish the third side by exiting out of the second lowest green bead before stepping up to the top green bead.

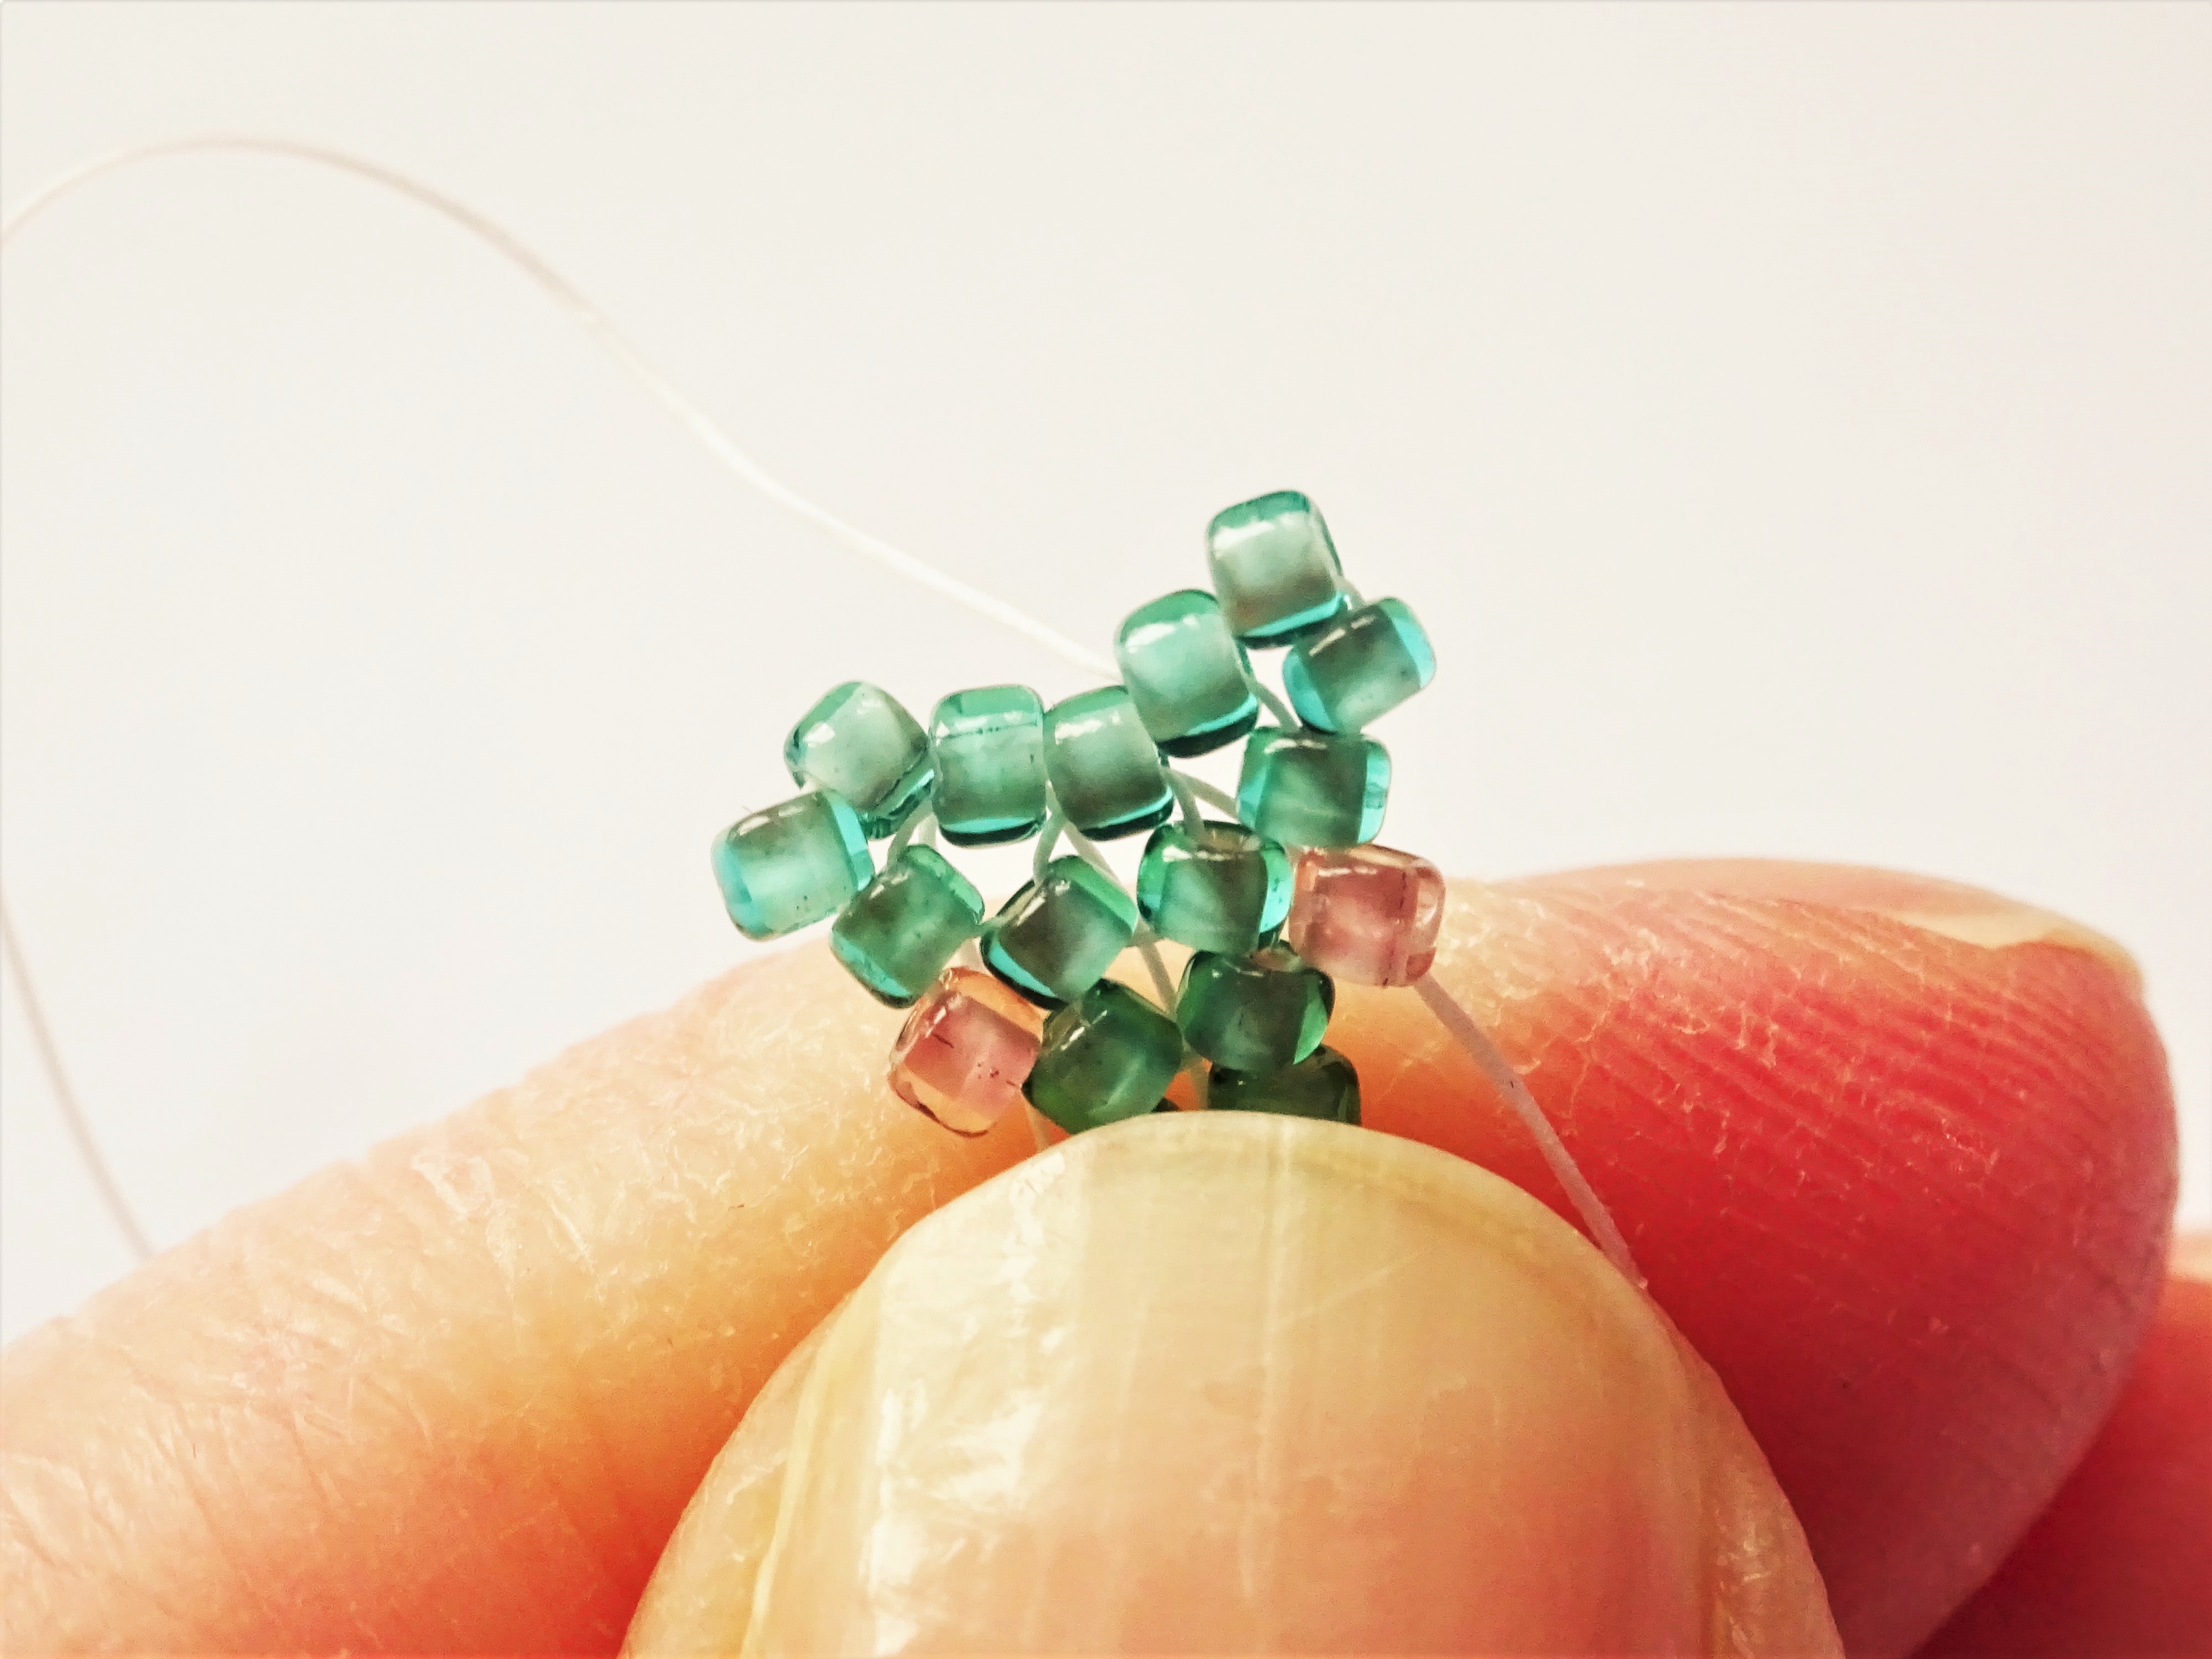
14. Begin the new round of beading by picking up two green beads as prior steps and then adding on 1 pink, followed by 3 purple and finishing with another pink in a peyote stitch. Do this step all the way around the triangle.

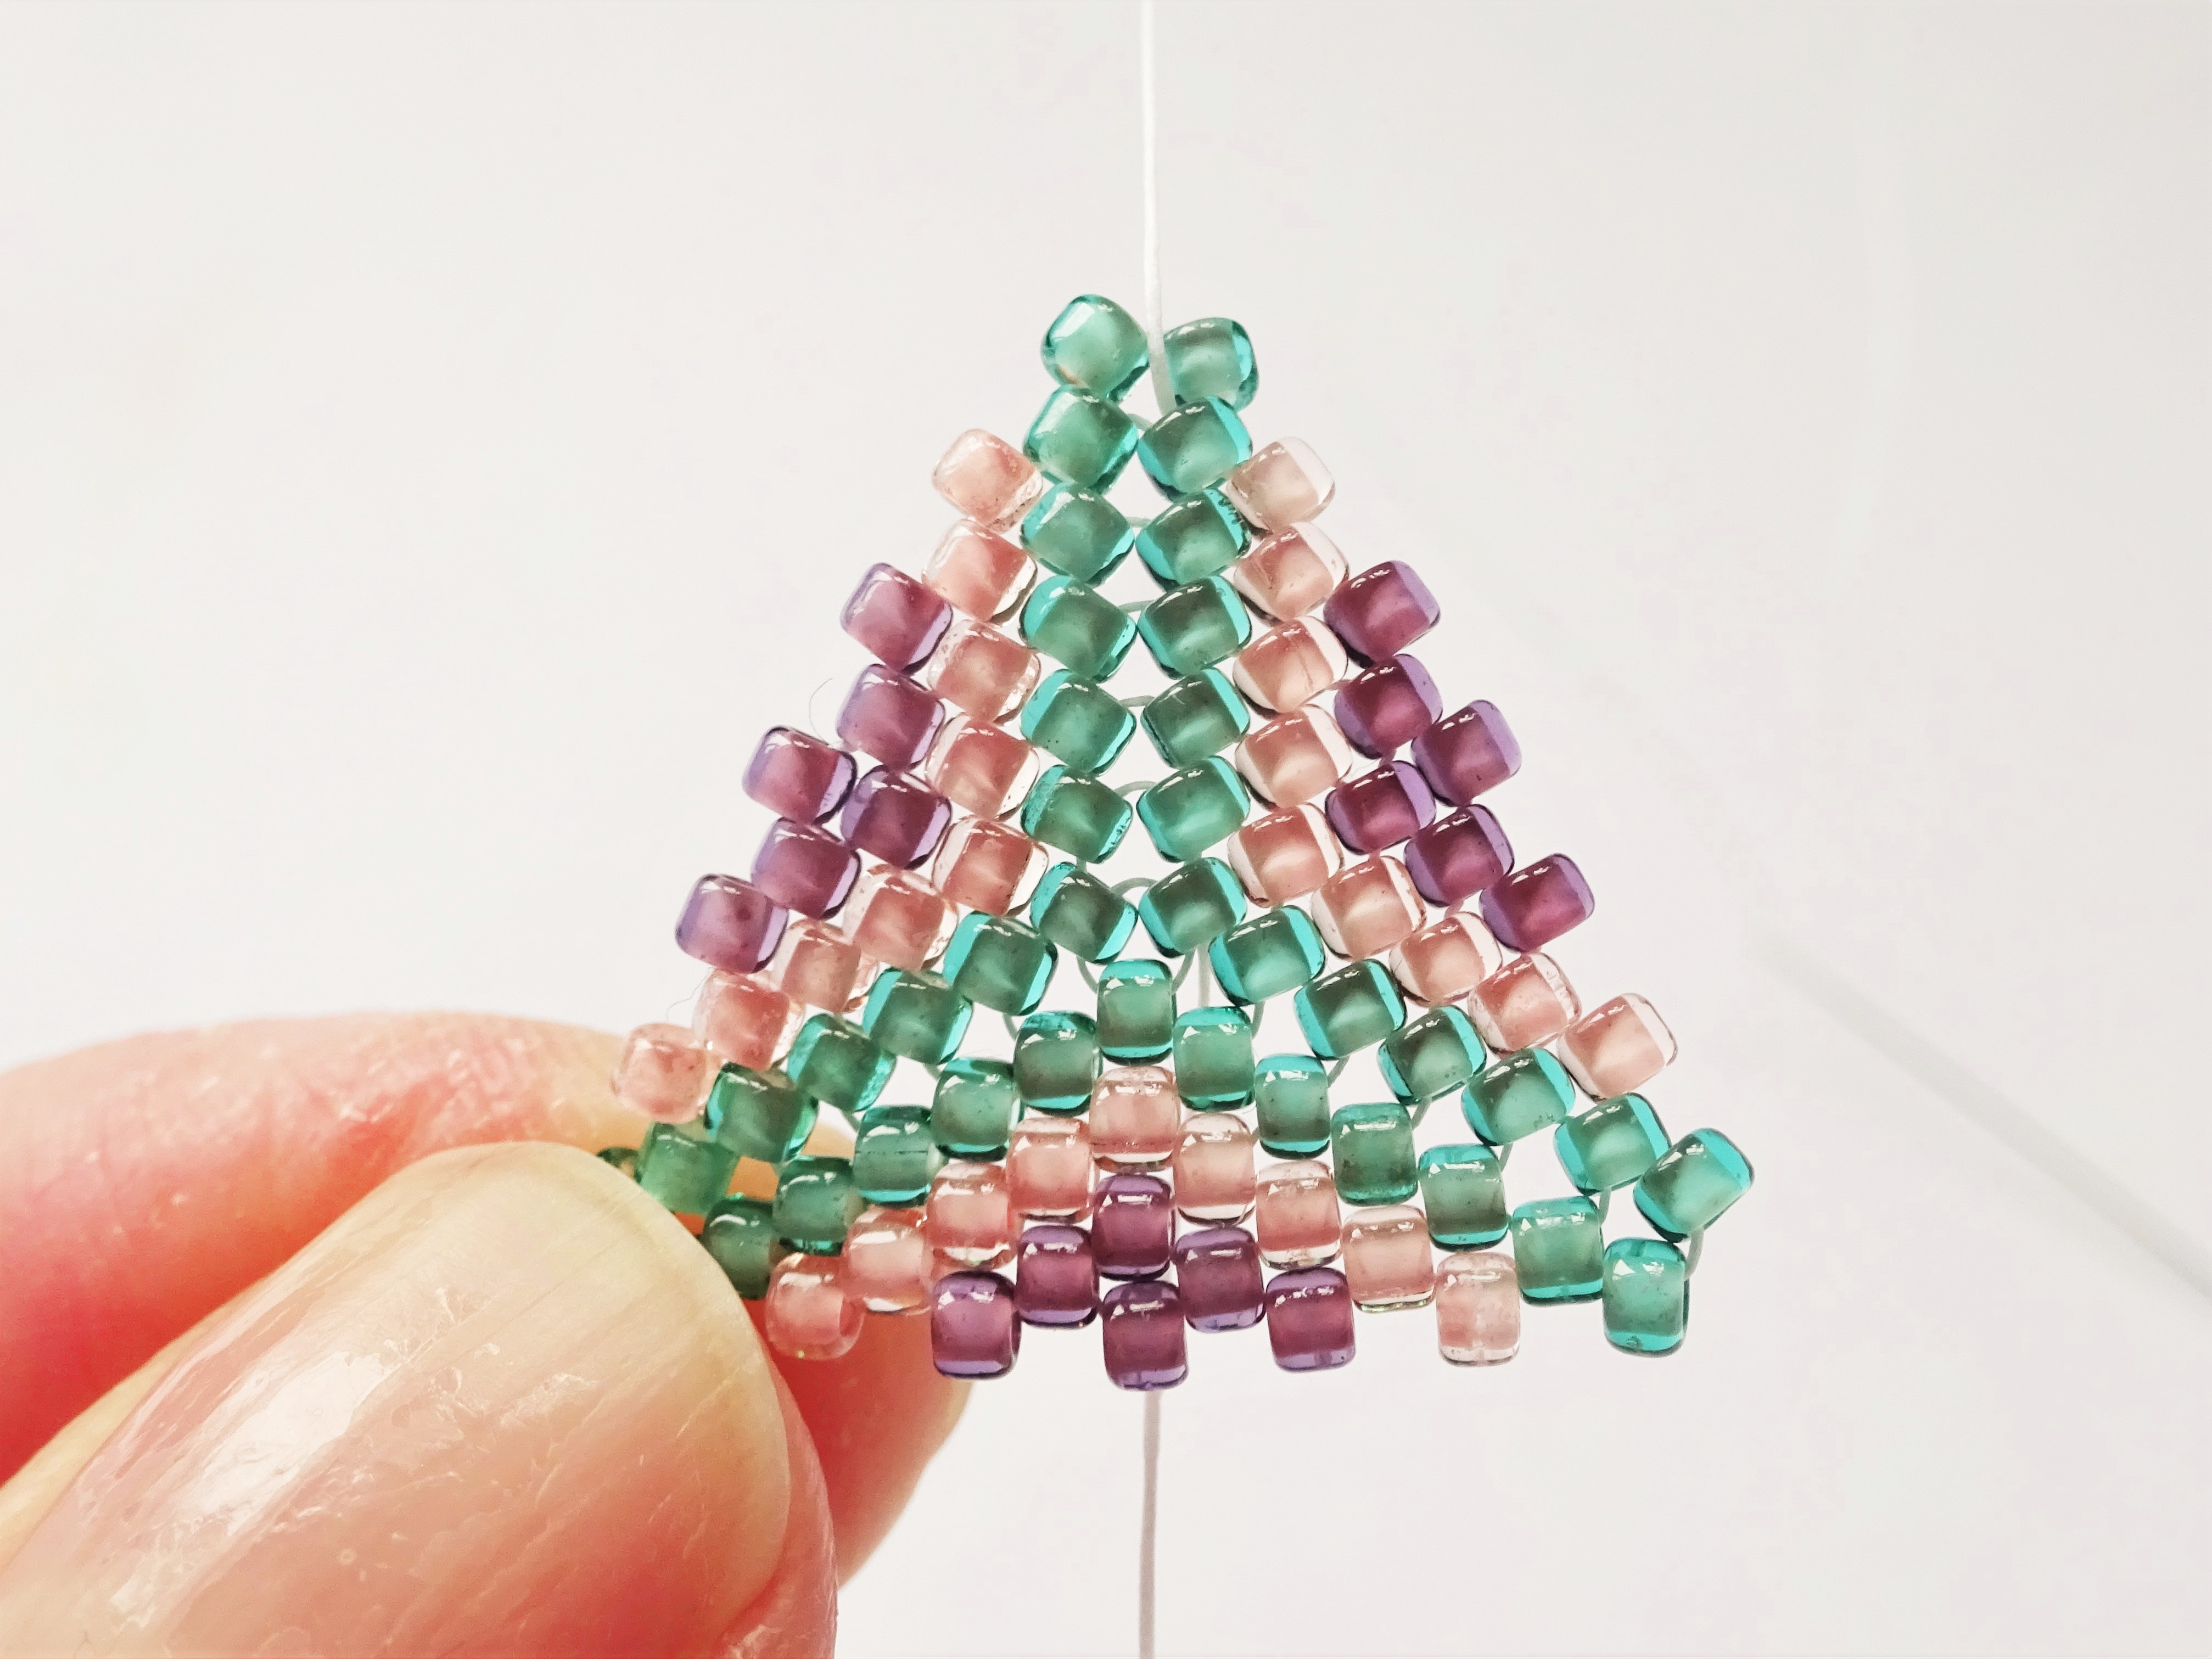
15. On this final round of bead work pick up one green bead, instead of two, and take the needle into the next green bead along. Picking up one bead only here helps to give the triangle a point.


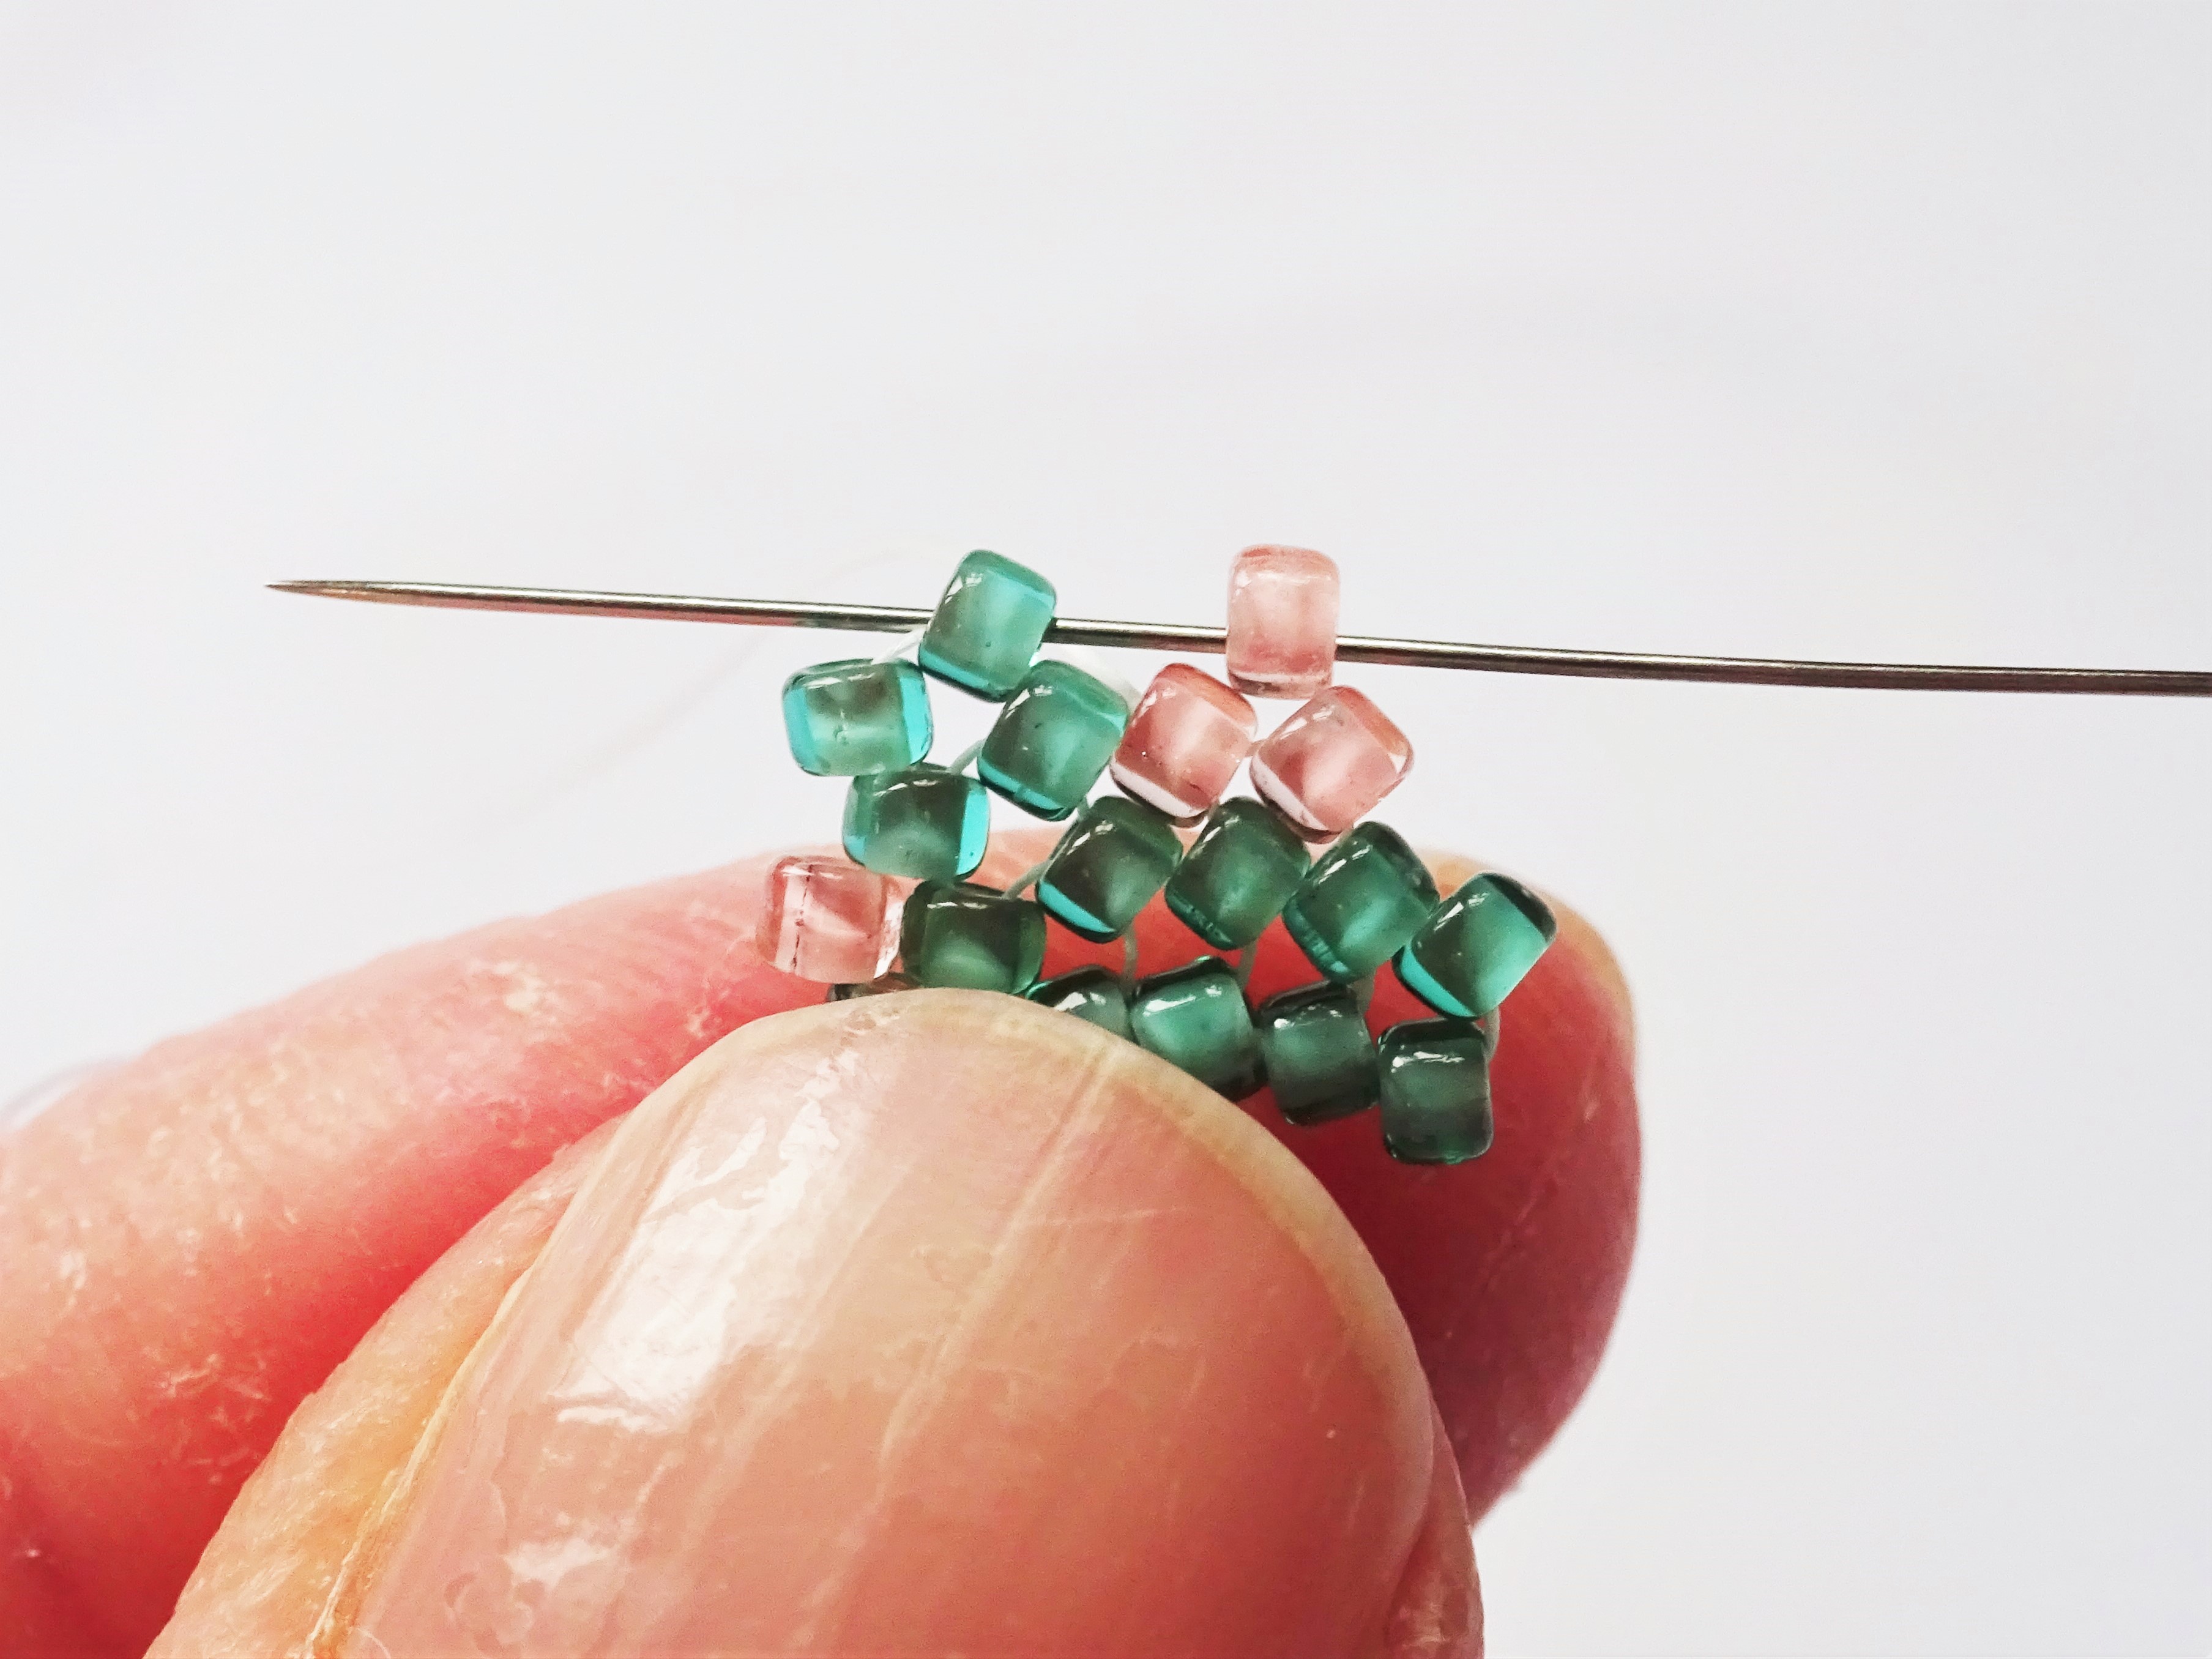
16. From here peyote 1 pink, 4 purple and 1 more pink bead. Continue all around the triangle in this way picking up only one green bead at each corner.


17. When all three sides are finished and the needle is exiting out of one of the corner green beads, pick up 5 green beads. Take the needle back through the green corner bead from the opposite side that you exited from. Tighten the thread to pull the beads into a loop.

18. Weave in the thread and tail thread, knotting as you go. Cut off any excess thread and add an earring wire to the beaded loop.
If you need any help on how to knot your beading thread then I have detailed how to do it towards the end of this beaded bezel tutorial.
Links below for products used are Affiliate links for Amazon. This just means that if you use my link to buy a product I earn a very small commission, at no extra expense to you (you pay the same regardless how you find the item). Every little extra helps me to offer free tutorials.
Amazon UK
Wildfire Beading Thread in Frost (White) 0.06in
Amazon US
Wildfire Beading Thread in Frost (White) 0.06in
I have several more beginner friendly Beadweaving tutorials if this has got you interested in seeing more.
I am currently working on a Peyote triangle necklace……. If I like the results then hopefully that will be up on my blog soon!
Until next time,
Hannah x

