


I’m sure it’s only 5 minutes since I wrote my brick stitch pumpkin tutorial but the cooler temperatures and yellowing leaves outside are telling me that it has already been a year. This can only mean one thing – it’s time for another Halloween inspired spooky brick stitch tutorial and it is the turn of the ghost this year.
For this cute ghost brick stitch tutorial I have used only 3 colours of size 11 seed beads; white, black and then clear for the loop on top of the ghosts head for the earring wire.
This bricks stitch tutorial goes into a lot of detail so if you are a beginner or just after a quick and easy Halloween make then this is perfect for you. There is also a YouTube video at the bottom of this post if that is more your style and, if that’s not enough, I have a free pdf pattern for you to download if you need to use that to follow along or to keep for future use.
It’s worth noting that I have chosen to make these ghosts side to side (as opposed to bottom to top as I do in my other brick stitch tutorials) as I felt that the shape of the black seed beads looked more like a oval opened mouth when tipped sideways and the bottom of the ghost looked better and more ghost like with the rounded edge of the seed beads facing downwards. That may be me being too picky and it certainly makes getting started on this tutorial a little more tricky, but I think it’s totally worth it.
Brick Stitch Cute Halloween Ghost Tutorial
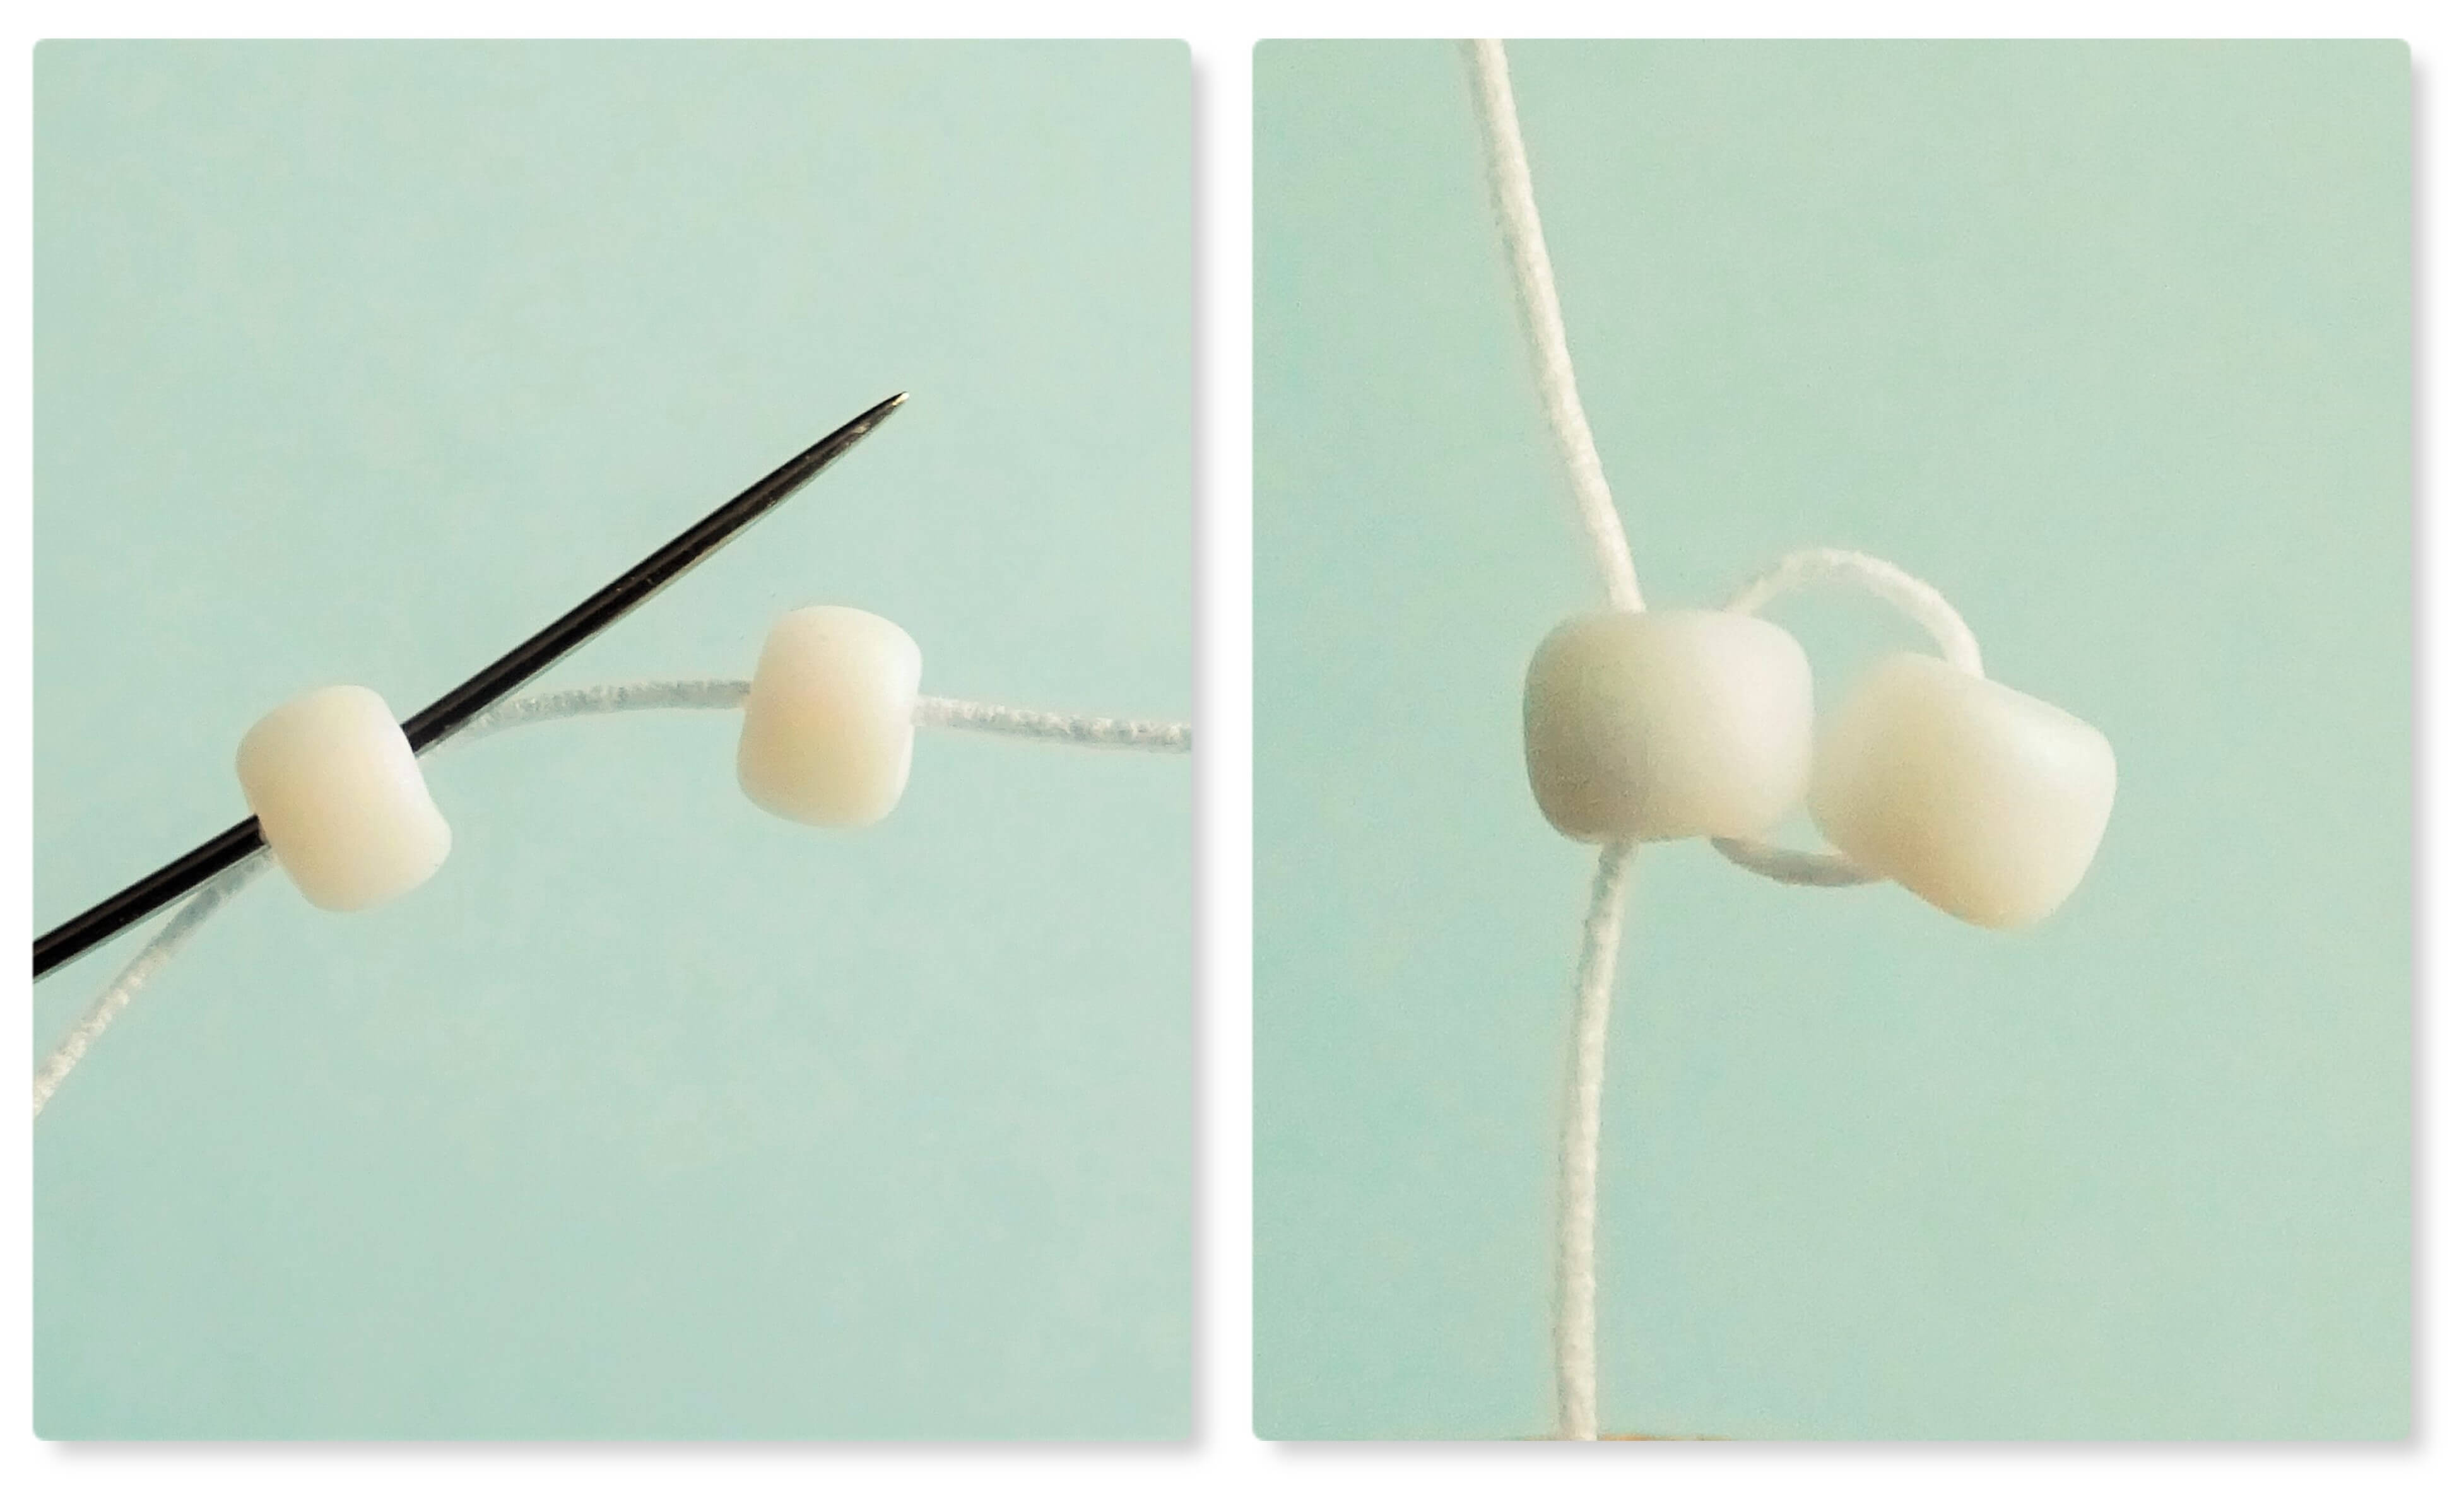
Cut a some beading thread about one and a half arm lengths long and add a needle on one end. Pick up two white seed beads and take them down the thread, leaving 9″ of thread left at the bottom (This is your tail thread. It will be used later so this needs to be kept at roughly 9″ long). Take your needle back up into the first bead that you picked up and pull through. Once the thread is pulled tight the two seed beads will sit side by side.

Pick up another white seed bead and take the needle back up into the seed bead you were exiting from but from the opposite side (ie, you were exiting out the top so take the needle up from underneath). Pull the thread tight so that the three seed beads are sitting in a row.

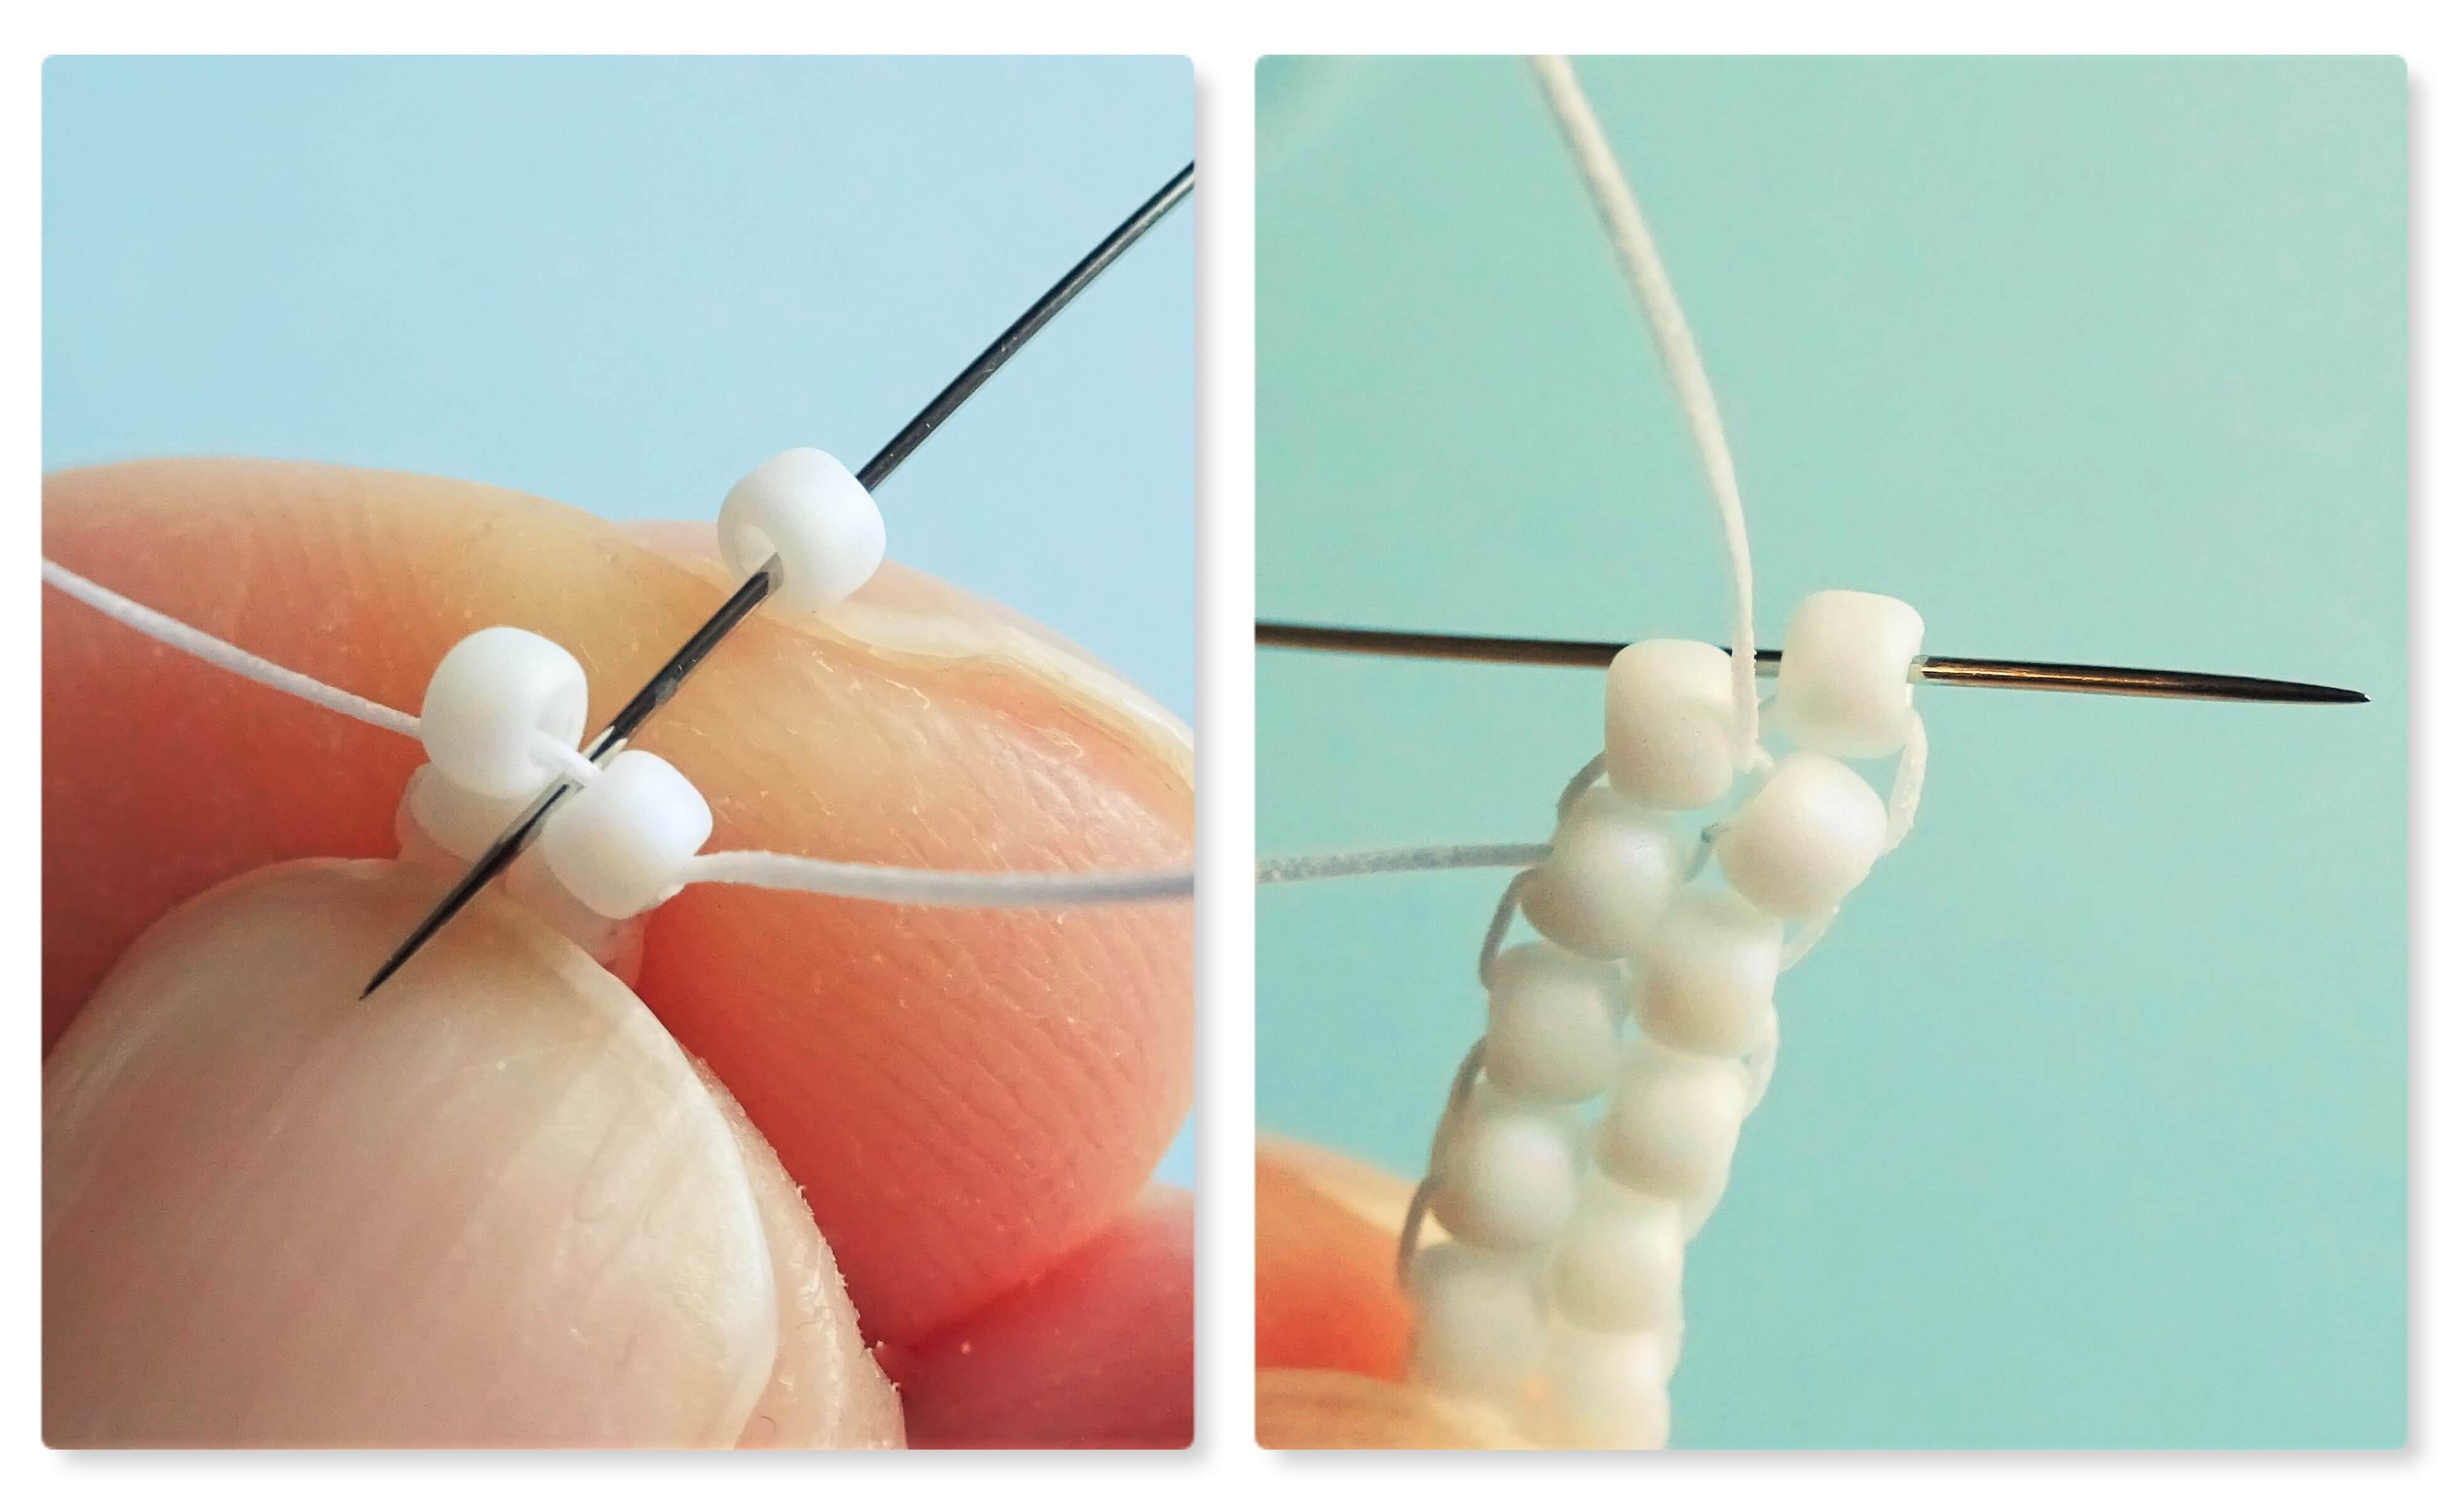
Your needle will now be exiting out of the middle bead so move it to the outer bead by taking the needle down into the hole on the next bead along. From there pick up another seed bead and take the needle back into the same seed bead that you just exited from but from the opposite side (just like you did in step 2).

Take the needle along into this newly added bead so that you are ready to add another bead. Add 6 more white seed beads using the method shown in steps 2 and 3 so there are 10 seed beads in total on this row. Don’t worry if this beadwork is a little wonky at this point, as more beads are added the beadwork will start to sit straighter.

We are now ready to begin the second row of beadwork. This row starts at the bottom of the ghost and decreases in length at the start. Begin by picking up one white seed bead and take needle under the thread that sits between the two seed beads on the row below. Next, take the needle back up into the seed bead that you have just added.

When you pull the thread tight the new seed beads should sit on top of the beads below. To continue the row, pick up one seed bead and take the needle under the next bridging threads along, between the seed beads directly below.

Take the needle back up the new seed beads and pull tight so that it site neatly alongside the other bead and on top of the lower row of beadwork. Continue with steps 6 and 7 until all the bridging threads have been used. There should be 9 white seed beads on this row by this point.
Because this row increases at the top of the ghost, we need to add on one more seed bead. Pick up 1 white seed bead and take the needle under the thread that goes up into the last seed bead currently in the row (this is because all the bridging threads have been used). Take the needle back up and into the new seed bead and pull all the thread through. Your new seed bead should be securely added.

The new row begins at the top of the ghost and in increases in length at this point so, to begin the row, pick up 2 white seed beads. Next, take the needle up into the new white seed bead that sits inwards towards the rest of the beadwork.
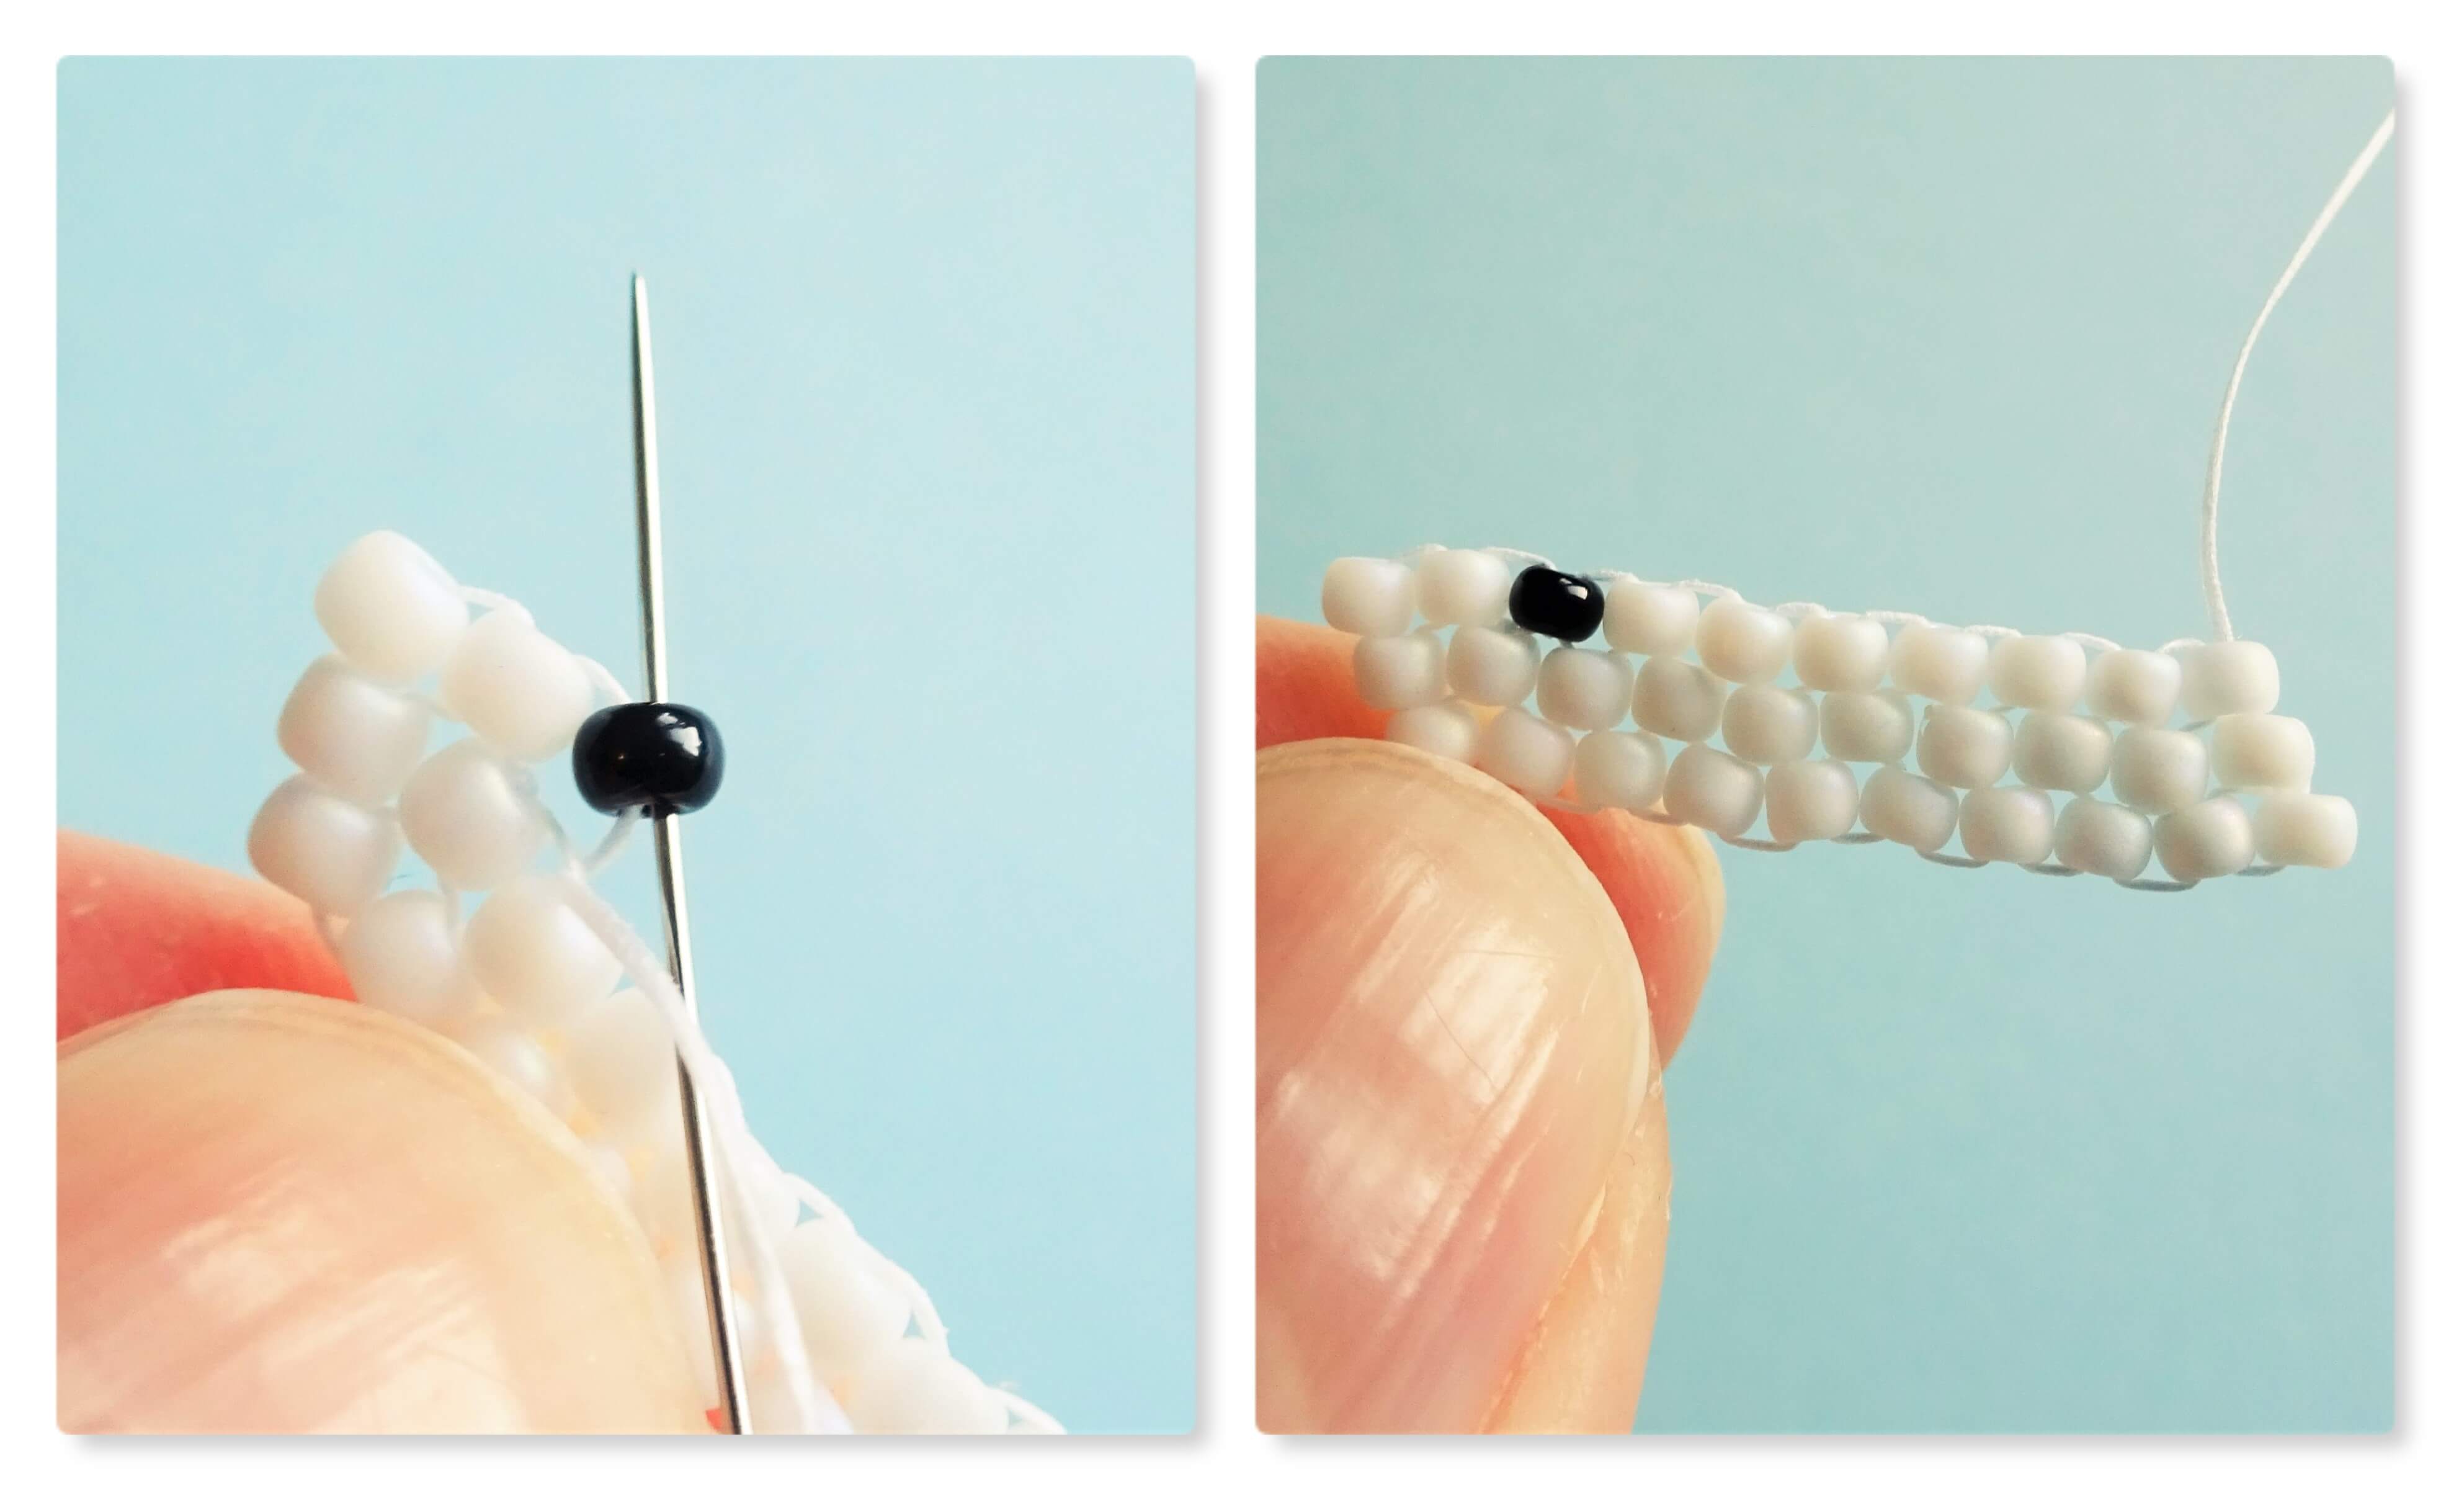
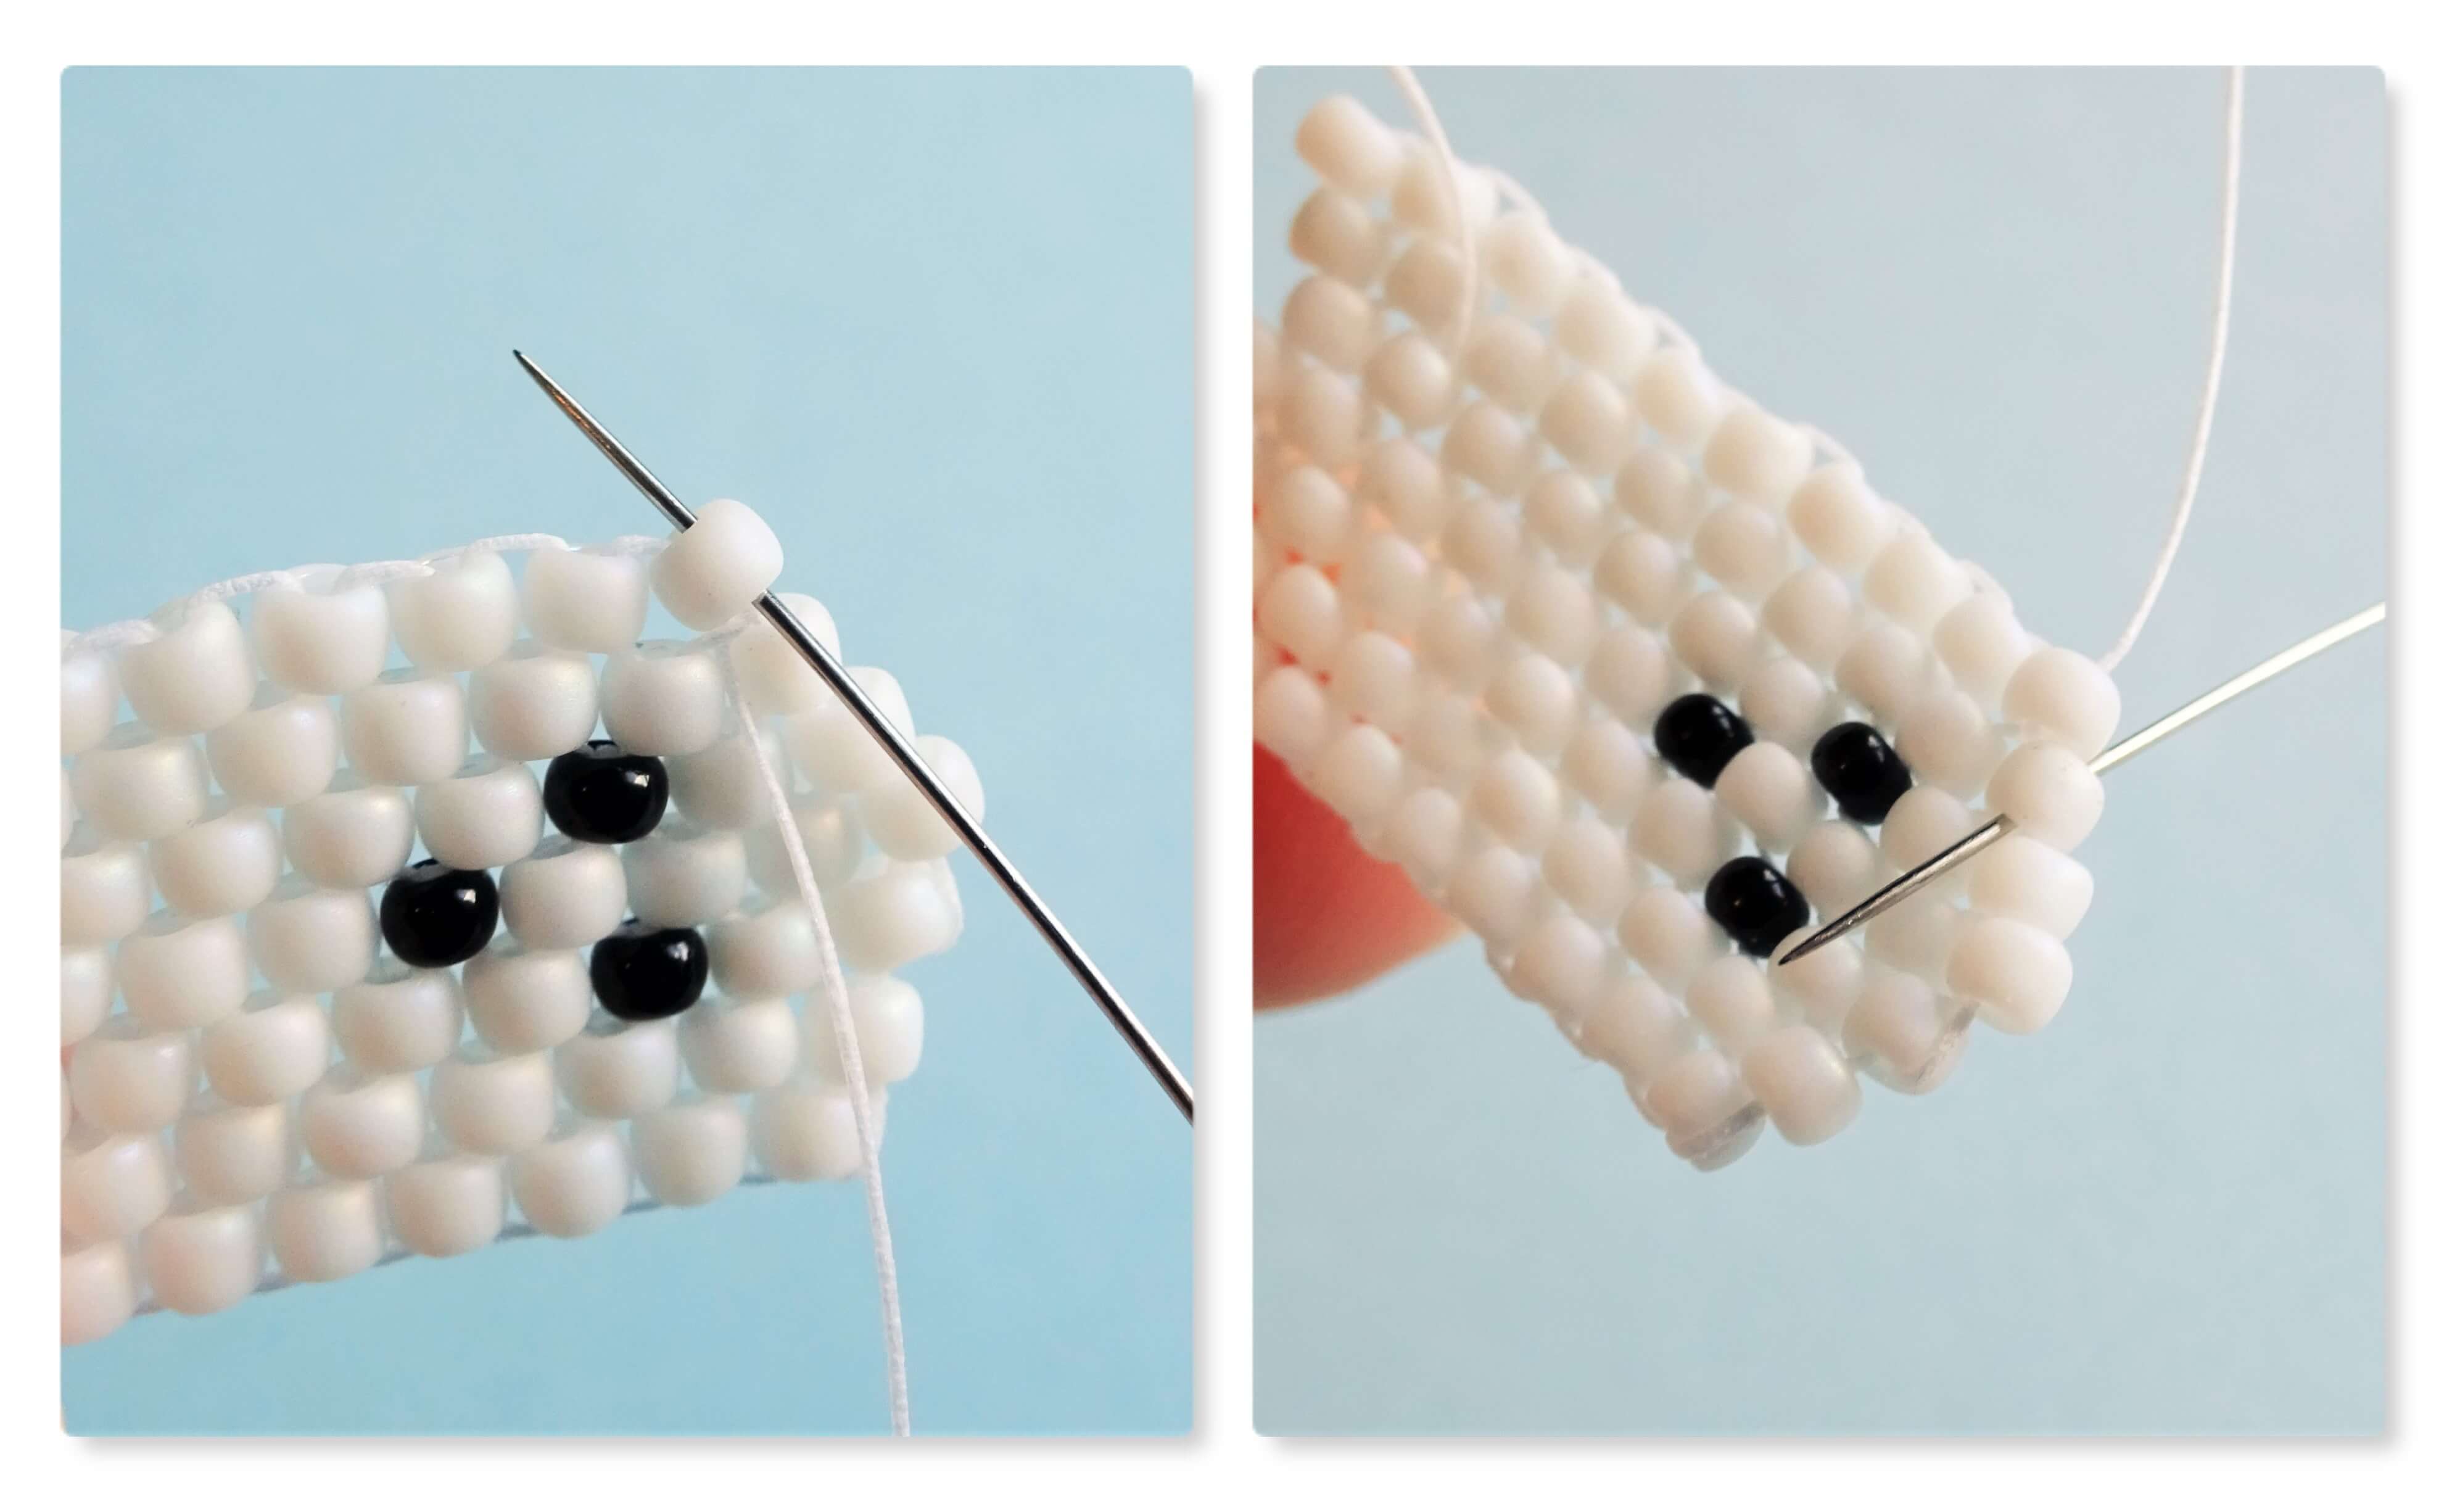
From here pick up 1 black seed bead and attach it as shown in steps 6 and 7 and then add 7 more white seed beads to finish the row.

The next row up increases on both ends so begin your row by picking up two white seed beads and adding them with the same method as in step 9. Continue by adding 4 more white seed beads, one at a time, and 1 black seed bead.
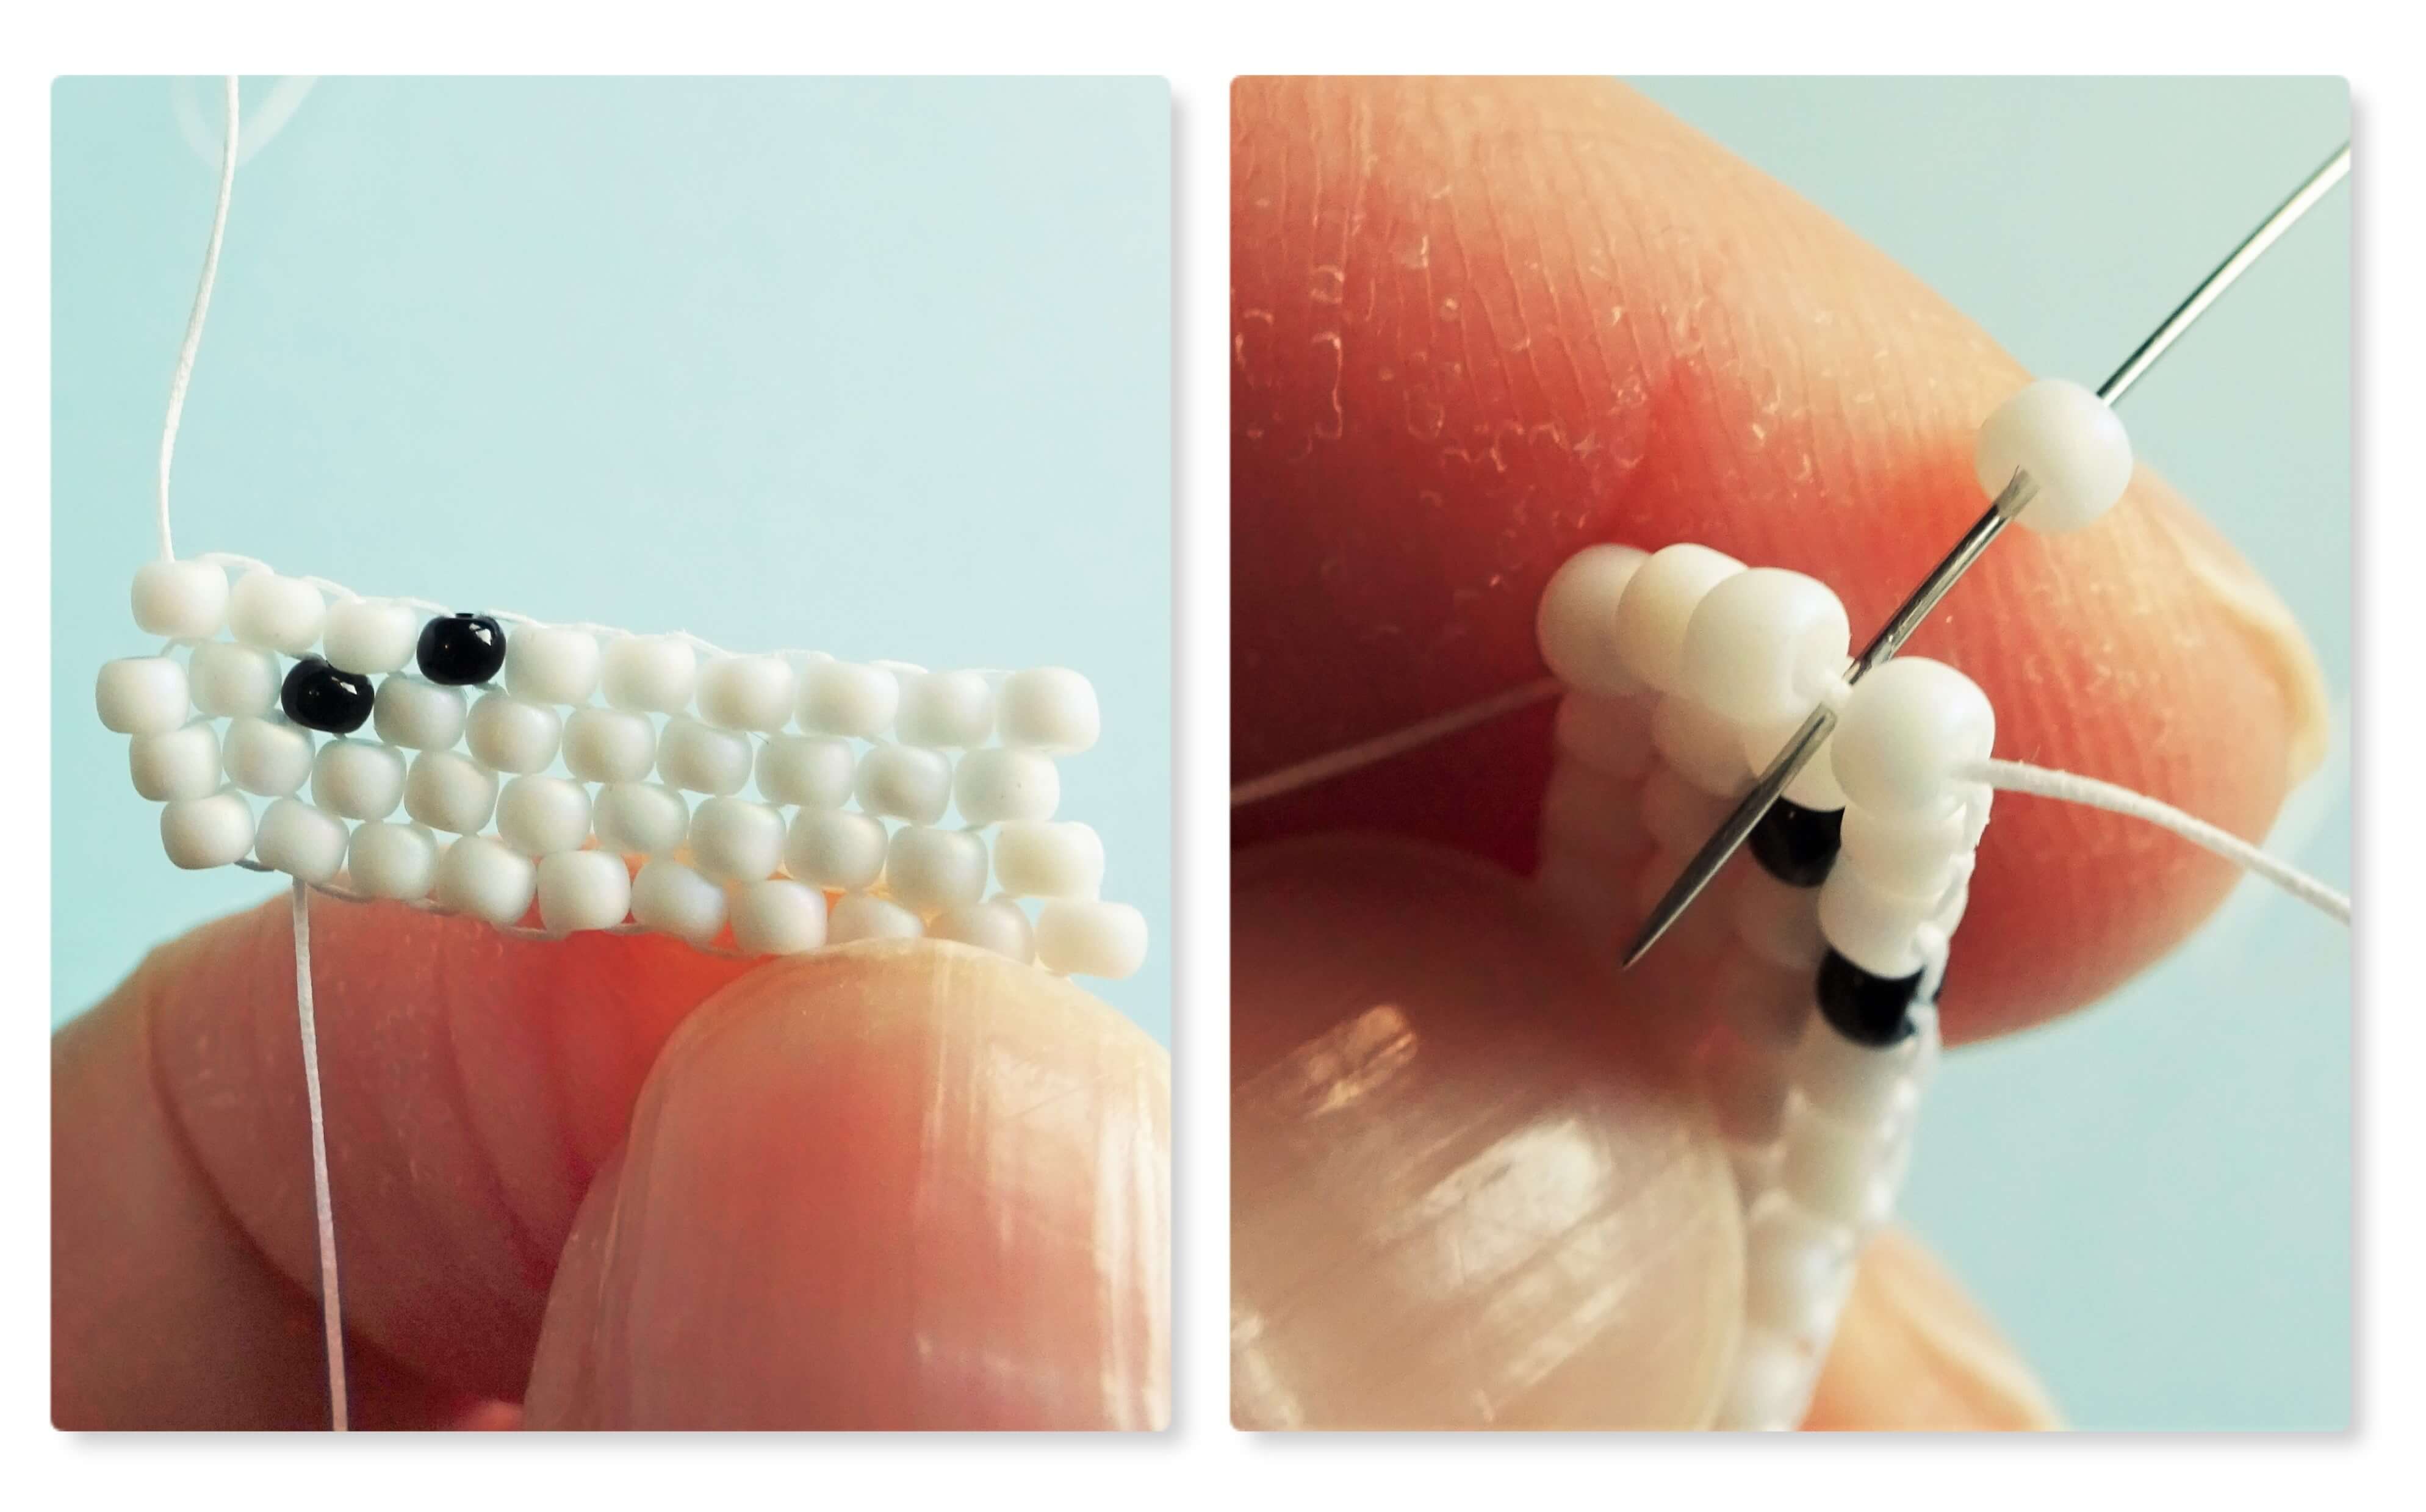
Add a further 3 white seed beads, one at a time, and then pick up one more seed bead and add it onto the edge using the the thread going up into the last seed bead in the row to secure it as in step 8.

The next row decreases top and bottom so begin by picking up one bead and adding it to the row under. Continue this row by adding another white seed bead, followed by one black bead and finished with 7 more white seed beads.

The next row begins at the bottom of the ghost and increases at the bottom but decreases at the top so, begin the new row of beading by picking up 2 white seed beads and adding them to make the new row. Finish the row of beading by adding 8 more white seed beads.

This final row of beading begins at the top of the ghost. The beadwork decreases at the top and increases at the bottom so begin the new row by pick up and adding 1 white seed bead. Finish the row off by adding 8 more white seed beads and then add a further seed bead by adding it onto the thread going up into the last seed bead in the row.

The thread on this end is now finished with so knot the threads by taking the needle up into the second to last bead on the final row and then take the needle under a thread that is going up between the beads.
Pull the thread until it forms a loop and take the needle through the loop and pull tight. This forms the knot. From here take the needle up into the bead above it and pull so that the knot disappears into the bead. Repeat this 3 or 4 times to secure it well but keep to the lower half on the ghost as we still need to do more beading at the top half.

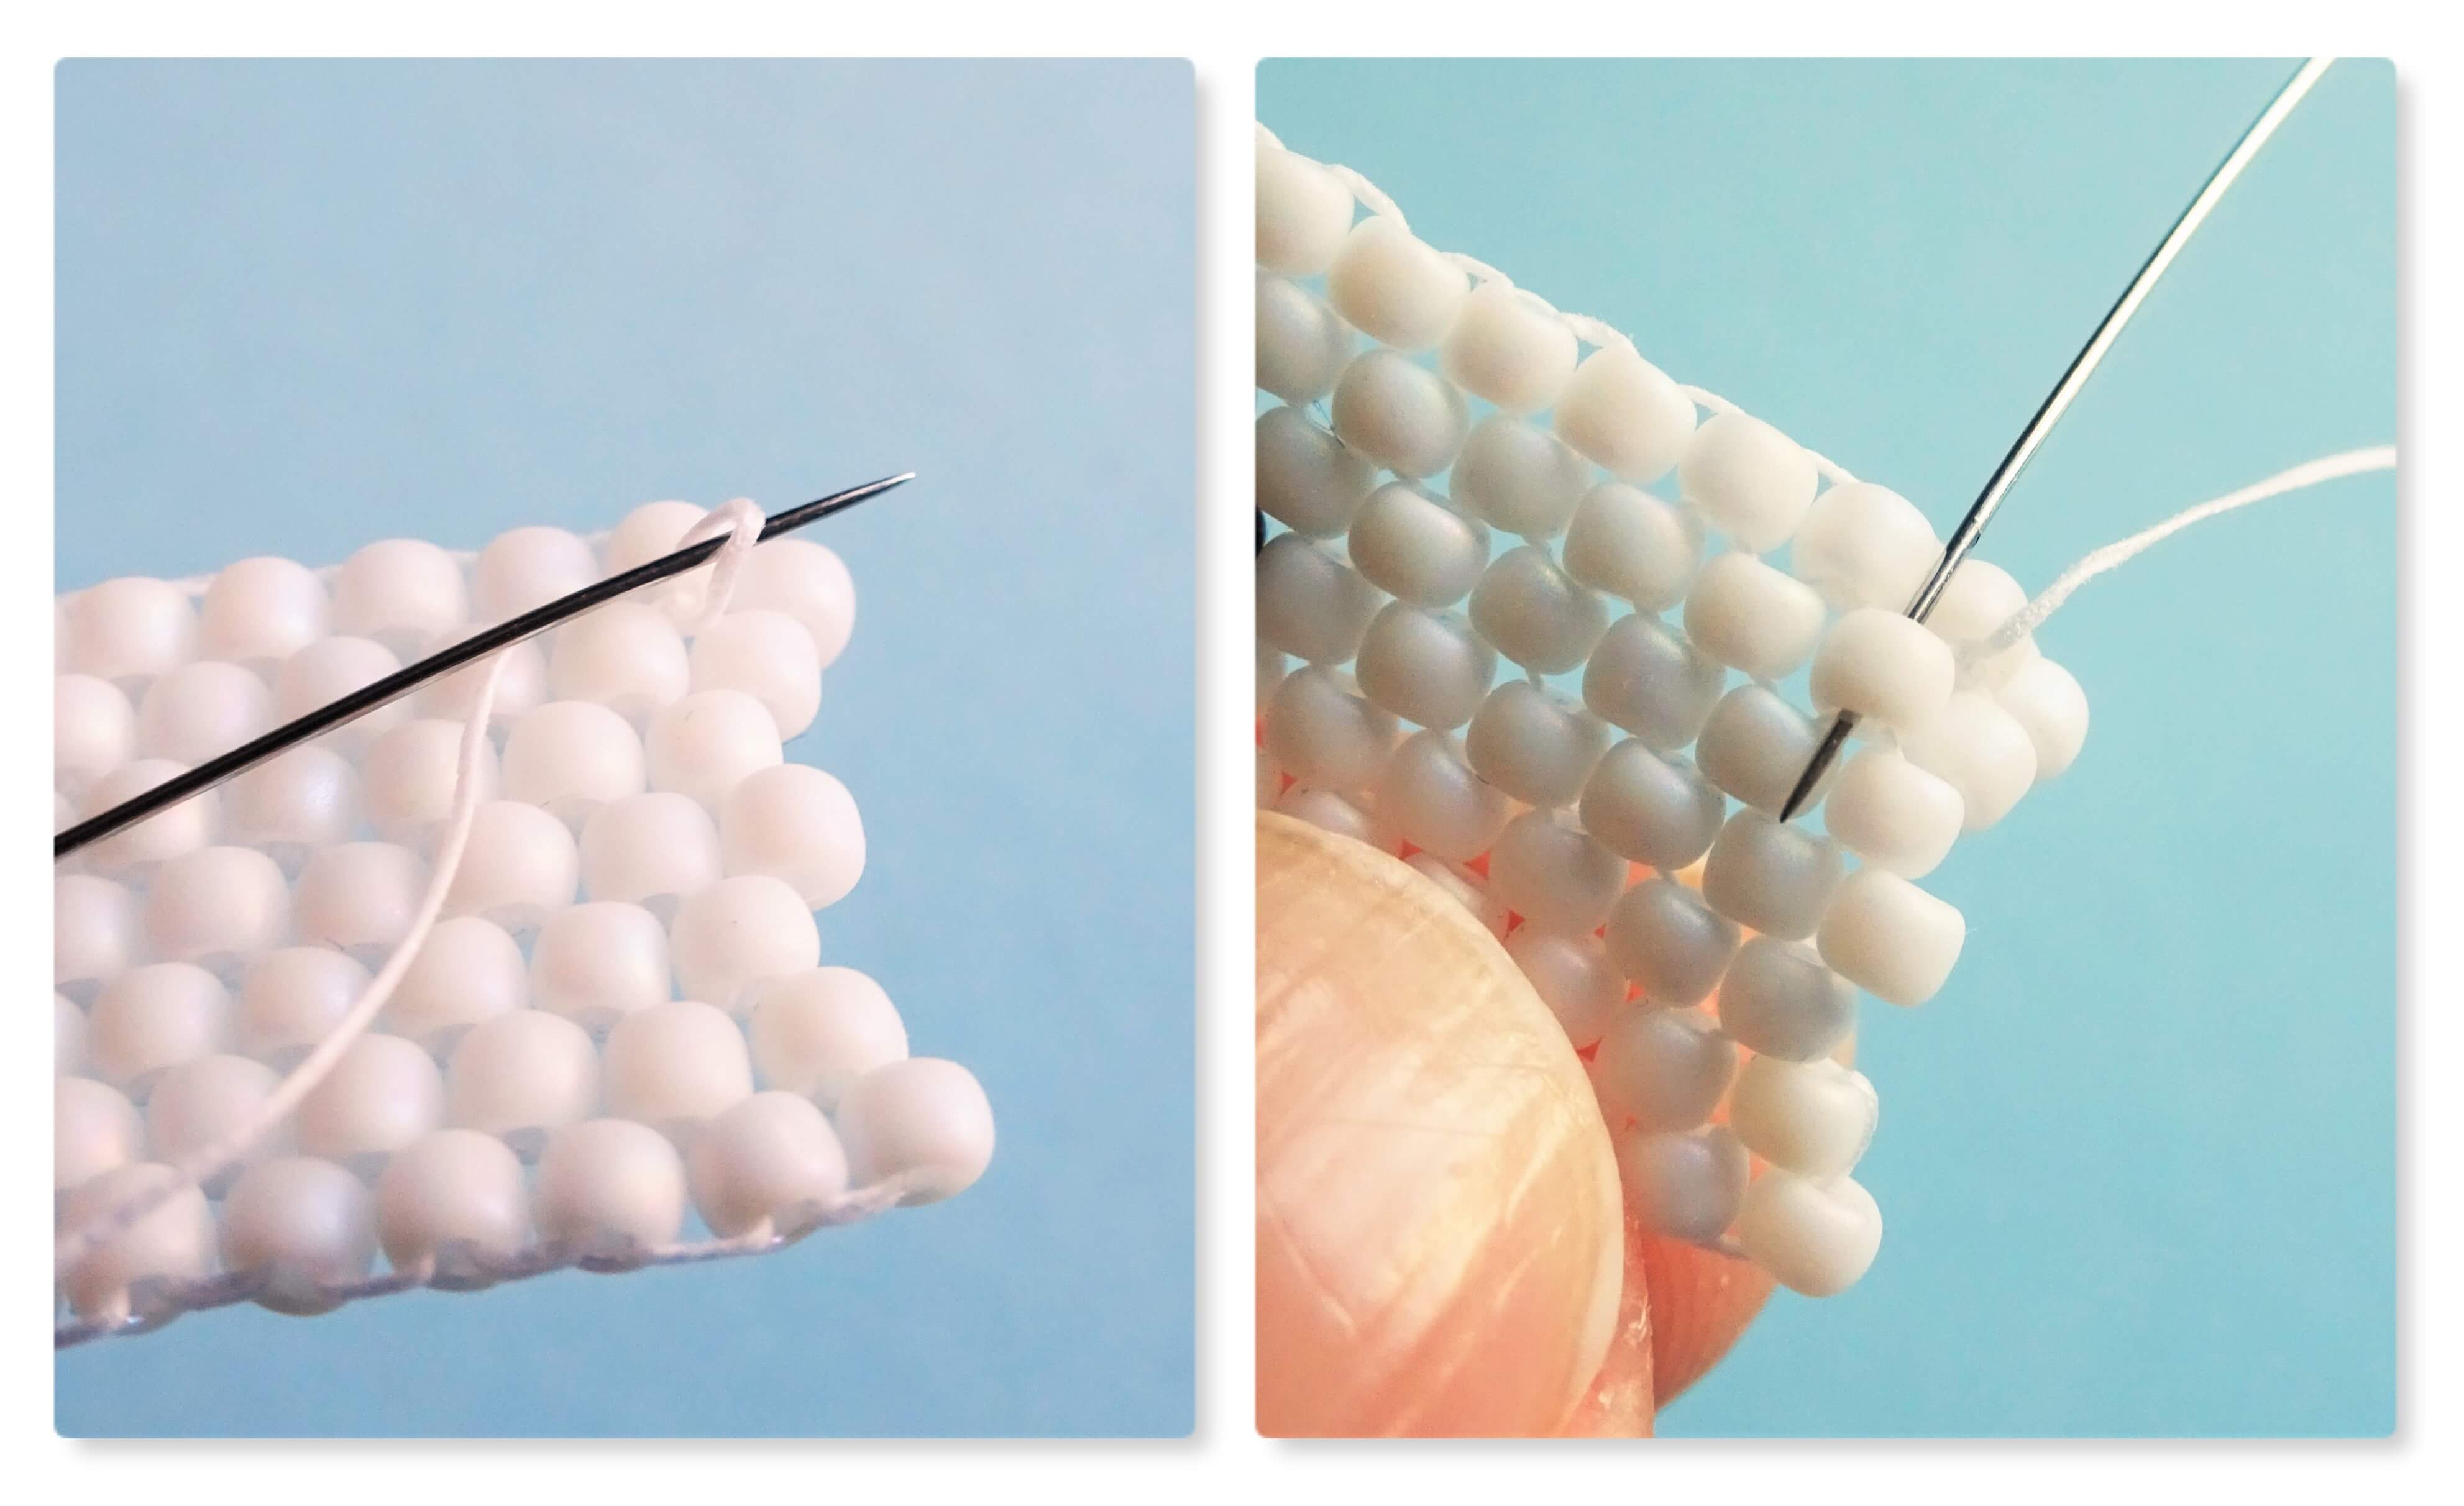
Put the needle on your long tail thread at the top of the ghost and take it up into the last bead on the row (top of the ghosts head). This bead can be a little loose so we are going to make it more secure. Take the needle under a bridging thread on going between the beads on the row above. This keeps the thread in place.
Take the needle back down into the last bead on the lower row again and then up into the outer most bead on the row above. The thread will be seen on the outside of the bead here but that is standard in brick stitch.

Continue by taking the needle through two more of the outermost seed beads to reach the middle top of the ghost. Exiting out of the top highest seed bead, pick up 5 clear seed beads and take the needle back into the same highest seed bead, opposite to where you exited from.

Pull the thread so that the clear seed beads form a loop and go back through the loop again to reinforce it and exit out of the highest white seed bead. Take the needle through all 3 seed beads on the edge of the beads rows so that your needle exits out at the side of the ghost.
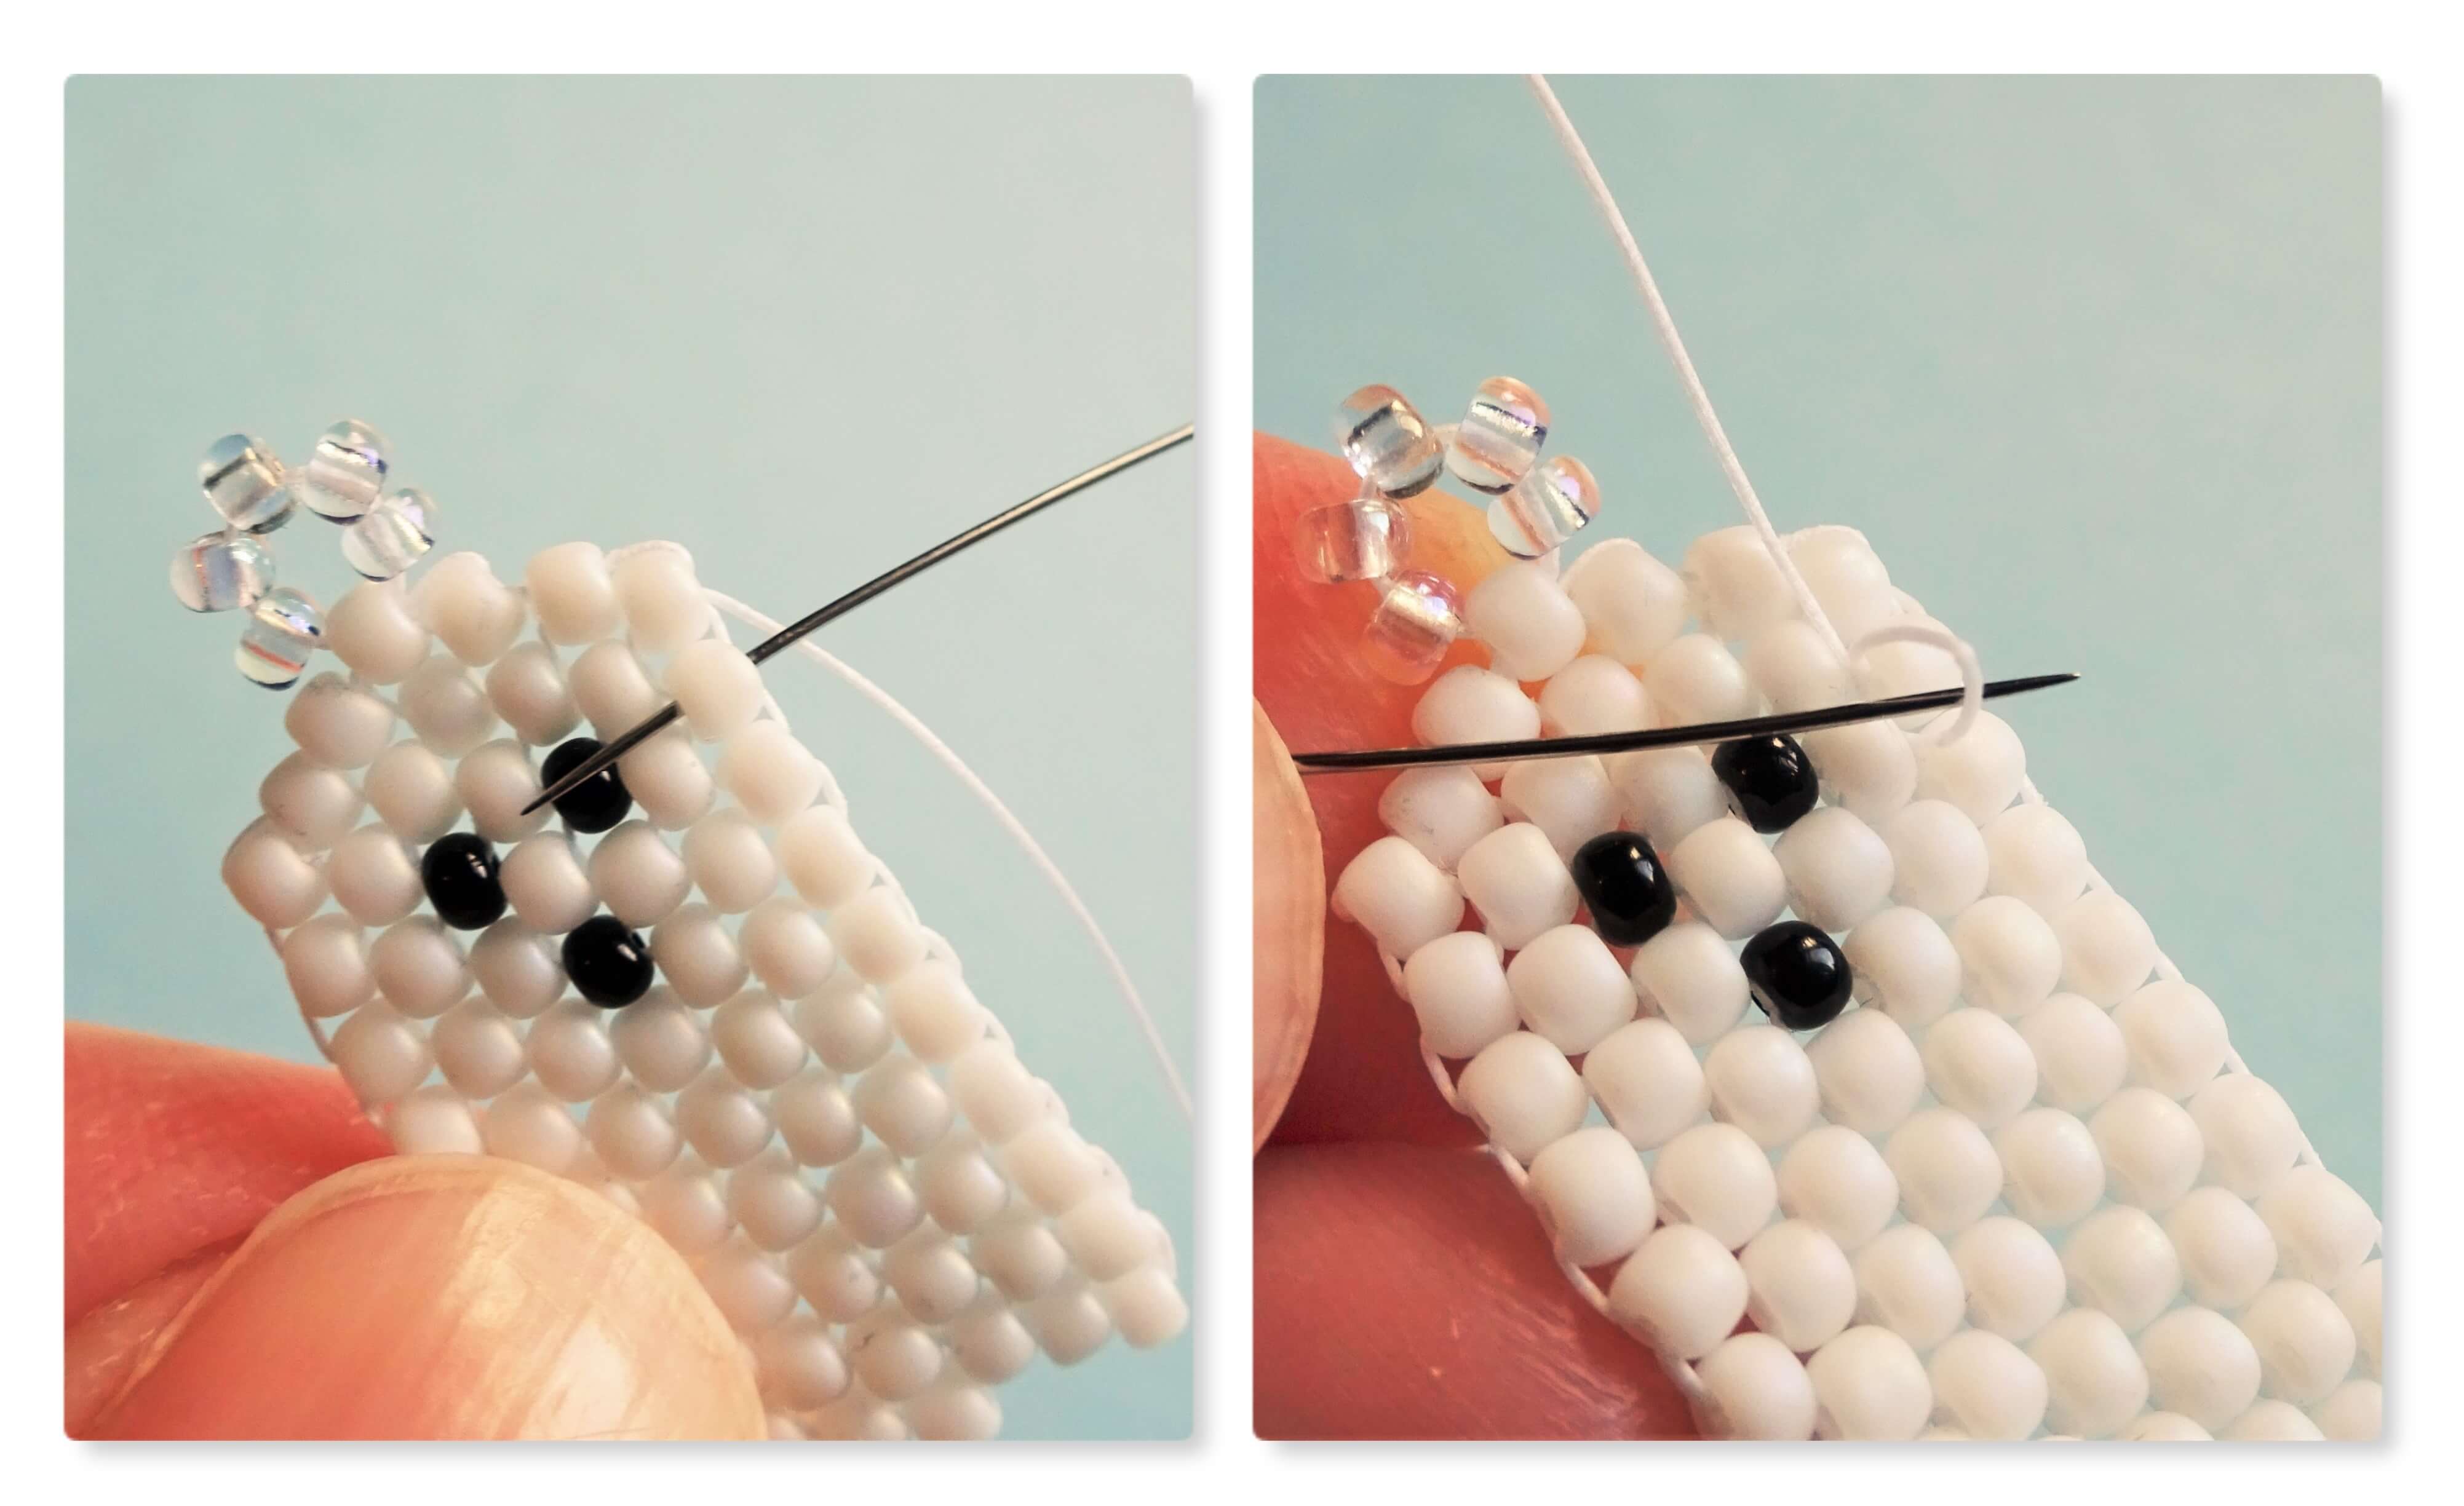
Take your needle into the second bead in the outer row and knot the thread as you did with the other end of thread.

Cut your knotted threads off and add your earring wires. You are now Halloween ready – well, you ears anyway!!!
If you now fancy trying more brick stitch patterns then I have a number of brick stitch tutorials here on my blog. They range from Christmas trees to Hearts. I also have a range of general bead weaving tutorials if you fancy trying out some bigger projects.
Now for the boring but necessary bit – This tutorial is for personal use only. If you sell the earrings you have made from this tutorial then please credit me, The Artisan Duck. It is prohibited to mass produce, reproduce, copy, share or teach any part of this tutorial. Also, if you share your finished earrings on social media then please tag me as I would love to see them.
Hannah x


Hi Hannah! My name is Donna and I’m a beginner in brick stitch. I haven’t made jewelry in decades! I’ve always been interested in brick stitch and peyote stitch. I finally decided to try! After reading blogs, watching some videos and following the steps for brick stitch on Artbeads, I practiced with big clunky beads. But the tutorial never showed how to knot off the beaded piece and I realized it wasn’t fun just stitching beads with no end game. Your tutorials are changing my life – they are well written, easy to understand with such CLEAR step-by-step photos. You put so much time, love and hard work in your tutorials. I needed to thank you. This project is the first one I’ll be trying tomorrow during the NFC/AFC title games. 😂 (I love the sound of football while I craft!) Anyway, thank you SO much for your tutorials. I will try each tutorial in brick stitch AND peyote stitch. It’ll take me quite a while, but I have a feeling it will be an enjoyable journey.
Sincerely,
Donna A.
Hello Donna, thank you so much for such a lovely message. I am so pleased to hear that you are enjoying my tutorials so much and that you are finding them useful. I love that I can spread my love of beading one bead at a time. I just wish I could put more tutorials together but they take me a while to put together and write up. I hope that you enjoyed your beading and football and that you have one of two cute brick stitch ghosts 👻 I am always thinking about what my next tutorials could be so if you have any suggestions as to what you would like to see, let me know and I’ll see what I can do! Wishing you lots of joy on your beading journey. Hannah x