

Please note that this post contains affiliate links for products used. These are clearly marked as such.
Today’s tutorial has a definite summery feel – Nothing says hot sunny days like cute, fluffy buzzy bees!
The beauty of polymer clay slabs is that they can be made in small quantities so you can make a one off, totally unique set of jewellery in very little time. With the kids home on their summer holidays quick and fun projects are definitely my go to at the moment.
Polymer clay slabs are perfect for a beginner at polymer clay. There is minimal opportunities for things to go wrong and the results are always fun. I even have a polymer clay slab tutorial here for kids to have a go at.
So, grab your clay and let’s get stuck in…..
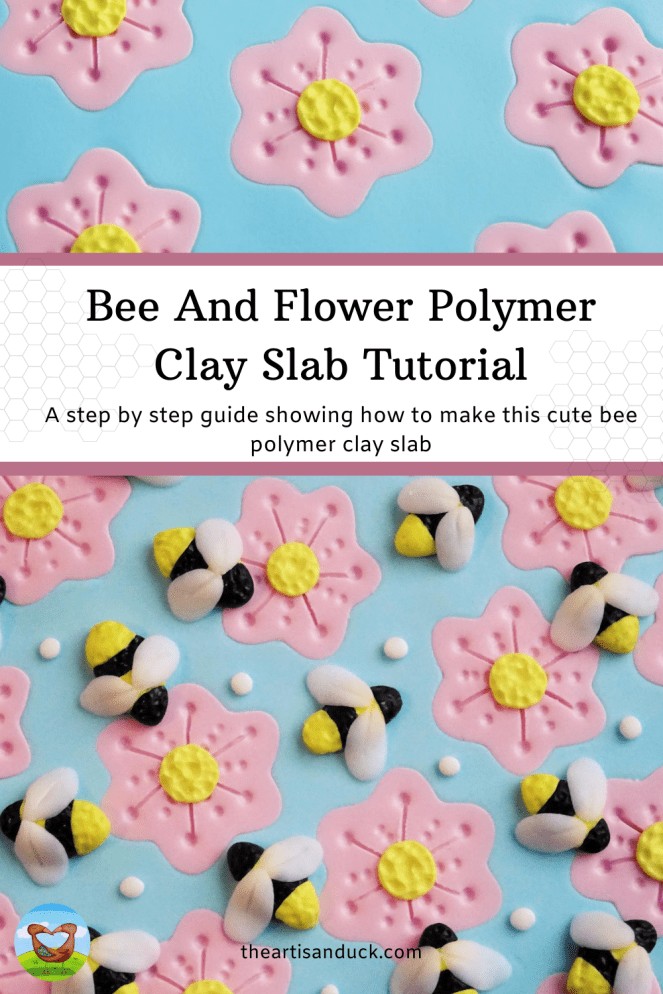
How To Make A Cute Bee Polymer Clay Slab

- Condition some blue clay ( I used fimo effect in Aqua) to make it nice and soft. Roll it out on a number 3 on your clay machine or use an acrylic roller if that is what you have. Condition some white clay and add a little Carmine clay to make a soft pink. Roll this through on a number 6 on your clay machine. Use a small flower cutter to cut flowers in the pink clay. Arrange these on top of the blue clay.

2. Use your acrylic roller to flatten the flowers into the blue clay. We want the bees to be the star attraction so this helps push the flowers into the background.

3. Use a pointed tool (I use a craft piercing tool but cocktail stick/ tooth pick would work) to draw lines in the flowers. Start from the middle top of each petal and draw towards the centre.

4. Using a dotting tool add dots to the top of each line and decorate in between the lines with more dots if desired.

5. Condition more white clay and mix in a little Fimo Professional in True Yellow to make a paler yellow. Roll this into a clay snake and cut off pieces. Roll these into balls and press them into the centre of each flower.

6. Use a small ball tool to add detail to the yellow centres. You could leave this step out if preferred. Put this to one side whilst the bees are made.
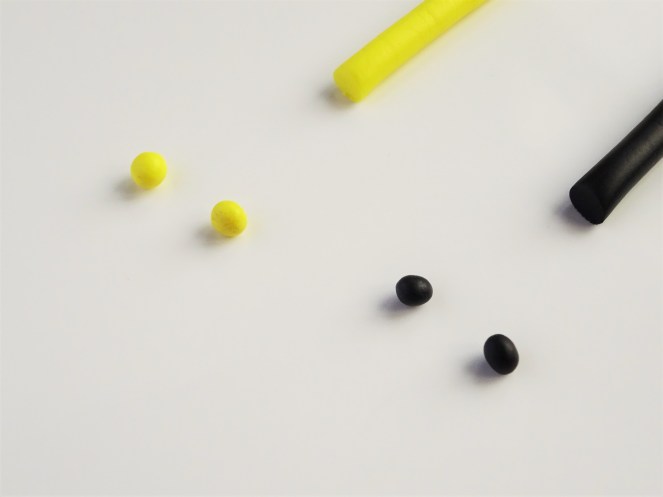
7. Roll some black clay into a snake and add a little more yellow to the mix made for the flower centres to make a stronger colour. Roll this into a snake too. Cut two even pieces from each colour and roll into balls.
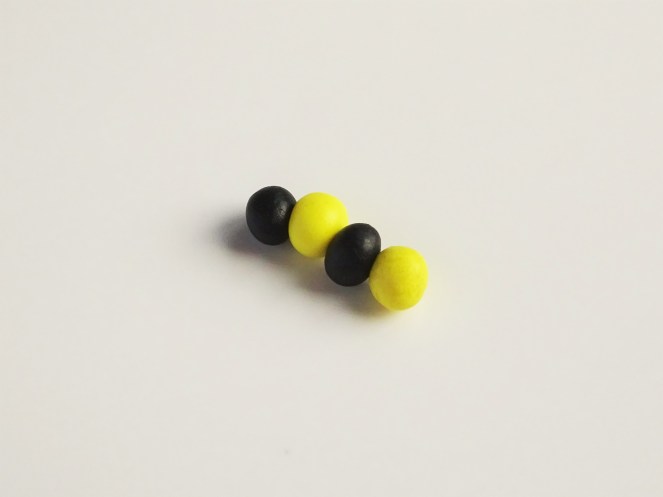
8. Arrange the yellow and black clay balls as pictured above – The black at the top is the bee’s head. Begin gently pressing the clay from each end to start forming the bee shape.

9. Gently squeeze the top and bottom of the clay to get an oval shape. Press it against your surface to flatten the underside of the clay.
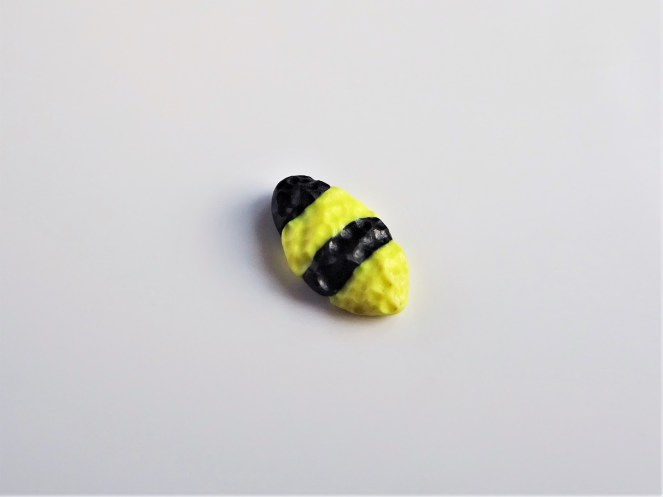
10. Using a small dotting tool texture the shape to give the impression of a fluffy bumble bee.

11. Add your bee to your blue clay and repeat until you have enough bees on your slab. Mine looks very busy but I wanted enough bees so that when I cut the clay there were no pieces without a bee.

12. Condition some translucent clay and roll into a clay snake. Cut two small pieces and roll into an oval ball shape. Press it firmly against your work surface to flatten the underside of the clay. Use your blade to lift them off your surface. Pinch the top of each wing to elongate it further into a teardrop shape and add to your bee.
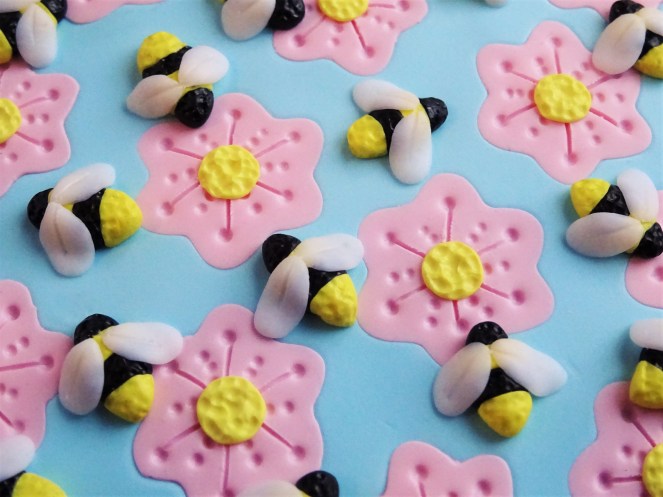
13. Repeat step 12 until every bee has a wing and draw a line along each one for a little more detail.

14. Roll some small white pieces of clay and add these into blank spaces on the blue clay.

15. Cut shapes from your clay (I felt very cruel cutting into those lovely bees!) and harden in your oven according to the instructions on you packet of clay. Leave to cool before giving two coats of gloss varnish.
I teamed mine up with pale yellow glass faceted crystals for a little added sparkle.

This is one of those projects that looks far harder than it actually is. I love the versatility of making polymer clay slabs as you can do as much or as little as you want to it.
If you have enjoyed this then stick around and check out my other polymer clay tutorials.
Below are the affiliate links for some of the items used – They are for Amazon UK and Amazon US. Please note that if you use my link to buy an item then I earn a small commission at no expense to you. This just means that I can continue to offer these free tutorials.
Amazon UK
Fimo Professional in True Yellow, Carmine, White and Black
Amazon US
Fimo Professional in True Yellow, Carmine, and Black
Thanks for reading and don’t forget to tag me on social media if you try this or another of my projects.
Hannah x


How cute. I do love bees and was once a bee keeper.
Thank you. I’m the sort that likes to see bees doing their thing and minding their own business but I’m also the type that will wildly flap my arms around if a bee comes near me 🤣🤣🤣
And that would be the last thing you should do. lol
Ha ha, I know. I can hear my Mum telling me when I was younger to just stand still and it’ll leave me alone….. I never could do it though 😆
These are so cheerful Hannah!
Thank you 😀
I began by thinking that the design would make the most amazing cake …. and then, after reading, I found the jewellery pieces you’d made from it!!! OH. MY GOODNESS! They’re BEAUTIFUL Hannah. I absolutely love them. (My daughter would go ape for the necklace. I shall send her a link).
GREAT make Hannah. Fantastic tutorial.
Sending oodles of love and squidges ~ Cobs. xxx
Thank you so much 😀 I have post coming out this week (once I’ve actually got around to writing it lol) with a similar albeit spooky theme……. My daughter stole the necklace from this one and my son ran off with part of this new spooky one. I must learn to keep the kids away from my makes!!! Hxxx
ROFL …. Kids … gotta love ’em! (But couldn’t eat a whole one. lol) ~ C. x
Very true 😀