

Please note, this post contains Affiliate links for products used.

Halloween this year may not be quite the same with social distancing and all that fun stuff but that doesn’t mean that we can’t have some fun ghost jewelry. Just think how epic ghost statement earrings will look on a Zoom call!
This tutorial is super simple and uses few supplies. If you don’t have an extruder, where I have used one you could simply roll the clay with your hand to make a long thin snake of clay.
How To Make A Spooky Halloween Ghost Polymer Clay Slab

- Condition some white clay and roll it out on a number 5 on your clay machine. Use a small heart cutter to cut hearts and then cut the hearts down the middle.

2. Use your fingers to neaten up the edges of the clay and cut off any points of clay left from where you cut it down the middle (see my YouTube video below if this is not clear). Using the outer curve of the heart as a guide gently bend the clay to form two opposing ghosts.

3. Mix some grey clay using 4 parts white to 1 part black (use a shape cutter to measure this) and roll thorough the clay machine on a number 3. Position your ghosts on the clay. Have them going in all directions so it looks like the ghosts are flying.

4. Condition some black clay and, using you clay extruder with the disc shown or by hand, make some long snakes of black clay.
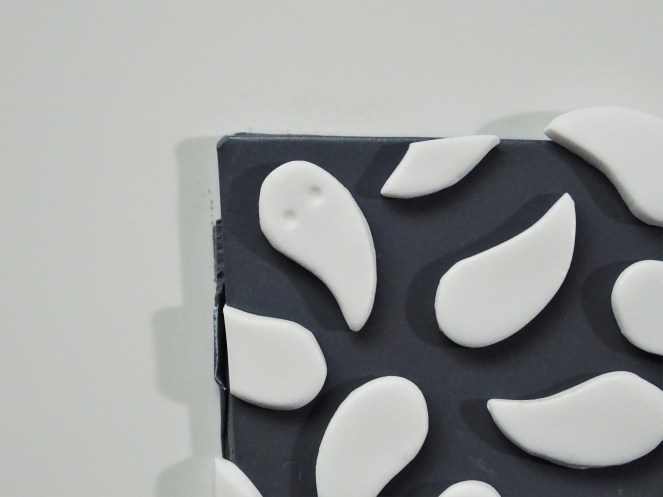
5. Using a mid size ball tool mark on each ghost where the eyes are going to go. I find this helps with the final placement, especially with them flying around!

6. Cut small pieces from the black snakes make in step 4 . Roll even size pieces for the eyes into balls and press into position in the marks made with the ball tool. For the mouth cut another small piece of clay and roll into more of an oval shape. Press this against your work surface to flatten and then position on the ghost.

7. To add further decoration to your clay slab condition and run some purple and orange clay through the clay extruder or roll by hand.
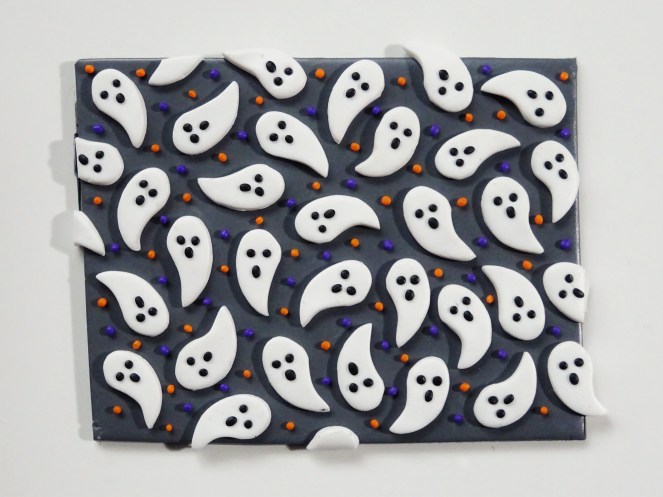
8. Cut and roll small pieces of each colour into balls and position all over your clay slab.

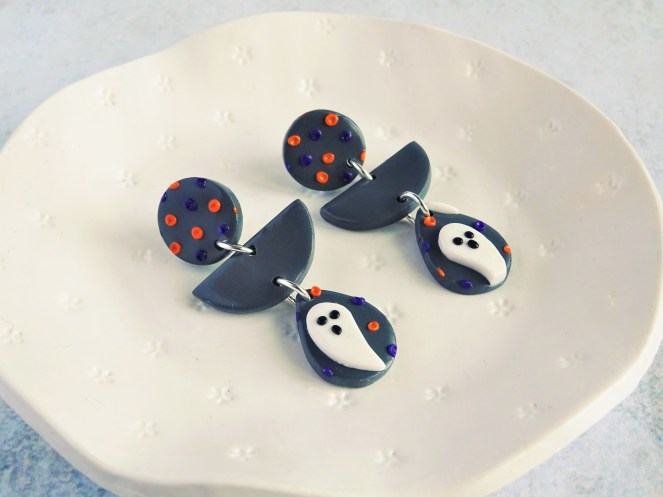
9. Using your mid size ball tool again press into each purple and orange ball of clay to add a final touch of detail. Your polymer clay ghost slab is now ready to be cut into jewellery.


Links below for products used are Affiliate links for Amazon. This just means that if you use my link to buy a product I earn a very small commission, at no extra expense to you (you pay the same regardless how you find the item). Every little extra helps me to offer free tutorials.
Amazon UK
Fimo white, Black , Orange and Purple
Shape Cutters – Small Shape Set (Heart included) and Basic Set
Makins Clay Polymer Clay Machine
Amazon US
Fimo White, Black , Orange and Purple
Shape Cutters – Heart and Basic Set
Makins Clay Polymer Clay Machine
If you have enjoyed this then don’t forget to check out my other polymer clay blog tutorials. They range from bees slabs, to handmade faceted stones to how to use your clay to make beads and pendants.
Thanks for reading today. Hope you have a spooky October!
Hannah x


Aw what little treasures these ghostly ghouls are! Great makes, Hannah, and fabulous tutorial. Haven’t watched the video yet, but have bookmarked it to watch tomorrow when I have some free time.
Sending love and squidges ~ Cobs. xxx
Ah, thank you Cobs. There may be more ghosts on the way….. I’m still very new to making YouTube videos so I hope it’s ok. Hannah xxx
These are brilliant Hannah ! 🙂
Thank you Darren – It’s good to be a little silly with the crafting sometimes!